
How to move files from PC to iPhone. How to transfer videos to iPhone - step-by-step instructions

iPhone is a multimedia device with which you can listen to music, watch movies, read books and do a whole lot of different things. But a user who has recently purchased a reasonable question arises - how can I transfer all these files to my iPhone? In this article we will look at the process of downloading various types of multimedia (and not only) files to the iPhone.
You can transfer any file to your iPhone, without exception, but, unfortunately, not every file can be opened. Let's start with the simplest manipulations - learn how to reset movies, music, books and photos using iTunes.
How to Transfer Music from Computer to iPhone Using iTunes
Step 1: Open iTunes. In case it is not installed, download latest version from the official website
Step 2: Connect iPhone to Computer Using USB Cable
Step 3: Add to iTunes music, which you want to download to your smartphone. To do this, click File -> Add a file to your library to open a specific song or File -> Add a folder to your media library to add a music folder
Step 4. Wait until the music is detected in iTunes and select your iPhone in the panel on the right
Step 5: Go to Menu Music and select the songs you want to transfer to iPhone. You can also check the option Entire media library to sync all music to your device

Step 6: Click Apply in the lower right corner of iTunes and wait for the synchronization to complete
To transfer movies to your iPhone, you must do exactly the same operation as described above, but by selecting in Step 5 Music, A Movies. By the way, it was after several such operations that users who did not like iTunes for its apparent complexity completely changed their opinion about this unique multimedia processor.
How to Transfer Photos from Computer to iPhone Using iTunes
Step 1: Open iTunes or download the latest version from Apple's official website
Step 2: Connect your iPhone to your computer using a USB cable
Step 3: Select the device that appears in the right panel. If there is no panel, then click View -> Show side menu or key combination Ctrl + S

Step 4: Select Menu Photo
Step 5. Click on the check mark next to the inscription Sync photos from
Step 6. To the right of this inscription there is a button with the inscription Images. Click on it and select Select folder
Step 7. Specify the folder containing the photos you want to see on your iPhone
Step 8: Click Apply in the lower right corner and wait for the synchronization to complete
How to Transfer Books from Computer to iPhone Using iTunes
With books, things are a little different. We have already described in detail three various applications for reading books on iPhone, these are iBooks, Bookmate and Aychitalka. Follow the appropriate links for detailed information about this process.
How to use iPhone as a flash drive
Step 1. Download and install the latest version of iFunBox
Step 2: Open the program and connect your iPhone to your computer. In order for iFunBox to see your device, iTunes must be installed on your computer

Step 3. The device will be detected in the program and you will be able to transfer absolutely any files to it, using the iPhone as a flash drive
Step 4. Drop the files that need to be “transferred” to the folder Shared storage
A very convenient solution that can help out at the most crucial moment. For example, you don’t have a flash drive at hand, but you need to upload an important file “weighing” several gigabytes, and you can’t send it by mail. The iPhone, coupled with iFunBox, copes with this task perfectly - the files are not damaged and are transferred safe and sound.
Users who jailbreaked their devices were several times luckier. Thanks to a huge selection of tweaks from Cydia for working with the file system, they can unpack files using special managers, download files directly from Safari and much more. Read about how to jailbreak your device running iOS 7 in this article, but be careful, Apple has closed the ability to jailbreak new firmware and in iOS 7.1 these instructions will no longer be relevant.
. 14584Transfer files to iPhone using Files Shared
To transfer files to iPhone, you can use the function "Shared Files"(File Sharing) built into iTunes. It allows you to transfer files to iPhone memory allocated for a specific application. For example, if you need to work with a file in an application DocsToGo on iPhone, you will transfer it using this function to the DocsToGo area.
Transferring files is not possible for all applications, so you should only install applications that can transfer files using the function "Shared Files". The standard apps that come with your phone do not support this feature. Only third-party ones installed from the AppStore.
How to copy a file from iPhone to computer?
- Open the tab "Shared Files"(File Sharing) as described above.
- In field "Applications"(Apps) Select the application containing the desired file.
- In field "Documentation"(Documents) select a file.
- Click "Save to"(Save To). This opens the iTunes dialog box (on a Windows computer) or the Choose a Folder: iTunes(on Mac).
- Select a folder to save the file.
- Click "Select folder"(Select Folder) when working in Windows or "Choose"(Choose) when working on a Mac. iTunes will copy the file. This technique will only work in applications that support this feature.
One of key features iPhone is, of course, mobile operating system iOS. Great amount original applications appear in App Store every day, allowing users to do their daily work or, conversely, have fun with maximum efficiency. Apps can be downloaded and purchased directly from iPhone using the standard app Store, but there are times when new items have to be dropped via iTunes. This is exactly what we will talk about today.
The first step is to decide on the application that we will reset to the iPhone using iTunes. This can be either paid or free application, choose any you like.
How to download an application in iTunes
Step 1. Open iTunes. If you do not have the program installed, then download the latest version from the official website
Step 2. In the right menu, which can be opened by clicking View -> Show side menu, click on the item iTunes Store

Step 3. The start window has loaded iTunes Sore, but we need to go to the application store. To do this, click on the button App Store, located in the top middle of the screen
Step 4. Select any application you like and click on it
Step 5. If the application is free, click Download. If you have chosen a paid application, click on its price tag and make a purchase. In both cases you will need to enter Apple password ID, unless, of course, you entered it earlier. Read more about how to buy applications for iPhone.
The application has downloaded to your computer, you can see its availability by going to the tab Programs all in the same sidebar. All that remains is to reset the application on your iPhone and you can start using it.
How to Download an App from iTunes to iPhone
Step 1: Connect iPhone to Computer and Launch iTunes
Step 2: In the iTunes sidebar, select your device
Step 3. In the top menu, in the middle, click on the button Programs. Here you will see your device's home screens and applications available for download.

Step 4. On the panel Programs(the one in the screenshot) you will see all the applications that can be installed right now. To install an application, you just need to click the Install button located opposite the desired application
Step 5. Once you have clicked Install, the application status will change to Will be installed. This means that the next time you sync, the app data will be downloaded to your device. To start synchronization, click Apply in the lower right corner
In progress iTunes sync will not only download the specified applications to your iPhone, but also add to its database the applications that were downloaded from the mobile device. In exactly the same way, you can delete applications from your iPhone using iTunes, which is very convenient if you have a very large collection of unused applications.
What to do if apps won't download from iTunes to iPhone
Step 1: Launch iTunes and select the menu option Shop -> Authorize this computer

Step 2. In the window that appears, enter your data account Apple ID and click Authorize
In most cases, this method helps to get rid of problems with loading applications on the iPhone, but sometimes the situation turns out to be much more advanced. So, if authorizing your computer does not help, try doing the following one by one:
- restart your computer
- reinstall iTunes
- try downloading apps to iPhone from another computer
- reinstall the operating system
Read and use:
Beginner users of Apple technology sometimes think that transferring photos from PC to iPhone is as easy as transferring them in the opposite direction. And they are wrong. When connected to a computer, an iPhone is not recognized as a regular flash drive - this is one of the security measures that reliably protects Apple devices from viruses.
The developers recommend using the iTunes media processor to download files to the iPhone - this method is considered official. However, there are other ways to transfer images, including those that allow you to do without a USB cable. They will also be discussed in this article.
Before you start transferring photos in the official way - that is, through iTunes - you need to perform a number of preparatory steps:
Copy photos to Apple device from different folders impossible - this is one of the significant disadvantages of this method.
After completing the preparatory steps, you can begin the data transfer procedure:
Step 1. Open iTunes and go to the device management menu - click on the button with the image of a smartphone.
Step 2. In the block " Settings» select the tab « Photo».

Step 3. Check the box next to " Synchronize».

Step 4. On the menu " Copy photos from:» click on the item « Select folder».

Step 5. Through " Conductor»Locate the folder on your PC with photos that you want to transfer to your iPhone.

If the folder also contains video files that you would also like to copy to your mobile phone, check the box next to “ Include video in synchronization».

Step 6. Click the button Apply».

Wait for the synchronization to complete, then go to the Photos app on your iPhone. There you will see the folder with the pictures that you copied.

Photos downloaded to iPhone via iTunes cannot be deleted in a standard way . If you open any of these photos, you will see that the icon with the image of a basket is simply not in its usual place.

Deleting such images also needs to be done through a media harvester. Just uncheck the " Synchronize" in the " tab Photo" and start the synchronization process by pressing the button " Apply" The folder with photos will disappear from the memory of the mobile device.
How to download photos from PC to iPhone using alternative file managers?
To download photos to iPhone, you can use the Chinese alternative to the iTunes media harvester - iTools. After installing this utility, you must proceed as follows:
Step 1. Connect mobile device to your PC and run the program.
Step 2. When iTools detects the device, go to the " Photo» main menu.

Step 3. Click the button Import" and select via " Conductor» folder with the pictures you want to upload.
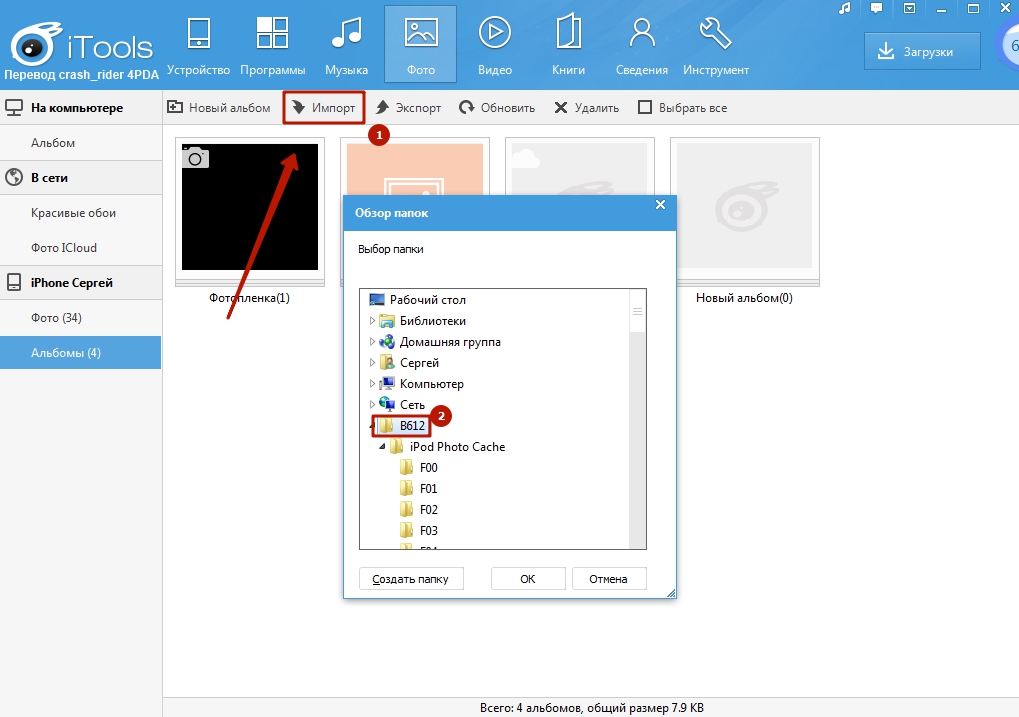
You won't be able to download photos one by one through iTools.
Step 4. Confirm that you want to copy the folder to your device - click " Yes».

Do not try to understand the question - it is written “crookedly”. Russification is a real problem with the iTools application.
Wait until the import is completed and you will see that the photos have appeared in the gadget’s memory.
Photos downloaded via iTools also cannot be deleted from the smartphone directly - only through a computer utility. But what then is the advantage of an alternative manager over iTunes? The advantages are:
- Through iTools, you can drop as many folders with photos as you like onto your gadget. In the case of iTunes, downloading a new folder will delete the one that was downloaded previously.
- iTools does not force the user to sync. This not only saves time, it also makes it possible not to worry about the safety of data on the device that the user has erased from the PC.
If you need to transfer photos to your iPhone one by one, you should use another alternative data manager - iFunBox. You can download the utility. The iFunBox program is good because it allows the computer to identify the Apple device as a flash drive.
You need to copy pictures to iPhone via iFunBox like this:
Step 1. After connecting the smartphone to the PC and launching the utility, go to the “ Quick Toolbox» in the main menu.
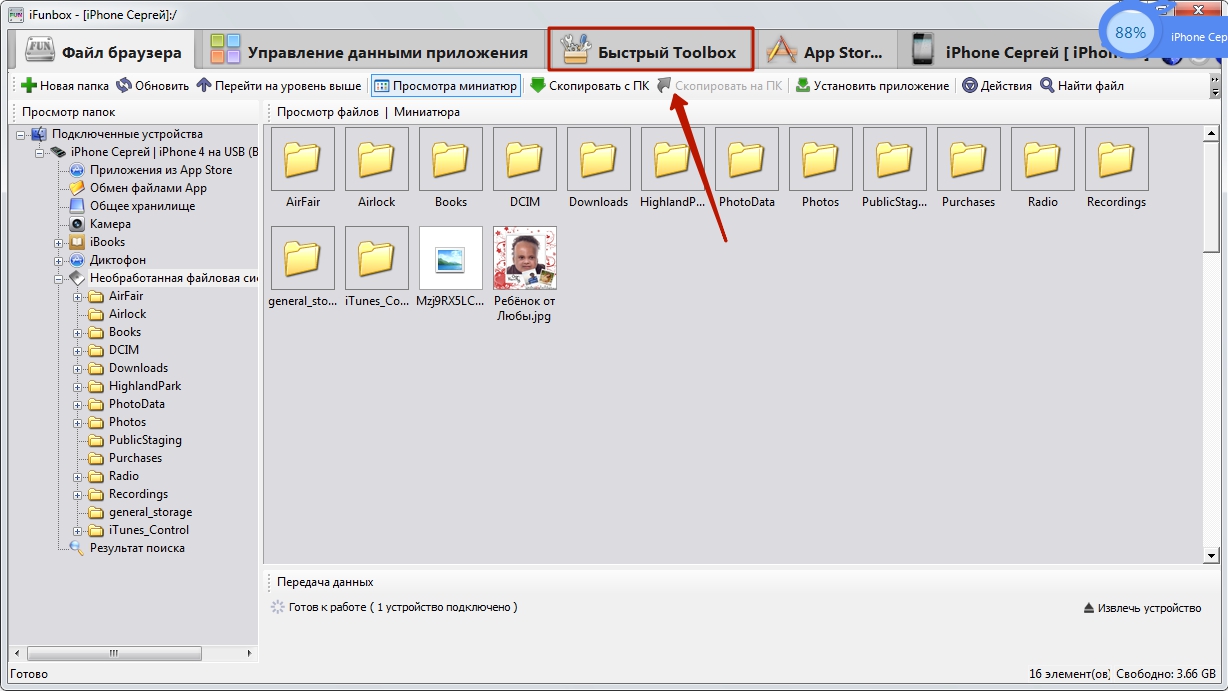
Step 2. Click on the icon " Photo».

Step 3. Click " Import» and drag the pictures you want to copy into the window that appears.
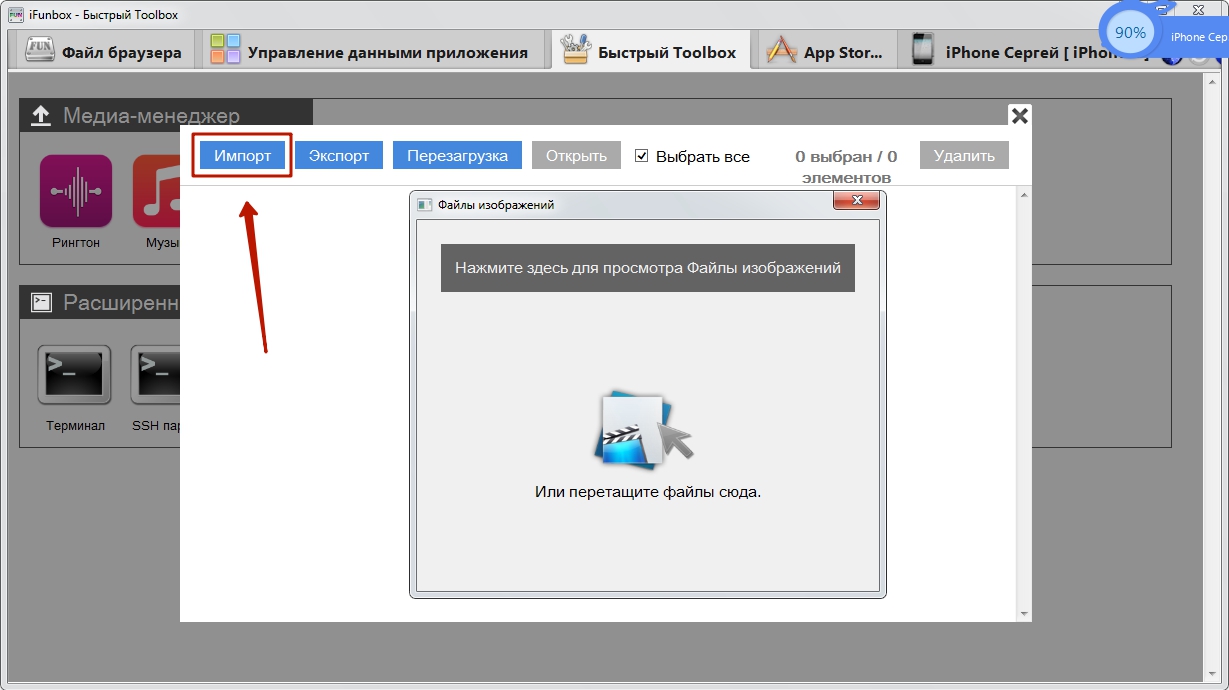
Once the import is complete, the photos will be on your mobile device.
iFunBox can only work correctly on the computer on which iTunes is installed.
Warning to users: do not resort to multiple alternative file managers for iPhone! This can lead to a failure, as a result of which all the gadget’s photo albums will be empty, and the pictures will be available only one at a time in the “ Photo» application of the same name.

Uploading photos to iPhone via the cloud
Dropbox continues to be the most famous cloud storage service, despite the fact that other similar services offer more attractive conditions. We have discussed the procedure for transferring data via Dropbox in manuals more than once - for example, in an article on how to download a movie to an iPhone for free. Now we will show how to transfer pictures through the “cloud”, using the example of another service - “Mail.ru Cloud”.
First you need to upload photos from your PC to cloud storage. Go to cloud.mail.ru, log in (or register if you are using the service for the first time) and create a folder for photos - through the button " Create».
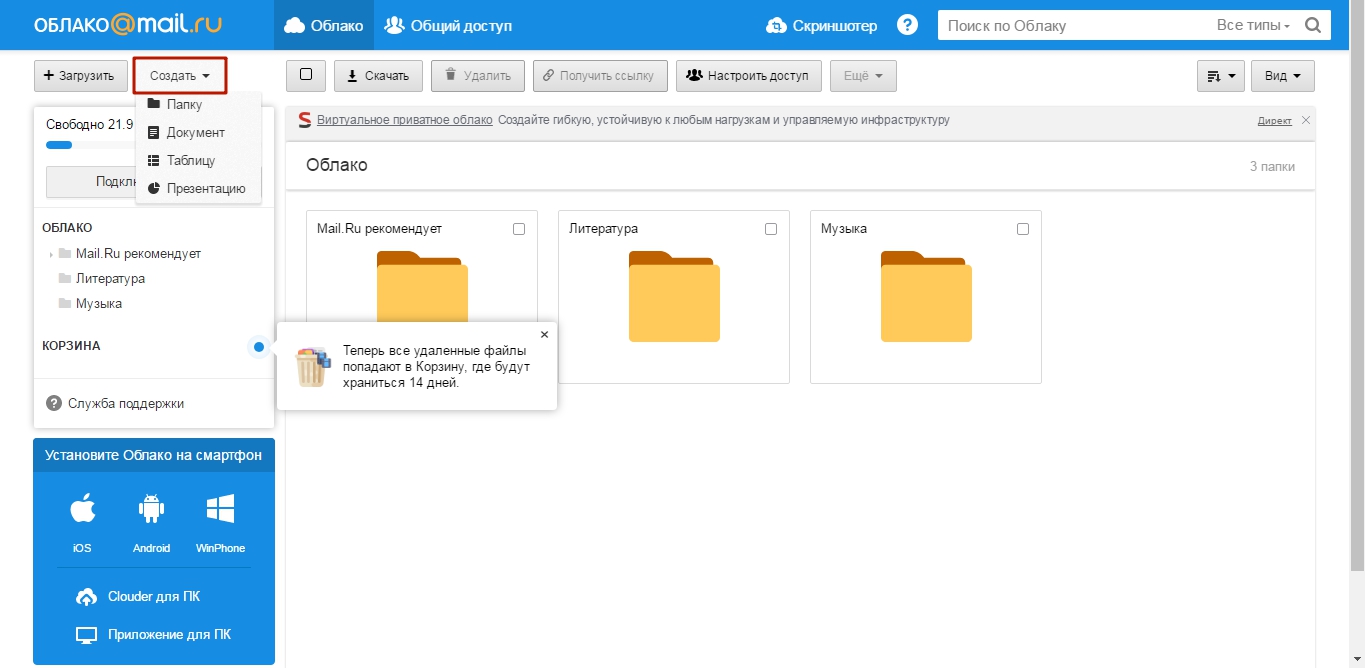
Give the folder a concise and understandable name - for example, “ Photo" Then click " Add».
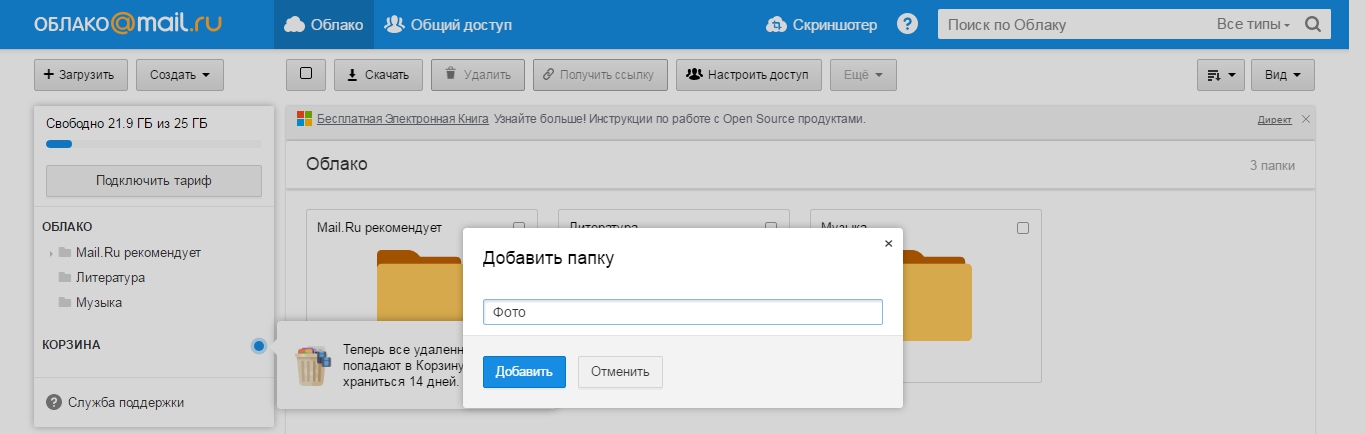
Finally, open a new folder and through the " Download» Fill it with photos you want to admire on your iPhone.

After this, you can close the site on your PC and switch to your mobile phone. Download the Mail.ru Cloud application to your iPhone, launch it and log in with your credentials.

In the main menu of the application, select the section " Cloud" In this section you will find the folder created on the PC.

After this, all that remains is to download the files from the folder to your phone.
How to upload photos via iCloud - Apple's cloud?
Only owners of devices with iOS version above 8.1. Also, for this to be possible, you need to download the program “ iCloud for Windows", available at this link, and install it.
How to use Apple's cloud to transfer photos?
Step 1. First of all, on your iPhone, go to “ Settings", follow the path " iCloud» — « Photo" and activate the slider " iCloud Photo Library».
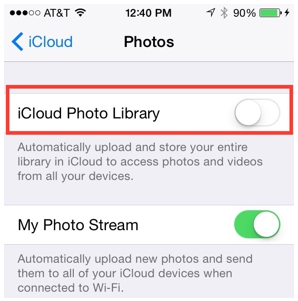
Image: macrumors.com
Step 2. Launch the program on your PC and enter your Apple ID credentials. Then click " To come in».


Click on the button " Options…" opposite the item " Photos».
Step 4. In the window " Photo options» look for the item « Upload new photos and videos from my Windows PC" and click the " Change", located opposite him.

Step 5. Through " Conductor» select a folder with pictures.

Then close the window Photo options» by clicking on the button « Ready».

Step 6. In the main program window, click on the “ Apply».
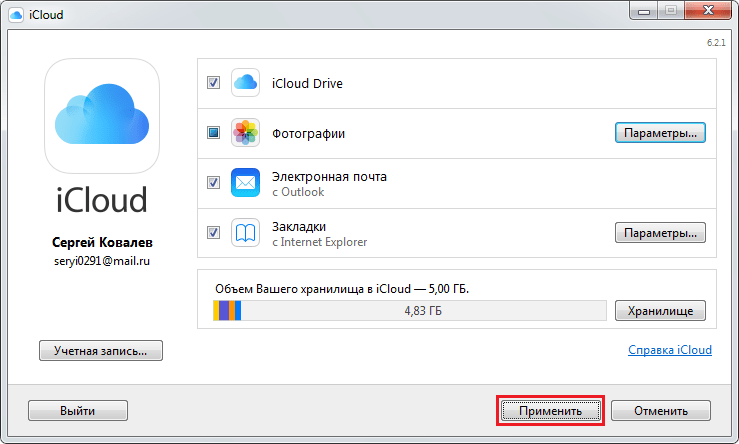
Confirm that you want to combine the information stored on your PC with the information hosted in iCloud - click " Merge».

After this, the computer program can be closed. Photos and videos from the folder uploaded to iCloud will be available on the network, as well as on all mobile devices and Macs associated with the same Apple ID.
Transfer Pictures from PC to iPhone: Other Methods
There are other ways to copy photos from a computer to an Apple gadget:
- Through social networks. You can use, for example, VKontakte as an intermediary. Upload photos from your PC to an album on your social network page, then go to VK from your smartphone and save the images to the device’s memory.
- Through email. Set up a mailbox on iPhone, then send a photo to this mailbox from another mailbox using your computer. After that, go to your email from your mobile phone - in “ Inbox» you will find photos that you can save in your smartphone’s memory. This method has a minus - video, as well as pictures in high resolution You won't be able to throw it because of the heavy weight. Emails have a limit on the size of attachments - the limit is usually set at 5 MB.
- Via a flash drive. On the modern market you can find flash drives designed for iPhones, equipped with a Lightning plug. The most famous of these media is . This video talks about the original flash drive from SanDisk:
Flash drives for iPhone are quite expensive (from 1.5 to 3 thousand rubles, depending on the amount of memory) and require the installation of additional software on the mobile device, but they allow you to quickly transfer large amounts of data from a PC to a gadget without “dancing with a tambourine.”
Conclusion
Despite the fact that Apple does not allow you to “upload” photos directly from a PC to an iPhone without iTunes, users have no reason to put up with this limitation. To transfer pictures, you can use any of the following options: social networks, to email.
The most convenient among the “wireless” methods is downloading via cloud storage. Cloud services are offered by many major Internet companies. The user's choice is not limited - he can use the service that he likes best to transfer photos. We recommend the relatively new product Cloud Mail.ru. The advantages of this service include large volume free space (25 GB) and low requirements mobile application from Mail to iOS - version 7.0 is enough.
Today, iPhones are the most common mobile devices on which it is convenient and pleasant to watch movies (especially on large screens), however, in the process of using them, users encounter some difficulties: “how to download a video from a computer to an iPhone?”, “how to transfer it to an iPhone.” video from a computer?”, and other similar questions often arise among owners of iOS gadgets.
Fast passage:
We have previously written about:
These methods are similar. Now let's get back to the films. Many device owners do not know how to download videos and other media files from PC to iPhone. Unlike smartphones with a different OS, you won’t be able to send a video so easily on an iOS device. To carry out the procedure, you will need to install additional software on your PC.
You can download anything to your iPhone, but please note that not all files can be opened. It is extremely important for users to understand what they are going to download to their gadget and what is the most effective way to do it. This article will provide several of the best methods for moving video from a computer to an iPhone (4, 4s, 5, 5s, 6, 6s and 7 8 X), as well as links to related software.
Transferring files from PC to iPhone is easier than it seems!
Most in effective ways transfer files from PC to iOS devices it is generally accepted:
- Transfer files to iPhone using iTunes media processor.
— through the iTunes library;
- directly into the program. - Send media files using cloud storage.
- Use iPhone as a flash drive to “transport” video.
- Use the WALTR app.
- Use a special “smart” flash drive.
Let's look at each method in more detail below.
Method 1: Transfer files via iTunes
Launch the latest on your computer iTunes version. Next, you need to connect the gadget to your PC via a USB cable to access file system smartphone and upload the video to the iPhone via the built-in media library.
You must first add all the video clips that you will be uploading to iTunes.
For this:
1. Click "File".
2. Click on the “Add file to library” option.
3. Connect your iPhone to your PC, if not already done. The gadget will appear in “Devices” in the left panel. Click on the option and go to the “Review” subsection.
4. Against the inscriptions “Synchronize only selected songs and videos” and “Process songs and videos in manual mode» (if available) check the boxes.
5. Go to the “Movies” subsection and check the box next to “Synchronize movies”, then confirm the marked videos and select “Done”.
If you need to download the entire folder with video to the gadget, then:
- Click File.
- Select the "Add folder to library" option.
In the case when you have a third-party video player installed, for example, VLC Player, the procedure looks like this:
- Open iTunes and connect iPhone to PC.
- Go to the “Programs” item, find the VLC Player in the list that opens and select “Add”.
- In the window that appears, select the required videos and click “Add”.
That's all, by carrying out simple steps, even an inexperienced owner of a mobile device can easily and simply send a video clip, music compositions and any other media files to his iPhone. You just need to have Personal Computer USB cable at hand.
Note:
The iTunes program is available on the official portal www.apple.com in the “Support” subsection. There you need to click on the “iTunes” option and in the subsection “Are you ready to update iTunes?” click “Details”. After downloading the software to your personal computer, you can install it. In some cases, the system may request installing QuickTime. This software is also free and available on the Apple website.
It is worth considering that older versions of iPhone play videos only in mp4 format; to convert, use Any Video Converter () or install GPlayer, VLC Player or any other player from the AppStore that supports videos of any formats on your mobile device.
Method 2 - sending files to iPhone using cloud storage
iTunes is not always installed on a PC or laptop, or the user simply does not want to install it. In this case alternative way Any cloud file storage service can be used to transfer files to iPhone. So, among the owners Apple products, Dropbox is popular. It is worth noting that cloud storage has a large number of additional useful options and capabilities, unlike desktop software.
iTunes, compared to Dropbox, has a number of disadvantages:
- Allows you to work only with 1 directory.
- If you select another folder, all previously synchronized files will be deleted, and their place will be taken by a new directory.
- The iPhone creates a connection to one specific PC and its shared folder, which creates some inconvenience.
Thus, iTunes assumes that the user will not only have some experience with the program, but also “properly” store all music, videos, books, etc. in one special folder for synchronization.
As for DropBox, then this service is free of such inconveniences and has a more flexible and convenient system for working with folders and transferring files. To use the cloud file storage service, you will need:
- Install the service program on iPhone
- Install the same
- Using a PC, go to the service program, create a new folder there and move all the necessary videos and media files into it
- Log into the “cloud” via your smartphone and download all the necessary videos.
It is worth noting that this method in case free version Dropbox imposes some restrictions on the size of transferred media files, namely 2 GB. To remove the limiters, use paid subscription, which costs $9.99 per month for 1 TB of space in the service.
Method 3. iFunBox and smartphone as a flash drive
Another option for transferring video from PC to iPhone is to connect the device to the PC in flash drive mode. You can download movies to your gadget, and then upload them to, for example, a friend’s computer.
First, you will need to download and install the iFunBox program on your computer. Then open it and connect the gadget to the PC via USB cable. It is important to remember that in order for your computer to detect your phone, you will also need to install iTunes.
When the program sees your iPhone, you can begin transferring the necessary files to the “Shared Storage” directory, and then download them from there to another PC and enjoy viewing.
An additional advantage in favor of iFunBox will be the ability to have almost unlimited access to the file system of your Apple device; you can transfer photos, music and much more. And if you have a jailbreak, then download (install) applications and exchange them with friends.
Method 4. Throw it through WALTR 2
Perhaps this is the most convenient and quick way. All you need to do is download and install the WALTR 2 application for MAC OS or Windows and you can use it. Pros of the application:
- You can transfer photos, videos, music, ringtones
- No unnecessary settings
- Simplest interface
- Drag principle and Drop- drag and drop any files
- Ability to work through home Wi-Fi without using the Internet.
The transfer process is incredibly simple. We connect the iPhone to the PC via cable or via Wi-Fi, it appears in the window, and a field is drawn around it, onto which you just need to drag any file. After that, it will be instantly downloaded to your smartphone and you can watch it! Please note that not all video formats can be correctly processed by the iPhone, so you may need a video converter before uploading.
Everything would be fine, but there is a fly in the ointment - the program is paid, although there is a trial version, but it only works for a day, and then you will need to buy full version for $39.95. However, if you urgently need to upload a video, you can download and use it.
Method 5 - flash drives and Leef iBridge
Quite a well-known and popular method. The idea is simple - you buy a special flash drive, which, in addition to expanding the internal iPhone memory, also used for loading various content and viewing on your phone. Such flash drives, as a rule, have special proprietary applications that allow you to view and manage all this multimedia content.
I think there is no need to explain how to use it correctly, but still:
- We insert the flash drive into the computer and load movies, music, photos, whatever into it.
- We take it out from the computer and insert it into the iPhone and watch, listen, etc. on it.
Such flash drives are immediately equipped with USB and Lightning interfaces, which makes them universal. The only downside is the price, so for the branded Leef iBridge 3 32 GB you will have to pay about $70, which not everyone can afford. However, there are also cheaper analogues from China, a review of which will soon be on our website.
Here's how it works:
Thus, the problem of downloading videos from a PC to an iPhone is easily solved; you just need to put in a little effort - and you will definitely succeed. It’s worth adding that methods 1, 2, 4 and 5 have been tested on iOS 11 and work successfully.
Publications on the topic
-
 Note: negative offset
Using the BGCOLOR attribute, you can change the color of the contents of a cell, a row, a group of columns, a group of rows, or an entire table. Color can...
-
 How to put a password on a folder, file or flash drive
When you try to protect personal data, you probably set a password to boot the system or create an account with...