
Matching devices for HF bands inurl page. Matching devices: purpose and construction principle

Modern transmitting and receiving transistor technology, as a rule, has broadband paths whose input and output resistances are 50 or 75 Ohms. Therefore, to implement the declared parameters of such equipment, it is necessary to provide an active load with a resistance of 50 or 75 Ohms for both the receiving and transmitting parts. I would like to emphasize that the receiving path also requires a matched load!
Of course, in the receiver this cannot be noticed by touch, color or taste without instruments. Apparently, because of this, some shortwave operators “foaming at the mouth” defend the advantages of old RPUs such as R-250, “Mole” and the like over modern technology. Old equipment is most often equipped with an adjustable (or tunable) input circuit, with which you can match the radio control unit with a wire antenna with “SWR = 1 on almost all bands.”
If a radio amateur really wants to check the quality of the matching of the “transceiver input - antenna” circuit, he just needs to assemble a very primitive matching device (MD), for example, a P-circuit consisting of two KPIs with a maximum capacitance of at least 1000 pF (if testing is also planned for low-frequency ranges) and coils with variable inductance. By turning on this control system between the transceiver and the antenna, changing the capacitance of the KPI and the inductance of the coil, the best reception is achieved. If at the same time the values of all elements of the control system tend to zero (to the minimum values), you can safely throw away the control system and, with a clear conscience, work on the air and continue, at least listen to the bands.
For the transmitter path, the lack of optimal load can end more sadly. Sooner or later, the RF power reflected from the mismatched load finds weakness in the transceiver path and “burns out” it, or more precisely, any of the elements cannot withstand such an overload. Of course, it is possible to make a silo that is absolutely reliable (for example, by removing no more than 20% of the power from transistors), but then the cost will be comparable to the components of expensive imported equipment.
For example, a 100-watt silo, produced in the USA as a kit for the K2 transceiver, costs 359 USD, and the tuner for it costs 239 USD. And foreign radio amateurs go to such expense in order to get “just some kind of coordination,” which, as the experience of the author of this article shows, many of our users of transistor technology do not think about... Thoughts about matching a transceiver with a load are in the minds of such woe radio amateurs begin to arise only after an accident has occurred in the equipment.
Nothing can be done - these are today's realities. Examinations for obtaining licenses and upgrading amateur radio categories are often carried out formally. At best, the applicant for a license is tested on his knowledge of the telegraph alphabet. Although in modern conditions, in my opinion, it is advisable to place more emphasis on testing technical literacy - there would be fewer “group sex for long-distance work” and “discussions” about the advantages of UW3DI over “all sorts of Icoms and Kenwoods.”
The author of the article is pleased by the fact that less and less talk is heard on the bands about problems when working on the air with transistor power amplifiers (for example, the appearance of TVI or low reliability of output transistors). I competently declare that if a transistor amplifier is correctly designed and competently manufactured, and during operation the maximum operating modes of radio elements are not constantly exceeded, then it is practically “eternal”, theoretically, nothing can break in it.
I draw your attention to the fact that if the maximum permissible parameters of the transistors are not constantly exceeded, they will never fail. Short-term overload, especially transistors designed for linear amplification in the HF range, can withstand quite easily. Manufacturers of high-power RF transistors check the reliability of the manufactured product in this way - they take a resonant RF amplifier, and after the optimal mode and rated power are set at the output, a test device is connected instead of the load. Setting elements allow you to change the active and reactive components of the load.
If in optimal mode the load is connected to the transistor under test through a line with a characteristic impedance of 75 Ohms, then usually in the device under consideration the line segment is closed by a resistor with a resistance of 2.5 or 2250 Ohms. In this case, the SWR will be equal to 30:1. This SWR value does not allow obtaining conditions from a complete open circuit to a complete short circuit of the load, but the actually provided range of changes is quite close to these conditions.
The manufacturer guarantees the serviceability of transistors intended for linear amplification of the HF signal with a load mismatch of 30:1 for at least 1 s at rated power. This time is quite enough for the overload protection to operate. Operating a power amplifier at such SWR values does not make sense, because the efficiency is practically “zero”, i.e. We are, of course, talking about emergency situations.
To solve the problem of matching transmitting and receiving equipment with antenna-feeder devices, there is a fairly cheap and simple way - using an additional external matching device. I would like to focus the attention of happy users of “bourgeois” equipment that does not have antenna tuners (and amateur designers too) on this very important issue.
All industrial transmitting and receiving equipment (including lamp equipment) is equipped not only with filtering, but also, additionally, with matching units. Take, for example, tube radio stations R-140, R-118, R-130 - their matching devices occupy at least a quarter of the station’s volume. And all transistor broadband transmission equipment, without exception, is equipped with such matchers.
Manufacturers even go to the extent of increasing the cost of this equipment - they are equipped with automatic control systems (tuners). But this automation is intended to protect the radio equipment from a stupid user who has a vague idea of what and why he should turn on the control system. It is assumed that a radio amateur with a call sign must have a minimal understanding of the processes occurring in the antenna-feeder device of his radio station.
Depending on what antennas are used at the amateur radio station, one or another matching device can be used. The statement of some shortwave operators that they use an antenna whose SWR is almost unity on all bands, so that SU is not required, shows a lack of minimal knowledge on this topic. No one has yet managed to deceive “physics” here - no high-quality resonant antenna will have the same resistance either within the entire range, much less on different ranges.
What happens most often is that either an “inverted-V” is installed at 80 and 40 m, or a frame with a perimeter of 80 m, and in the worst case, the clothesline is used as an “antenna”. Particularly “talented” ones invent universal pins and “carrots”, which, according to the categorical assurances of the authors, “work on all ranges with virtually no adjustment!”
Such a structure is configured at best on one or two bands, and everyone goes ahead, “we call and they answer, what else is needed?” It’s sad that to increase the “operating efficiency” of such antennas, all searches lead to “radio extenders” such as the output unit from the R-140 or R-118. Just listen to those who like to “work in a group at a distance” at night on the 160 and 80 meter bands, and recently this can already be seen on 40 and 20 meters.
If the antenna has SWR = 1 on all bands (or at least on several) - this is not an antenna, but an active resistance, or the device that measures SWR “shows” the ambient temperature (which is usually constant in the room).
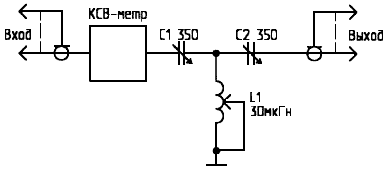
I don’t know whether or not I managed to convince the reader that it is mandatory to use a control system, but, nevertheless, I will move on to the description of specific circuits of such devices. Their choice depends on the antennas used at the radio station. If the input impedances of radiating systems do not fall below 50 Ohms, you can get by with a primitive L-type matching device - Fig. 1, because it only works in the direction of increasing resistance. In order for the same device to “lower” the resistance, it must be turned on in reverse, i.e. swap input and output.
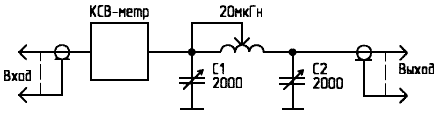
Automatic antenna tuners of almost all imported transceivers are made according to the circuit shown in Fig. 2. Antenna tuners in the form individual devices Companies often produce according to a different scheme (Fig. 3). A description of this scheme can be found, for example, in. All branded control systems made according to this scheme have an additional frameless coil L2, wound with wire with a diameter of 1.2...1.5 mm on a mandrel with a diameter of 25 mm. Number of turns - 3, winding length - 38 mm.
Using the last two circuits, you can provide SWR = 1 to almost any piece of wire. However, do not forget - SWR = 1 indicates that the transmitter has an optimal load, but this in no way means high efficiency of the antenna. Using the control system, the diagram of which is shown in Fig. 2, it is possible to match the probe from the tester as an antenna with SWR = 1, but, except for its closest neighbors, no one will evaluate the efficiency of such an “antenna”. A regular P-circuit can also be used as a control system - Fig. 4. The advantage of this solution is that it is not necessary to isolate the KPI from the common wire; the disadvantage is that with high output power it is difficult to find variable capacitors with the required gap.
When using more or less tuned antennas at a station and in the case when operation on 160 m is not intended, the inductance of the SU coil may not exceed 10...20 μH. It is very important that it is possible to obtain small inductances up to 1 ... 3 μH.
Ball variometers are usually not suitable for these purposes, because the inductance is adjusted within smaller limits than in coils with a “slider”. Branded antenna tuners use coils with a “runner”, in which the first turns are wound with an increased pitch - this is done to obtain small inductances with maximum quality factor and minimal interturn coupling.
Sufficiently high-quality matching can be obtained by using the “poor radio amateur’s variometer” in the control system. These are two series-connected coils with tap switching (Fig. 5). The coils are frameless and contain 35 turns of wire with a diameter of 0.9...1.2 mm (depending on the expected power), wound on a 020 mm mandrel.
After winding, the coils are rolled into a ring and soldered with taps to the terminals of conventional ceramic switches with 11 positions. Taps for one coil should be made from even turns, for the other - from odd turns, for example - from 1,3,5,7,9,11, 15,19, 23, 27 turns and from 2,4, 6, 8 ,10, 14,18,22,28,30th orbits. By connecting two such coils in series, you can use switches to select the required number of turns, especially since the accuracy of selecting the inductance is not particularly important for the control system. The "poor radio amateur's variometer" copes successfully with the main task - obtaining small inductances.
In order for this homemade tuner to approach “bourgeois” antenna tuners in its quasi-smooth tuning capabilities, for example, AT-130 from ICOM or AT-50 from Kenwood, instead of one biscuit switch, it will be necessary to introduce short-circuiting of the coil taps with “relays”, each of which will be switched on separately toggle switch. Seven “relays” switching seven taps will be enough to simulate a “manual AT-50”.
An example of relay switching of coils is given in. The gaps between the plates in the KPI must withstand the expected stress. If low-resistance loads are used, with an output power of up to 200...300 W, you can get by with the KPI from older types of RPU. If they are high-resistance, you will have to select KPI with the required clearances (from industrial radio stations).
The approach to choosing KPI is very simple - 1 mm of gap between the plates can withstand a voltage of 1000 V. The estimated voltage can be found using the formula U = Ts P/R, where:
P - power, R - load resistance. The radio station must have a switch installed, with which the transceiver is disconnected from the antenna in the event of a thunderstorm (or when it is turned off), because More than 50% of cases of transistor failure are associated with static electricity. The switch can be mounted either in the antenna switch or in the control system.
U-shaped matching device
The result of various experiments and experiments on the topic discussed above was the implementation of a U-shaped “matcher” - Fig. 6. Of course, it is difficult to get rid of the “complex circuit of bourgeois tuners” Fig. 2 - this circuit has an important advantage, namely that the antenna (at least the central core of the cable) is galvanically isolated from the transceiver input through the gaps between the KPI plates. But an unsuccessful search for suitable KPIs for this scheme forced us to abandon it. By the way, the P-circuit circuit is also used by some companies that produce automatic tuners, for example, the American KAT1 Elekraft or the Dutch Z-11 Zelfboum.
In addition to matching, the P-circuit also acts as a filter low frequencies, which is very useful when working on overloaded amateur radio bands - hardly anyone will refuse additional harmonic filtering. The main disadvantage of the U-shaped matching device circuit is the need to use a KPI with a sufficiently large maximum capacity, which suggests the reason why such a circuit is not used in automatic tuners of imported transceivers. In T-shaped schemes, two KPIs are most often used, rearranged by motors. It is clear that a 300 pF KPI will be much smaller, cheaper and simpler than a 1000 pF KPI.
In the control system circuit shown in Fig. 6, KPIs with an air gap of 0.3 mm from the tube receivers are used. Both sections of the capacitor are connected in parallel. A coil with taps switched by a ceramic biscuit switch is used as inductance.
The coil is frameless and contains 35 turns of wire 00.9...1.1 mm, wound on a mandrel 021...22 mm. After winding, the coil is rolled into a ring and soldered with its short taps to the terminals of the biscuit switch. Branches are made from 2, 4, 7, 10, 14, 18, 22, 26 and 31 turns.
The SWR meter is made on a ferrite ring. The permeability of the ring when working on KB, in general, is not of decisive importance; in the author’s version, a 1000NN ring with an outer diameter of 10 mm is used.
The ring is wrapped in thin varnished fabric, and then 14 turns of PEL 0.3 wire are wound around it (without twisting, in two wires). The beginning of one winding, connected to the end of the second, forms the middle terminal.
Depending on the required task (more precisely, on how much power is supposed to be passed through the control system, and on the quality of the LEDs VD4 and VD5), silicon or germanium detection diodes VD2 and VD3 can be used. By using germanium diodes, higher sensitivity can be obtained. The best of them is GD507. However, the author uses a transceiver with an output power of at least 50 W, so ordinary KD522 silicon diodes work perfectly in the SWR meter.
As a “know-how”, in addition to the usual one, an LED setting indication is used on the pointer device. A green LED VD4 is used to indicate the “forward wave”, and a red LED (VD5) is used to visually monitor the “reverse wave”. As practice has shown, this is a very successful solution - you can always quickly respond to an emergency situation. If something happens to the load while on air, the red LED begins to flash brightly in time with the emitted signal.
It is less convenient to navigate by the SWR meter needle - you won’t be constantly staring at it during transmission! But the bright glow of red light is clearly visible even with peripheral vision. This was positively appreciated by Yuri, RU6CK, when he got such a control system (besides, Yuri has poor eyesight). For more than a year now, the author himself has been using mainly only the “LED setting” of the control system, i.e. Setting up the “coordinator” comes down to making the red LED go out and the green LED “blazing” brightly. If you really want a more precise setting, you can “catch” it using the microammeter needle. The M68501 device with a total deviation current of 200 μA was used as a microammeter. You can also use the M4762 - they were installed in the Nota and Jupiter tape recorders. It is clear that C1 must withstand the voltage supplied by the transceiver to the load.
Tuning of the manufactured device is carried out using an equivalent load, which is designed to dissipate the output power of the cascade. We connect the control system to the transceiver with a “coaxial” of minimum length (as far as possible, since this section of cable will be used in the further operation of the control system and transceiver) with the required characteristic impedance; we connect an equivalent load to the output of the control system without any “long cords” and coaxial cables , turn all the control knobs to minimum and use C1 to set the minimum readings of the SWR meter during “reflection”. It should be noted that the transmitter output signal must not contain harmonics (i.e. it must be filtered), otherwise the minimum may not be found. If the design is made correctly, the minimum is obtained with capacity C1 close to the minimum.
Then we swap the input and output of the device and check the “balance” again. We carry out testing on several ranges. I warn you right away that the author is not able to help every radio amateur who could not cope with setting up the described control system. If someone is unable to make a control system on their own, you can order a finished product from the author of this article. All information can be found here.
LEDs VD4 and VD5 must be chosen modern, with maximum brightness. It is desirable that LEDs have maximum resistance when the rated current flows. The author managed to purchase red LEDs with a resistance of 1.2 kOhm and green LEDs with a resistance of 2 kOhm. Usually green LEDs glow weakly, but this is not bad - after all, it is not a Christmas tree garland that is being made. The main requirement for a green LED is that its glow should be quite clearly noticeable in normal transmission mode. But the color of the red LED, depending on the user’s preferences, can be selected from poisonous crimson to scarlet.
As a rule, such LEDs have a diameter of 3...3.5 mm. To make the red LED glow brighter, the voltage was doubled - diode VD1 was introduced into the circuit. For this reason, accurate measuring instrument Our SWR meter can no longer be called - it overestimates the “reflection”. If you want to measure accurate SWR values, you need to use LEDs with the same resistance and make the two arms of the SWR meter exactly the same - either both with voltage doubling, or without doubling. However, the operator is more likely to be concerned about the quality of the matching of the transceiver-antenna circuit, rather than the exact value of the SWR. LEDs are quite sufficient for this.
The proposed control system is effective when working with antennas powered through a coaxial cable. The author tested the control system for “standard”, common antennas of “lazy” radio amateurs - “frame” with a perimeter of 80 m, “inverted-V” - combined 80 and 40 m, “triangle” with a perimeter of 40 m, “pyramid” for 80 m.
Konstantin, RN3ZF, (he has an FT-840) uses such a control system with a “pin” and “inverted-V”, including on the WARC bands, UR4GG - with a “triangle” on 80 m and the “Volna” and “Volna” transceivers Danube", and UY5ID, using the described control system, matches the silo on the KT956 with a multilateral frame with a perimeter of 80 m with symmetrical power supply (an additional transition to symmetrical load is used).
If, when setting up the control system, it is not possible to turn off the red LED (to achieve the minimum readings of the device), this may mean that, in addition to the main signal, the emitted spectrum contains harmonics (the control system is not able to provide matching at several frequencies simultaneously). Harmonics, which are located higher in frequency than the main signal, do not pass through the low-pass filter formed by the elements of the control system, are reflected, and on the way back they “ignite” the red LED. The fact that the control system “cannot cope” with the load can only be indicated by the fact that coordination occurs at extreme values (not minimum) of the parameters of the control unit and coil, i.e. when there is not enough capacitance or inductance. None of the indicated users experienced such cases when operating the control system with the listed antennas on any of the bands.
The control system was tested with a “rope”, i.e. with a wire antenna 41 m long. It should not be forgotten that the SWR meter is a measuring instrument only if there is a load on both sides of it at which it was balanced. When setting to “rope”, both LEDs light up, so the tuning criterion can be taken as the brightest possible glow of the green LED with the minimum possible brightness of the red one. Apparently, this will be the most correct setting - for maximum power transfer to the load.
I would like to draw the attention of potential users of this control system to the fact that under no circumstances should the coil taps be switched when emitting maximum power. At the moment of switching, the coil circuit breaks (albeit for a fraction of a second), and its inductance changes sharply. Accordingly, the contacts of the biscuit switch burn out and the load resistance of the output stage changes sharply. It is only necessary to switch the slide switch in receive mode.
Information for meticulous and “demanding” readers - the author of the article is aware that the SWR meter installed in the control system is not a precision high-precision measuring device. Yes, such a goal was not set during its manufacture! The main task was to provide the transceiver with broadband transistor stages with an optimal matched load, I repeat once again - both the transmitter and the receiver. The receiver, like a powerful silo, fully requires high-quality coordination with the antenna!
By the way, if in your “radio” the optimal settings for the receiver and transmitter do not coincide, this indicates that the device was not properly configured at all, and if it was done, then most likely only the transmitter, and the receiver’s bandpass filters have optimal parameters for other load values.
An SWR meter installed in the control system will show that by adjusting the elements of the control system we achieved the parameters of the load that was connected to the ANTENNA output of the transceiver during its configuration. Using the control system, you can safely work on the air, knowing that the transceiver is not “puffing up and begging for mercy,” but has almost the same load for which it was configured. Of course, this does not mean that the antenna connected to the control system began to work better. Don't forget about it!
For radio amateurs dreaming of a precision SWR meter, I can recommend making it according to the diagrams given in many foreign serious publications, or buying a ready-made device. But you will have to fork out some money - indeed, devices produced by well-known companies cost from 50 USD and above CB - I don’t take into account the fancy Polish-Turkish-Italian ones. A successful, well-described design of an SWR meter is given in.
A. Tarasov, (UT2FW) [email protected]
Literature:
- Bunin S.G., Yaylenko L.P. Shortwave Radio Amateur's Handbook. - K.: Technology, 1984.
- M. Levit. Device for determining SWR. - Radio, 1978, N6.
- http://www.cqham.ru/ut2fw/


The matching device, hereinafter referred to as the SU, ensures coordination
output impedance of the transmitter, with the antenna impedance and
additionally provides harmonic filtering, especially
transistor output stages, and also has the properties of a preselector
input part of the transceiver. Tube output stages,
have a tunable P-circuit at the output, and a larger range
in accordance with the antenna. But anyway, calibrated
P-circuit of a tube PA at 50 or 75 ohms and connected through the control system,
will have much less harmonics at the output. Its use
as a filter, preferably, especially in densely populated areas.
If you have well-tuned antennas and PA, there is no need
use SU. But when there is only one antenna, for several bands,
and it is not possible, for various reasons, to use others
antennas, SU gives good results. Using the control system, you can agree
any piece of wire, bringing SWR=1, but this does not mean that your
the antenna will work efficiently. But even in the case of configured
antennas, the use of control system is justified. Take at least the different seasons,
when changes in atmospheric factors (rain, snow, heat, frost, etc.)
significantly affect the antenna parameters. Bourgeois transceivers have
internal tuners that allow you to match the transceiver output to 50 ohms,
with an antenna, usually in a small range from 15 - 150 ohms, depending
depending on the transceiver model. For matching within large limits, they are used
external tuners. Inexpensive bourgeois transceivers do not have a tuner, therefore,
so that the output stage does not fail, it is necessary to have a good
tuned antennas or control systems. The most common L-shaped and
T-shaped, in the form of a U-contour, symmetrical, not symmetrical control units.
The choice is yours, I settled on a well-proven
itself to the T-tuner circuit, from the article W1FB, published on TFR UN7GM,
An excerpt from which is given below:
To view the diagram in real size, left-click on the diagram.
The above circuit ensures matching Rin = 50 ohms with a load R = 25-1000 ohms,
providing 14 dB more 2nd harmonic rejection than Ultimate's
ranges 1.8-30 MHz. Details - variable capacitors have a capacity of 200 pF,
for a power of 2 kW at peak, the gap between the plates should be about 2 mm.
L1 - coil with a slider, maximum inductance 25 mH. L2 - 3 turns
bare wire 3.3 mm on a 25 mm mandrel, winding length 38 mm. Setting method:
for tube transmitters, move the switch to position D (equivalent
load), set the transmitter to maximum power
reduce the power to a few watts, turn the switch to
T (tuner) - put both capacitors in the middle position and adjust
L1 achieve a minimum SWR, then adjust the capacitors again, achieving
minimum SWR - adjust L1, then C1, C2, each time achieving the minimum
SWR until best results are achieved
apply full power from the transmitter and once again adjust all elements in
within small limits. For small powers of the order of 100 W, 3-wire is well suited
sectional variable capacitor from the old GSS G4-18A, there is an isolated
section.
Based on considerations, make it for centuries, for decent power and for everything
occasions, I purchased KPE, switches and a variable inductance coil
from radio stations R-130, "Mikron", RSB-5, RF connectors SR-50, equivalent to 50 ohm 20 W
(internal) and external (for setting up the PA, etc.) 50 ohm 1 kW, 100 μA device.
All this was placed on a chassis measuring 380x330x170, supplementing the control system with an antenna switch
and RF output indicator. The chassis is made of 3mm thick duralumin,
The body is U-shaped, made of metal 1 mm thick. Installation should be short
conductors, for “ground” use a bus throughout the chassis, starting from the control unit input
and all circuit elements, ending with antenna connectors. Chassis can be
do much less based on your components. If there is no coil
with variable inductance, a variometer can be used, with acceptable
inductance, or a roller switch with a coil. Position the coil
as close to the switch as possible so that the leads from the coil are as short as possible.
The control system can be supplemented with the “Artificial soil” device.
When using random antennas, poor grounding, this device leads to
resonance grounding system of the radio station. Ground parameters are included in the antenna parameters,
therefore, the better the grounding, the better the antenna performs. You can also
supplement the control system with protection against static charges by installing it on the antenna connector
resistor 50-100 kohm 2w to ground.
Radio amateurs are creative people, so sharing experiences is always useful.
I will be glad if I helped someone decide on the choice of control system on a visual basis
example. And once again I want to remind you that the control system is a compromise, with a very low
Efficiency of the antenna-feeder device, it turns into a heating
device. Friends - build normal antennas, no matter what the cost!
Ivan E. Kalashnikov (UX7MX)
Description of the matching device
As a result, various experiences and experiments on this topic led the author to the scheme of a U-shaped “matcher”. By the way, the P-circuit circuit is also used by some companies that produce automatic tuners - the same American KAT1 Elekraft or the Dutch Z-11 Zelfboum. In addition to matching, the P-circuit also acts as a low-pass filter (by the way, this is what we need!), which is quite good for overloaded amateur radio bands; probably, hardly anyone will refuse additional filtering of unnecessary harmonics.
The main disadvantage of the P-circuit circuit is the need for a KPI with a sufficiently large maximum capacity, which makes me wonder why such circuits are not used in automatic tuners of imported transceivers - just look at the cost of KPIs with small and large capacities. In T-shaped circuits, two KPIs are most often used, tunable by motors, and it is clear that a 300pf KPI (which is required for a T-shaped circuit) will be much smaller, cheaper and simpler than a 1000-2000pf KPI.
Our control system uses KPIs from tube receivers with an air gap of 0.3 mm, both sections are connected in parallel. A coil with taps switched by a ceramic biscuit switch is used as inductance. A frameless coil of 35 turns of wire 0.9-1.1 mm is wound on a mandrel with a diameter of 21-22 mm, rolled into a ring and soldered with its short taps to the terminals of the biscuit switch. The taps are made from 2,4,7,10,14,18,22, 26,31 turns. The SWR meter is made on a ferrite ring. For HF, the permeability of the ring in general is not of decisive importance - a K10 ring with a permeability of 1000HH is used. and 14 turns are wound on it in two wires without twisting PEL 0.3, the beginning of one winding connected to the end of the second forms the middle terminal. Depending on the required task, more precisely, on what power is supposed to be passed through this control unit and the quality of the emitting LEDs, detection diodes D2, D3 can be made of silicon or germanium.
From germanium diodes you can get greater amplitudes and sensitivity. The best are GD507. But since the author uses a transceiver with an output power of at least 50W, ordinary silicon KD522 is sufficient. As a “know-how”, this control system uses LED indication of settings in addition to the usual one on the pointer device. To indicate the “forward wave,” a green (blue) LED AL1 is used, and for visual control of the “reverse wave,” a red LED AL2 is used. As practice has shown, this solution is very successful - you can always quickly respond to an emergency situation - if something happens while working with a load, the red LED begins to flash brightly in time with the transmitter, which is not always so noticeable from the SWR meter needle. You won’t be constantly staring at the SWR meter needle during transmission, but the bright glow of red light is clearly visible even with peripheral vision. RU6CK appreciated this when he got such a condition (Yuri has a vision problem). For quite a number of years now, the author himself has been using mainly only the “LED tuning” of the control system - i.e. The setting is to ensure that the red LED goes out and the green one glows brightly.
If you really want a more precise setting, then you can “catch” it using the microammeter needle. The device is configured using a 50 Ohm load equivalent, for which the transmitter output stage is designed. We connect the control unit to the TRX of minimum (as far as possible - since this piece will be used to connect them in the future) length with a coaxial cable with the required characteristic impedance, to the output of the control system without any long cords and coaxial cables the equivalent of the load, unscrew all the handles of the control system to minimum and use C1 to set the minimum SWR meter readings for “reflection”.
I note that the C6 plates need to be introduced a little and the C6 capacity will depend on the length of the coaxial from TRX to the SU and the quality of manufacture of all the “wiring” in the SU itself, i.e. With capacitance C6 we compensate for the reactivity introduced by the coaxial and wiring into the control system. It is necessary to balance the SWR meter several times with capacitor C1 with the minimum possible capacitance C6. It should be noted that the output signal for tuning must not contain harmonics (i.e. it must be filtered), otherwise there will be no minimum. If the design is carried out correctly, the minimum is obtained in the area of the minimum capacity C1 and C6. We swap the input and output of the device and check the “balance” again. We check the setting on several ranges - if everything is OK, then the minimum setting will be the same in different positions.
If it doesn’t match or isn’t “balanced”, look for a better quality “oil” for the inventor’s head... J I just ask you tearfully - don’t ask the author questions about how to make or configure such a control system - you can order a ready-made one if you can’t do it yourself. LEDs need to be selected from modern ones with maximum brightness and maximum resistance. I managed to find red LEDs with a resistance of 1.2 kOhm and green LEDs with a resistance of 2 kOhm. The main task is for it to glow clearly enough in normal mode for the transceiver to transmit. But red, depending on the user’s goals and preferences, can be chosen from poisonous crimson to scarlet. As a rule, these are LEDs with a diameter of 3-3.5 mm. For a brighter red glow, the voltage was doubled - diode D1 was introduced. Because of this, our SWR meter can no longer be called an accurate measuring device - it overestimates the “reflection” and if you want to calculate the exact value of the SWR, you will have to take this into account. If there is a need specifically for measuring precise SWR values, you need to use LEDs with the same resistance and make the two arms of the SWR meter absolutely identical - either with doubling the voltage, both or without it, both. Only in this case will we obtain the same voltage value coming from the shoulders Tr to MA. But rather, we are more concerned not with what kind of SWR we have, but with the fact that the TRX-antenna circuit is matched. For this, the LED readings are quite sufficient. This control system is effective when used with unbalanced power antennas via coaxial cable. The author conducted tests on “standard” common antennas of “poor” radio amateurs - a frame with a perimeter of 80 m, Inverted-V combined 80 and 40 m, a triangle with a perimeter of 40 m, a pyramid for 80 m.
Konstantin RN3ZF uses such a control system with a pin, Inverted-V, including on the WARC bands, he has FT-840. UR4GG is used with a triangle on 80m and Volna and Danube transceivers. UY5ID matches the KT956 silo with a multi-sided frame with a perimeter of 80m with symmetrical power supply, and uses an additional “transition” for symmetrical load. If during setup it is not possible to turn off the red LED, this may indicate that in addition to the main signal, there are also components in the emitted spectrum and the control system is not able to pass them through and match them simultaneously at all emitted frequencies. And those harmonics that lie higher than the main signal in frequency do not pass through the low-pass filter formed by the elements of the control system, they are reflected and on the way back they “ignite” the red LED. The fact that the control system cannot “cope” with the load can only be indicated by the fact that coordination occurs at extreme values (not minimum) of the parameters of the control unit and coil - i.e. There is not enough capacitance or inductance. None of the users of the listed antennas on any of the bands have had such cases.
The use of a control system with a “rope” - a wire 41 m long - was tested. We should not forget that the SWR meter is a measuring device only if there is a load on both sides of it at which it was balanced. When set to “rope”, both LEDs light up and the reference point can be taken as the brightest green (blue) glow, with the minimum possible red light. We can assume that this will be the most correct setting - for maximum output to the load. If you constantly work on the “rope”, then remember that for it to work effectively, you must create a second “pole”, i.e. EARTH! The ground can serve, in extreme cases, as a heating radiator; at best, as a tuned counterweight. When you connect the second “pole” - the ground - to the control system, the readings of the LEDs and the device will become more “meaningful”.
I would also like to note that under no circumstances should you switch the coil taps when emitting maximum power. At the moment of switching, the circuit breaks (albeit for a fraction of a second) - the inductance changes sharply - accordingly, the contacts of the biscuit switch burn out and the load on the transceiver changes sharply. Switching the slide switch only needs to be done when switching the transceiver to RX. A device with a total deflection current of 200 μA was used as a microammeter. It is clear that C1 must withstand the voltage generated by the transceiver under load.
Information for meticulous and “demanding” readers - the author is aware that this type of SWR meter is not a precision high-precision measuring instrument. But the task of manufacturing such a device was not set! The main task was to provide the transceiver with wideband transistor stages with an optimal matched load, I repeat once again - both the transmitter and the receiver. The receiver needs high-quality coordination with the antenna just as much as a powerful silo! By the way, if in your “Radio” the optimal settings for the receiver and transmitter do not coincide, this indicates that the transceiver was not properly configured at all, and if it was done, then most likely only the transmitter. And the receiver’s bandpass filters have optimal parameters at different load values than those that were adjusted on the transmitter.
The purpose of our SWR meter is to show that by twisting the control knobs we have achieved the parameters of the load that we connected to the ANTENNA output during tuning. And we can calmly work on the air, knowing that now the transceiver is not “puffing up and begging for mercy,” but has almost the same load for which it was configured. This, of course, does not mean that your antenna began to work better as a result of using this control system; you should not forget about this! For those interested in a precision SWR meter, I can recommend making it according to the schemes given in many foreign serious publications or buying a ready-made device. But you will have to fork out some money - indeed, only SWR meters (!) from well-known companies cost from $50 and more, I don’t take into account the Polish-Turkish-Italian SWR meters.
A good and complete article on making an SWR meter was in Radio magazine No. 6 1978, author M. Levit (UA3DB). If it seems that one of the LEDs AL1 or AL2 “shines too brightly in the eye,” you need to insert a current-limiting resistor in series with it and select it according to the brightness of the glow. Only after this change in the circuit, you will need to check the control system settings again. Because The arms of the SWR meter are loaded mainly with the resistance of the LEDs and with their change, the balancing of the SWR meter will most likely be disrupted.
HF antenna matching devices are necessary for the installation of amateur and professional radio points. As a rule, the cost of such equipment is low. They are sold openly, and to buy matching devices for HF antennas, no special permission is required.
Application area
HF antenna tuners are necessary for almost all people who practice radio communications. HF antenna tuners tend to buy and install in the following categories:
- fishermen, hunters, tourists and other outdoor enthusiasts;
- Truckers and taxi drivers also prefer to install an antenna tuner for the transceiver in their cars;
- Today, Russia cannot boast that there is a stable coating throughout its entire territory. cellular communications. In many populated areas, the only means of communication is a radio station, complete with which people tend to buy a matching device for an HF transmitter.
Based on the above, it becomes clear that an integral part of amateur radio points are not only transceivers, walkie-talkies and antennas, but also tuners. As a rule, the price of such devices is low and affordable for a radio amateur with average income.
"RadioExpert" - a resource for purchasing radio products
The RadioExpert online store offers inexpensive ordering of various radio products. The price list will help you get acquainted with the entire range of products sold.
The company brings to your attention antennas, tuners, amplifiers, walkie-talkies and many other radio products produced by world-famous brands. The resource cooperates with them directly, bypassing resellers, so the price of antennas, tuners and other radio equipment is at an acceptable level. Of course, the site provides a guarantee for all products.
The online service delivers all purchased goods to anywhere in Russia and the CIS countries. The company guarantees that the parcel will be delivered as soon as possible.
If you have any questions regarding the products sold, prices and delivery, we recommend that you contact our consultants who will be happy to answer any questions.
The experience of numerous contacts and communication with users of transistor technology suggests that it is rare that a radio amateur who is not constantly engaged in design makes an attempt to understand the issues of matching the transceiver with the load. Thoughts about coordination begin to arise in such heads only after an accident has occurred in the equipment. There is nothing to be done - the realities of today are as follows... Exams for obtaining categories have not yet become popular; at best, it is passing the telegraph alphabet. Although for modern conditions, in my opinion, it is more advisable to check technical literacy - there would be less “group sex for long-distance work” and “discussions” about the advantages of UW3DI over “all sorts of Icoms and Kenwoods”... I would like to draw the attention of happy users of bourgeois equipment without antennas tuners, and amateur designers too, on this very important issue.
The choice depends on the antennas used at the station. If the input impedances of radiating systems do not fall below 50 Ohms, you can get by with a primitive L-type matching device, Fig.1
because it only works in the direction of increasing resistance. In order for the same device to “lower” the resistance, it will need to be turned on in reverse, the input and output being swapped. Automatic antenna tuners of almost all imported transceivers are made according to the scheme Fig.2.

Antenna tuners in the form of separate devices from the company are often manufactured according to the scheme Fig.3

Using the last two circuits, you can provide SWR=1 to almost any piece of wire. We must not forget that SWR=1 indicates that the transmitter has an optimal load, but this in no way characterizes effective work antennas. Using the control system according to the scheme in Fig. 2, you can match the probe from the tester as an antenna with SWR = 1, but no one except the nearest neighbors will appreciate the effectiveness of such an “antenna”. A regular P-circuit can also be used as a control system, Fig.4

its advantage is that there is no need to isolate the capacitors from the case; the disadvantage is that with high output power it is difficult to find variable capacitors with the required gap. There is information on SU Fig. 3 on page 237. All branded control systems in this circuit have an additional coil L2, it is frameless, wire with a diameter of 1.2-1.5 mm, 3 turns, a mandrel with a diameter of 25 mm, winding length 38 mm. When using more or less range antennas at a station and if operation on 160m is not intended, the inductance of the coil may not exceed 10-20 µH. The moment of obtaining inductances of small values, up to 1-3 μH, is very important. Ball variometers are usually not suitable for these purposes, because the inductance is adjusted within smaller limits than in coils with a “slider”. Branded antenna tuners use coils with a “runner” in which the first turns are wound with an increased pitch - this is done to obtain small inductances with maximum quality factor and minimal interturn coupling. Sufficiently high-quality matching can be obtained by using the “poor radio amateur’s variometer”. These are two coils connected in series with switching taps, Fig.5.

The coils are frameless, wound on a mandrel with a diameter of 20 mm, wire with a diameter of 0.9-1.2 mm (depending on the expected power), 35 turns each. Then the coils are rolled into a ring and soldered with their taps to the terminals of conventional ceramic switches with 11 positions. Taps for one coil should be made from even turns, for the other from odd turns, for example - from 1,3,5,7,9,11,15,19,23,27 turns and from 2,4,6,8, 10,14,18,22,28,30th orbits. By connecting two such coils in series, you can use switches to select the required number of turns, especially since the accuracy of selecting the inductance is not particularly important for the control system. The "poor radio amateur's variometer" copes successfully with the main task - obtaining small inductances. By the way, the tuner of such an expensive TRX as the TS-940 uses only 7 taps, and the automatic antenna tuners AT-130 from ICOM - 12 taps, AT-50 from Kenwood - 7 taps - so don’t think that the option described here is “primitive” , which does not deserve your attention." In our case, we have an even “cooler” option - a correspondingly more precise setting - 20 taps. The gaps between the plates in the KPI must withstand the expected stress. If low-resistance loads are used, you can get by with KPE from old types of RPU, with an output power of up to 200-300W. If they are high-resistance, you will have to select KPIs from radio stations with the required clearances. The calculation is simple - 1mm can withstand 1000V, the estimated voltage can be found from the formula P=U`(squared)/R, where P is power, R is load resistance, U is voltage. The radio station must have a switch with which the transceiver is disconnected from the antenna in the event of a thunderstorm or inoperative condition, because More than 50% of cases of transistor failure are associated with static electricity. It can be entered either into the antenna switching panel or into the control system.
Description of the matching device.
As a result of various experiences and experiments on this topic, the author came up with a U-shaped “matcher” scheme.

Of course, it is difficult to get rid of the “complex circuit of bourgeois tuners” (Fig. 2) - this circuit has an important advantage - the antenna (at least the central core of the cable) is galvanically isolated from the transceiver input through the gaps between the KPI plates. But an unsuccessful search for suitable KPIs for this scheme forced us to abandon it. By the way, the P-circuit circuit is also used by some companies that produce automatic tuners - the same American KAT1 Elekraft or the Dutch Z-11 Zelfboum. In addition to matching, the P-circuit also acts as a low-pass filter, which is quite good for overloaded amateur radio bands; probably, hardly anyone will refuse additional filtering of unnecessary harmonics. The main disadvantage of the P-circuit circuit is the need for a KPI with a sufficiently large maximum capacity, which makes me wonder why such circuits are not used in automatic tuners of imported transceivers. In T-shaped circuits, two KPIs are most often used, reconfigurable by motors, and it is clear that a 300pf KPI will be much smaller, cheaper and simpler than a 1000pf KPI. The control system uses KPIs from tube receivers with an air gap of 0.3 mm, both sections are connected in parallel. A coil with taps switched by a ceramic biscuit switch is used as inductance. A frameless coil of 35 turns of wire 0.9-1.1 mm is wound on a mandrel with a diameter of 21-22 mm, rolled into a ring and soldered with its short taps to the terminals of the biscuit switch. The taps are made from 2,4,7,10,14,18,22, 26,31 turns. The SWR meter is made on a ferrite ring. For HF, the permeability of the ring in general is not of decisive importance - a K10 ring with a permeability of 1000NN is used. It is wrapped in thin varnished fabric and 14 turns are wound on it in two wires without twisting PEL 0.3, the beginning of one winding connected to the end of the second forms the middle terminal. Depending on the required task, more precisely on what power is supposed to be passed through this control unit and the quality of the emitting LEDs, detection diodes D2, D3 can be made of silicon or germanium. From germanium diodes you can get greater amplitudes and sensitivity. The best are GD507. But since the author uses a transceiver with an output power of at least 50W, ordinary silicon KD522 is sufficient. As a “know-how”, this control system uses LED indication of settings in addition to the usual one on the pointer device. A green LED AL1 is used to indicate the “forward wave”, and a red LED AL2 is used to visually monitor the “reverse wave”. As practice has shown, this solution is very successful - you can always quickly respond to an emergency situation - if something happens while working with a load, the red LED begins to flash brightly in time with the transmitter, which is not always so noticeable from the SWR meter needle. You won’t be constantly staring at the SWR meter needle during transmission, but the bright glow of red light is clearly visible even with peripheral vision. RU6CK appreciated this when he got such a control system (besides, Yuri has poor eyesight). For more than a year now, the author himself has been using mainly only the “LED setting” of the control system - i.e. The setting is to ensure that the red LED goes out and the green one glows brightly. If you really want a more precise setting, you can “catch” it using the microammeter needle. The device is configured using the load equivalent for which the transmitter output stage is designed. We connect the control unit to the TRX of the minimum (as far as possible - since this piece will be used to connect them in the future) length with a coaxial cable with the required characteristic impedance, to the output of the control system without any long cords and coaxial cables, the equivalent, unscrew all the handles of the control system to the minimum and using C1 we set the minimum readings of the SWR meter for “reflection”. It should be noted that the output signal for tuning must not contain harmonics (i.e. it must be filtered), otherwise there will be no minimum. If the design is carried out correctly, the minimum will be in the region of the minimum capacity C1. We swap the input and output of the device and check the “balance” again. We check the setting on several ranges - if everything is OK, then the minimum setting will be the same in different positions. If it doesn’t match or isn’t “balanced” - look for a better quality “oil” for the inventor’s head... I just ask you tearfully - don’t ask the author questions about how to make or configure such a control system - you can order a ready-made one if you can’t do it yourself. LEDs need to be selected from modern ones with maximum brightness and maximum resistance. I managed to find red LEDs with a resistance of 1.2 kOhm and green LEDs with a resistance of 2 kOhm. Usually the green ones glow weakly - but this is not bad - we don’t make a Christmas tree garland. The main task is for it to glow clearly enough in normal mode for the transceiver to transmit. But red, depending on the user’s goals and preferences, can be chosen from poisonous crimson to scarlet. As a rule, these are LEDs with a diameter of 3-3.5 mm. For a brighter red glow, the voltage was doubled - diode D1 was introduced. Because of this, our SWR meter can no longer be called an accurate measuring device - it overestimates the “reflection” and if you want to calculate the exact value of the SWR, you will have to take this into account. If there is a need specifically for measuring precise SWR values, you need to use LEDs with the same resistance and make the two arms of the SWR meter absolutely the same - either with doubling the voltage, both or without it, both. Only in this case will we obtain the same voltage value coming from the shoulders Tr to MA. But rather, we are more concerned not with what kind of SWR we have, but with the fact that the TRX-antenna circuit is matched. For this, the LED readings are quite sufficient. This control system is effective when used with unbalanced power antennas via coaxial cable. The author conducted tests on “standard” common antennas of “lazy” radio amateurs - a frame with a perimeter of 80 m, Inverted-V combined 80 and 40 m, a triangle with a perimeter of 40 m, a pyramid with a perimeter of 80 m. Konstantin RN3ZF uses such a control system with a pin, Inverted-V, including on the WARC bands, he has FT-840. UR4GG is used with a triangle on 80m and Volna and Danube transceivers. UY5ID matches the KT956 silo with a multi-sided frame with a perimeter of 80m with symmetrical power supply, and uses an additional “transition” for symmetrical load. If during setup it is not possible to turn off the red LED (to reach the minimum readings of the device), this may indicate that in addition to the main signal, there are also components in the emitted spectrum and the control system is not able to pass them through and match them simultaneously at all emitted frequencies. And those harmonics that lie higher than the main signal in frequency do not pass through the low-pass filter formed by the elements of the control system, are reflected and on the way back “ignite” the red LED. The fact that the control system cannot “cope” with the load can only be indicated by the fact that coordination occurs at extreme values (not minimum) of the parameters of the control unit and coil - i.e. There is not enough capacitance or inductance. None of the users of the listed antennas on any of the bands have had such cases. The use of a control system with a “rope” - a wire 41 m long - was tested. We should not forget that the SWR meter is a measuring device only if there is a load on both sides of it at which it was balanced. When set to “rope”, both LEDs light up and the reference point can be taken as the brightest green light with the least possible red light. We can assume that this will be the most correct setting - for maximum output to the load. I would also like to note that under no circumstances should you switch the coil taps when emitting maximum power. At the moment of switching, the circuit breaks (albeit for a fraction of a second) - the inductance changes sharply - accordingly, the contacts of the biscuit switch burn out and the load on the transceiver changes sharply. The switch must be switched when the transceiver is switched to RX. The M68501 device with a total deviation current of 200 µA was used as a microammeter. You can also use M4762 - they were used in “Nota” and “Jupiter” tape recorders. It is clear that C1 must withstand the voltage generated by the transceiver under load. Information for meticulous and “demanding” readers - the author is aware that this type of SWR meter is not a precision high-precision measuring instrument. But the production of such a device was never undertaken. The main task was to provide the transceiver with broadband transistor stages with an optimal matched load, I repeat once again - both the transmitter and the receiver. The receiver needs high-quality coordination with the antenna just as much as a powerful silo! By the way, if in your “Radio” the optimal settings for the receiver and transmitter do not coincide, this indicates that the adjustment was not really done at all, and if it was done, then most likely only the transmitter and the receiver’s bandpass filters have optimal parameters for other load values than it was adjusted on the transmitter. The purpose of our SWR meter is to show that by twisting the control knobs we have achieved the parameters of the load that we connected to the ANTENNA output during tuning. And we can calmly work on the air, knowing that now the transceiver is not “puffing up and begging for mercy,” but has almost the same load for which it was configured. This, of course, does not mean that your antenna began to work better because of this control system; you should not forget about this! For those interested in a precision SWR meter, I can recommend making it according to the schemes given in many foreign serious publications or buying a ready-made device. But you will have to fork out some money - indeed, devices from well-known companies cost $50 and more, I don’t take into account the SV-ish Polish-Turkish-Italian ones.
A. Tarasov UT2FW
Publications on the topic
-
 Types of USB connectors - main differences and features
Contents: In our age of computer technology, smartphones and gadgets, it is difficult to find a person who does not know what connectors are...
-
 How to change a hard drive to an SSD
When replacing HDD with SSD, what increase in performance speed can you expect? This article tests using an example model...