
Installing and formatting the hard drive. "Format C": what is this command? Formatting hard drive partitions

Formatting hard disk is the process of creating a logical layout of a data storage area located on a magnetic medium and necessary for further filling with information and working with it. Typically, formatting is carried out before starting to work with the HDD, to completely destroy information or to eliminate damage caused by a virus.
Types of hard drive formatting
Low-level formatting is the layout of the HDD at the physical level, which usually remains unchanged throughout the life of the media. It is carried out at the manufacturer's factory and cannot be done at home. Programs that, according to developers, allow you to perform low level formatting, usually at best, are only able to overwrite control information.
Partitioning is necessary to create a layout into logical drives, which will allow you to store information in a more organized way. For example, the only HDD laptop, you can separate two disks, one of which can be dedicated to operating system, the other is for storing files. This will allow you to reinstall the OS without erasing information stored on the non-system partition. Partitioning non-system disks can be done from under Windows.
High-level formatting is divided into full and quick. Fast only involves clearing file system tables, which are kind of directories for storing files. Full formatting (verification), in addition to destroying information in tables, also includes searching for broken blocks and replacing them with working ones. There are several formatting options.
Formatting the HDD during Windows installation
In order to begin installing the operating system, you should set the settings in the BIOS so that the first device from which the computer starts booting is the installation disk. In order to enter the BIOS, you should restart the operating system and press several times Delete key after the computer starts up again.
In the window that appears, go to the Boot section and specify there as the device from which the computer will first boot, the drive where you insert the installation disk.
After setting the necessary boot parameters, insert the installation disk into the drive, save the changes to the BIOS and restart the computer. Typically the F10 key is used for this. If you have done everything correctly, the operating system installation and recovery window will appear in front of you.

Press Enter to begin installation, click Windows. After this, the text will appear in front of you license agreement, press F8 to continue further work.

After this, you will need to delete all the partitions into which the hard drive was divided in order to create a single partition on the HDD with an unallocated area. To do this, select each of the available sections one by one and press the L key.

After you delete all partitions hard drive, only the single inscription “Unallocated area” will remain in the list.

Press Enter and you will be presented with options for file systems into which you can format the hard drive. Select Format partition in NTFS.

After a few minutes, formatting the hard drive will be completed. This method is good primarily because it allows you to format the system disk, while programs running under Windows do not allow you to do this. If you are going to format a HDD where there is not a running operating system, but some files, then it will be much more convenient to use another method.
Formatting a hard drive using the built-in Windows program
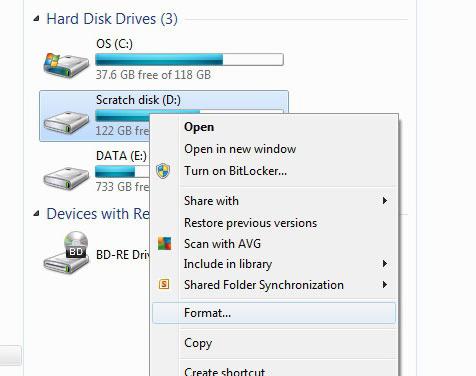
Open "My Computer" and right-click on the required drive and select "Format" from the pop-up menu.

In the window that appears, you can specify the necessary formatting parameters. Quick formatting takes much less time compared to full formatting, but occurs without completely erasing information, which allows, if necessary, to restore some of the information using special programs.

After you set the necessary parameters and click Start, a window will appear warning you that all data on the disk will be destroyed. Click the OK button and wait for the formatting completion message.

Using the command line to format the HDD
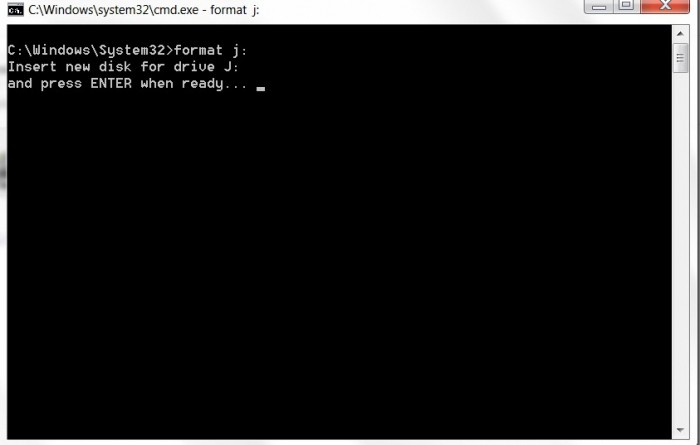
One of the simplest ways to format a hard drive is to use a special command on the command line. Click Start -> Run or press the Win+R key combination. A small window will appear in front of you, where you should enter the name of the cmd program and press Enter.
In the black window that appears, enter format command and a drive letter followed by a colon, such as format d:, and press Enter. A question will appear with the warning “Attention, all data on the fixed drive d: will be destroyed!” and the question “Start formatting?” Press Y and Enter to continue. The formatting will begin.
Formatting using the built-in Disk Management program
The Windows operating system has a special built-in program that allows you to perform various operations with disks and their partitions. The program is located at Control Panel -> Administrative Tools -> Computer Management -> Disk Management.

Right-click on the required drive and select Format. In the window that appears, you can specify the formatting method (quick or full) and type file system.
Using the Partition magic utility to format the HDD
One of the most convenient and functional programs for working with disks and logical partitions is the Partition magic utility. The program can be used even if the built-in Windows software fails to cope with the task.

To format a disk when help Partition magic, must be created boot disk, insert it into the drive and after restarting the computer, working in the program itself, perform all the necessary operations - formatting, as well as deleting or creating a new partition.

- Hi all! Urgently needed on one computer format drive C: with Windows 10 installed, how to do it the most in a fast way?
- Hello, tell me how to remove the C: drive? I want to sell a laptop, the new owner wanted it to be clean, that is, without an operating system. Windows 8.1 is currently installed. No installation Windows drives Or I don’t have flash drives.
Hello friends! If your laptop has Windows 8.1 or Windows 10 installed, then formatting or deleting the C: drive is very simple, but keep in mind that deleting and formatting are two different things.
If you simply delete the C: drive with the installed operating system, then any user can restore it (and very quickly) with all your files. The recovery will occur in such a way that your Windows 8.1 will boot and all your files, passwords, and so on will get to strangers.
It's another matter to format the C: drive; in this case, little can be recovered.
- Note: If you are selling a laptop, you can either produce it without saving personal files.
If you are determined to format or delete the C: drive, then read on.
For example, let's take my laptop with Windows 8.1 installed.
Press the key " Shift"And without releasing it, we reboot the laptop.
The recovery environment loads, select “Diagnostics”
"Extra options"

"Command line"

On the command line enter the commands:
diskpart
lis vol (we display a list of all sections and see that Uolume 1 (Volume 1), this is the disk C: with Windows 8.1 installed. Be guided by the name or volume, most often the C: drive is first or second in this list, if you want, you can directly enter the C: drive in the command line and see everything system folders: Windows, Program Files).
sel vol 1 (select Volume 1)
format quick fs=NTFS ( format drive C: to the NTFS file system, you can use the parameterquick-quick formatting)
Formatting completed successfully.
After this formatting operation, it will be very difficult to restore anything on your laptop.

If you want to format a data disk, for example, a flash drive or drive (D:), then this can be done using standard Windows tools. However, if you want to format the system drive, that is, the drive on which Windows is installed, then regular means it will not be possible to do this.
In order to format the drive (C:), you will need the Acronis program Disk Director. Using its boot disk, you can boot through the BIOS and format the disk with Windows.
How to format a drive in Windows
To format a drive in Windows standard means follow these steps:
1. a) In Windows XP, go to the menu Start - Control Panel - Administrative Tools - Computer Management.
b) In Windows 7, go to the menu Start - Control Panel - System and Security - Administration - Computer Management
2. In the left part of the window that appears, select Disk Management.
3. Right-click on the drive you want to format. In the context menu, select Format.
4. A window for selecting formatting options will appear.

In field Volume Label Enter the name of the drive that will be displayed in Explorer. This field can be left blank
Select file system NTFS. Leave the cluster size Default.
Check the box Quick formatting so that formatting takes place in express mode. Essentially, in this mode the “disk table of contents” is simply cleared and it becomes clean. This saves a lot of time when formatting a disk.
Click OK. After a warning that all information on the disk will be deleted, the disk will begin formatting.
How to format a Windows disk using BIOS
To format drive C, that is, format Windows disk you need to burn an Acronis Disk Director boot disk and boot from it through the BIOS.
From the boot disk menu, select Acronis Disk Director 11 Advanced.

In the Acronis Boot Agent window that appears, select Launch management console.

The window that appears displays all physical hard drives and logical partitions on them.

Right-click on the drive (C:) and select from the context menu Format.

On the list File system select NTFS, leave the cluster size Auto The volume label is the name of the partition that will be displayed in Explorer.

You can leave this field blank. Click OK. Now click the button.

Apply scheduled operations A window will appear with a list of operations that will be performed on the disk. Click.

Continue The formatting process will begin. When it finishes press the button.
Close
First of all, you need to understand what formatting is. This is a process by which your drive is cleared of the information on it. It is most often used in cases where it is necessary to quickly empty the disk of its contents and write other data to it. Or before installing the operating system. How can such an operation be performed? For this purpose, there is a program for Before using it, take care of the safety of the necessary files and documents, copy them, for example, to external drive.
Formatting using the Control Panel
The very first way to perform drive cleaning is to use the computer's own capabilities. To use them, you need to use the control panel of your device. In this section, select “Disk Management” and see all the available options: assign labels and names, create partitions, perform the formatting we need, etc.
We find the drive or partition we need, hover the mouse over it, right-click and select “format”. This option is convenient because we initially see all the drives connected to the computer, even those that are inactive and we will not see them in the Explorer window. Before starting the procedure, the window that appears allows you to make some settings. You can change the volume label, that is, the name of the selected drive, and select the file system type. You need to pay attention to the fact that these parameters have already been pre-configured and set, so you don’t need to touch them, except in cases where there is an exact purpose for the changes.
Next, the program for formatting the hard drive offers you to choose full formatting or quick formatting, which differ significantly from each other. If the first option deletes data as efficiently as possible, without the possibility of recovery, then with the second the disk will be recognized as empty, but if desired, information from it can be recovered. It is recommended to use it if you are confident that the media is fully functional.
Using the Explorer window

The method described above is not the only solution to the problem assigned to us. It is possible to format the disk even more quickly. To do this, it is quite enough to open “My Computer”, get to all active ones. Then select the one we need, right-click to open the menu and click on the “formatting” item.
Before us is another program for formatting a hard drive. Using the window that opens additional settings You can adjust various operation parameters. Please remember that the actual disk capacity is less than the data provided to us by the manufacturer. For example, a 2TB drive will actually have 1.81TB of available space.
How to format a system disk?
If there is an operating system on the disk, then it, of course, cannot erase itself, so other methods have to be used. Why do this? This procedure is performed if a new one is installed on the system disk with the current OS. To do this, insert the installation disk with the operating system into the computer/laptop. It will launch and prompt you to start the installation. All you have to do is follow the instructions for performing this operation.

First, of its two types, we select installation from scratch, ignoring the option of updating the system. On the hard drive you are using, you can create and delete logical partitions and perform accelerated formatting. Then we continue to install the OS or, after removing the disk, we continue working on the computer.
We looked at Windows OS version 7. In operating systems Windows Vista and Windows XP all actions are similar. But if you are servicing the system drive, then it is preferable to use third-party ones called Live CD.
Free hard drive formatting program
For formatting any information storage devices, including hard drives connected to the device, you can use HDD program Low Level Format Tool. System utilities are, of course, a good thing, but high-quality cleaning is better done with the help of a third-party software. The above utility is small, convenient, and supports working with different interfaces, for example, SATA, IDE, USB, Fir, SCSI. We can service devices from the following manufacturers: Seagate, Maxtor, Fujitsu, Samsung, Quantum, Toshiba, IBM. Also works with flash cards.

What else is good about this program? hard drive is its main merit. It destroys absolutely all data that is recorded on the media, without missing or boot sectors with separated logical partitions. Please remember that deleted information cannot be recovered.
How does HDD Low Level Format Tool work?
Download the distribution, launch and install. This is done so simply that we will not dwell on it in detail. Then we read and choose: use the free version or pay an additional three dollars and thirty cents and get an updated and faster program. We choose the first option. The only disadvantage of this utility is that every time you start it, you will have to see and delete the window asking you to pay extra money.
The interface is very simple. You will immediately see which storage devices are connected to the computer and are ready for use. Various data about these devices and various reference information are available.
Let's do some testing. We will not experiment with a hard drive; for this we will use a regular flash drive with a capacity of 4 GB. Select it from the list and click the “Continue >>>” button. We will see the characteristics of the flash drive and the start/stop formatting buttons. Before starting the process, the program will clarify whether you really want to start it. In the window you can monitor the progress of the operation.

Peculiarity free version- low speed (4.3 Mb/sec), so everything will last about 10 minutes. HDD Low Level Format Tool will not only format your drive, but will also be able to “repair” it if the computer does not see the flash drive.
How else can you format a hard drive?
One of the most powerful and functional utilities for this is Acronis. This program for formatting your hard drive is updated regularly and keeps up with the times. It's paid, but it's also free trial version. So if you like the utility, you can purchase the full version. System requirements not too big, so it can be installed on almost every computer.
There are many options offered, the choice is yours.
In recent years, computer literacy of the population has increased slightly. In any case, many people know about the programs, and some can already figure out their home router themselves, since from technical support Most domestic providers cannot achieve anything meaningful.
But still, the overwhelming majority of users do not know anything about the computer that would be more difficult than sitting in social networks. In particular, if some serious software failures occur that can only be fixed by completely reinstalling the OS, they have no idea how to format a disk with Windows 7.
Of course, such a need does not arise very often, but if a beginner encounters it, then there can be a lot of problems. That is why it will probably be useful for you to read this article in order to form your own idea of the process.
The essence of formatting. Why is it needed?
Formatting is the process by which the surface of a hard drive is marked. The most basic thing is low-level formatting, which is performed only at the manufacturer. We are interested in the high-level process that modifies logical partitions on disks.
Before formatting a Windows 7 disk, the user must determine the file system type, cluster size, and other specifications newly created section. This should not be taken lightly, since the survivability of the media and the amount of free space on it depend on these operations.
What is the best cluster size?
In particular, if you set it to the maximum possible and store only text documents on such a disk, you will waste your free space. Let's assume that you have defined the volume as 512 KB. That is, by writing only one file to disk text document at 20B, you occupy an entire cluster, 99% of which will be wasted.
How to format the system partition?
If you know a little about computers, then you perfectly remember the procedure for standard preparation of a new section. You can right-click on its icon and select “Format” from the context menu. But there is one problem.
The fact is that system partition(on which the system is installed) you cannot format it like that. If you try, a warning will appear stating that this operation is impossible. How to be?
Using a boot disk
If you really want to find out how to format a disk with Windows 7, you will have to get the boot disk from which you installed the system. If there is none, you need to make it yourself. To do this, you need to write an image downloaded from the network (or created by yourself) to
You need to insert it into the drive, restart the computer, and set the BIOS to boot from the CD/DVD drive. You will have to find out how to do this yourself, since different manufacturers provide different versions“BIOS” with radically different interfaces.
As a rule, all the information you need should be posted on the manufacturer's website motherboard. So, having learned how to format a disk through the BIOS, you will have to find this information.
So, immediately after loading from optical drive you will be taken to the OS installation menu. Since we are talking about Windows 7, even the most “green” beginners can relax: everything is so clear (almost at the level of intuition) that even a child can handle it.
Immediately after the first dialog box appears, select “Install”. Next, select the required OS version (if you enter the key, the installation program will select the required one). After this, work with disks appears. Having finally understood how to format the system disk, find out its letter in advance, otherwise you can easily lose your entire collection of music or movies.

That's what we need. Select the required section by left-clicking on it. At the very bottom of the window there should be a “Disk Settings” link. Once you select it, you will see other options appear. You need the Format section. Select the required file system and click OK. Then you can either continue installing Windows, or install some other operating system.
Since the system itself offers to format the disk during installation, if you do not have any experience, it is better to leave the settings that are offered by default.
Live CD
If you have ever dealt with system administration, then you probably know about Live CDs, which in the case of Windows OS are often called BartPE. From such media you can not only boot from the BIOS, but also get a fully functional system as a result. Since formatting the system disk under a working OS will not work (this is not Linux, after all), this option may be the only correct one.
Since the system is loaded from a “live CD” into RAM, you can right-click on any drive (including the system drive), and then select “Format” from the context menu. All subsequent actions are no different from those that we have already described in this article.
The same can be done using installation disk with any Linux distribution. As a rule, they all have Live CD mode, so you don't have to do any dances with the console. Ubuntu is ideal, the interface of which is as simple and intuitive as possible.
Another variant
But it often happens that two systems are installed on one disk at once. In particular, this happens due to inexperience when a person mistakenly installs several copies of an identical OS on one physical disk.
This cannot be done, because such a combination may well cause problems when loading and operating programs. In addition, the human factor cannot be ruled out when users delete information from the first system. system files second. Of course, there is no need to talk about stable work in the latter case.
So how to format a drive with Windows 7 then? Everything is much simpler here.
Cleaning via context menu

To do this, you need to go to “My Computer”, and then select the drive on which the copy of Windows you don’t need is installed. There is no need to worry that the Windows you are currently working on will be targeted. We have already indicated that in this case the system itself will not allow you to do this.
Next, you should right-click on the section you need, and then select “Format” from the menu that appears. A dialog box will also appear asking you to specify the file system type. It all depends on your preferences and requirements.
File system selection
The main (and most reliable) is NTFS, but if necessary, FAT32 can be used. We have already written above about determining the size of a standard cluster. As for the type of formatting, here again everything depends only on you.
But! You need to carefully understand how to format an NTFS hard drive. It should be noted that the reliability of this file system is based on the fact that it creates a sufficiently large recovery partition.
In the case when you are preparing a disk whose volume exceeds several hundred GB, this can be sacrificed. But you shouldn’t mark disks with a capacity of 40 GB and below this way. However, where can you find such “dinosaurs” now? But if you need to prepare the hard drive of an old computer, then our recommendations will certainly be useful to you.
If you check the “Quick (Table of Contents Cleanup”) checkbox, the process will not take much time, but there will still be a chance that deleted files from the disk can be recovered.

If you intend to sell this hard drive, we recommend that you uncheck this box. After clicking on the “Start” button, all data will be erased from the media, including the operating system installed there. This may take some time, which will directly depend on both the power of your computer and the size of the disk.
Perform cleaning through Disk Management
This method is somewhat more reliable. Having understood Windows 7 using this method, you must first click on the “Start” button, and in the menu that appears, select “Control Panel”. In the Panel that opens, look for the “Administration” option.
In the dialog box that opens, select the “Computer Management” shortcut. A control window for the utility of the same name will open, in which we are interested in the “Storage devices” item. In it you need to double-click on the “Disk Management” line.
After all these manipulations, a window will open with a list of storage devices installed in the system. Select the disk you need from it and right-click on it. The same context menu will open, in which you should select the “Format” item. You have already been familiarized with further actions above.
Using the Command Line Emulator

So we got to the most “advanced” method, which is used only by the most experienced users. This way, formatting a disk with Windows 7 is very convenient and quick, but you need to remember or write down all the commands that we will give you in the text below.
It’s best to simply copy them into and then paste them into the command line using the right mouse button (“Paste”).
Once again, pay attention: carefully monitor the drive letter that you need to format. An error can cause you to lose data that is of considerable value (to you, anyway).
First you need to run the emulator with administrator rights. This is done simply. First, click on the “Start” button and look for the “Search” field there. You drive it into CMD command, and then press the Enter key. A window with search results will open on the right side, in which you need to right-click on the file of the same name and select the “Run as Administrator” option in the context menu.
Having decided how to format a disk partition with the system or unnecessary data, first of all write the command format Y: on the command line, where instead of Y there should be the letter of the partition you need. We repeat once again: make no mistake! There have been cases when absent-minded users lost all archives with family videos.
After this, you need to press the Enter key, after which the data will be completely formatted. Important! When using command line emulation mode, no warnings are issued about the possible loss of important data in the event of an error, so be extremely careful when entering commands!
A little about flash drives
If your external drive asks you to format it before using it, you can also use command line. All steps of the action are exactly the same, but the main command will have a slightly different form: format Y: /Q. As in the previous case, the letter Y is the designation of your disk, which you need to change to a value relevant to your case, and the key Q stands for Quick, which indicates a quick format with a simple clearing of the table of contents.
What is it for? The fact is that you should not completely format flash drives again, as this once again reduces the number of rewrite cycles.
Publications on the topic
-
 Add to favorites Script to add to favorites for all browsers
Starting today I will tell you about one useful function on the site - this is a link, well, or a button “Add to bookmarks (favorites)”. This feature...
-
 How to remove non-reciprocal readers (followers) on Twitter Who are unfollowers
Twitter is becoming more and more integrated into modern life. Not only is the service very interesting, but its use...