
An introduction to slideshow development in JavaScript. Creating a photo slider using pure javascript Preparing images for the slider

If the slides contain only pictures, you can slightly change the structure:


 Previous Next
Don't forget to add a meaningful value to the alt attribute.
To use page links, you can do the following:
... ... ... 1 2 3
Previous Next 1 2 3
Note the use of “data” attributes - some slide shows can insert pictures as a background, and these attributes will be used in the script as places to connect the background and the slide.
Using Lists A semantically correct approach would be to use list items as slides. In this case, the structure will be like this:
If the order of the slides is well defined (for example, in a presentation), you can use numbered lists
CSS Let's start with the following structure:
Previous Next
Because Since the slideshow will run from right to left, the outer container will have a fixed size, and the inner one will be wider since it contains all the slides. The first slide will be visible. This is set via overflow:
Slider ( width: 1024px; overflow: hidden; ) .slider-wrapper ( width: 9999px; height: 683px; position: relative; transition: left 500ms linear; )
Inner wrapper styles include:
Large width
- fixed height, maximum slide height
- position: relative, which will allow you to create slide movement
- CSS transition left, which will make the movement smooth. For simplicity, we have not included all prefixes. You can also use CSS transformations (together with translation) for this.
Slides have a float attribute to make them line up. They are positioned relatively so that you can get their left offset in JS. We use it to create a sliding effect.
Slide ( float: left; position: relative; width: 1024px; height: 683px; )
Although we have set a certain width, in the script we can change it by multiplying the number of slides by the slide width. You never know what width you might need.
Navigation is carried out through the “Previous” and “Next” buttons. We reset their default styles and assign our own:
Slider-nav ( height: 40px; width: 100%; margin-top: 1.5em; ) .slider-nav button ( border: none; display: block; width: 40px; height: 40px; cursor: pointer; text-indent : -9999em; background-color: transparent; background-repeat: no-repeat; ) .slider-nav button.slider-previous ( float: left; background-image: url(previous.png); ) .slider-nav button .slider-next ( float: right; background-image: url(next.png); )
When using page links instead of buttons, you can create the following styles:
Slider-nav ( text-align: center; margin-top: 1.5em; ) .slider-nav a ( display: inline-block; text-decoration: none; border: 1px solid #ddd; color: #444; width: 2em; height: 2em; line-height: 2; text-align: center; ) .slider-nav a.current ( border-color: #000; color: #000; font-weight: bold; )
These classes will be assigned dynamically from the script.
This approach is suitable for the sliding effect. If we want to achieve the fade-in effect, we need to change the styles, since float adds horizontal padding between slides. That is, we don’t need slides on one line - we need a “pack” of slides:
Slider ( width: 1024px; margin: 2em auto; ) .slider-wrapper ( width: 100%; height: 683px; position: relative; /* Creates a context for absolute positioning */ ) .slide ( position: absolute; /* Absolute positioning of all slides */ width: 100%; height: 100%; opacity: 0; /* All slides are hidden */ transition: opacity 500ms linear; ) /* Initially only the first one is visible */ .slider-wrapper >
We use the opacity property to hide slides because screen readers will skip the content of elements that have display: none (see CSS in Action: Invisible Content Just for Screen Reader Users).
Thanks to CSS contextual positioning, we created a “stack” of slides, with the last slide in the source being in front of the others. But that's not what we need. To maintain the order of the slides, we need to hide all slides except the first.
JS uses CSS transition, changing the value of the opacity property of the current slide, and resetting this value to zero for all others.
JavaScript code Slideshow without pagination Slideshow without pagination works by clicking the “Next” and “Previous” buttons. They can be thought of as increment and decrement operators. There is always a pointer (or cursor) that will be increased or decreased each time you press the buttons. Its initial value is 0, and the goal is to select the current slide in the same way as array elements are selected.So when we click Next the first time, the pointer increases by 1 and we get a second slide. By clicking on Previous, we reduce the pointer and get the first slide. Etc.
Along with the pointer, we use jQuery's .eq() method to get the current slide. In pure JS it looks like this:
Function Slideshow(element) ( this.el = document.querySelector(element); this.init(); ) Slideshow.prototype = ( init: function() ( this.slides = this.el.querySelectorAll(".slide") ; //... ), _slideTo: function(pointer) ( var currentSlide = this.slides; //... ) );
Remember - NodeList uses indexes just like an array. Another way to select the current slide is with CSS3 selectors:
Slideshow.prototype = ( init: function() ( //... ), _slideTo: function(pointer) ( var n = pointer + 1; var currentSlide = this.el.querySelector(".slide:nth-child(" + n + ")"); //... ) );
The CSS3:nth-child() selector counts elements starting from 1, so you need to add a 1 to the pointer. After selecting a slide, its parent container must be moved from right to left. In jQuery you can use the .animate() method:
(function($) ( $.fn.slideshow = function(options) ( options = $.extend(( wrapper: ".slider-wrapper", slides: ".slide", //... speed: 500, easing : "linear" ), options); var slideTo = function(slide, element) ( var $currentSlide = $(options.slides, element).eq(slide); $(options.wrapper, element). animate(( left : - $currentSlide.position().left ), options.speed, options.easing); ); //... ); ))(jQuery);
There is no .animate() method in regular JS, so we use CSS transitions:
Slider-wrapper ( position: relative; // required transition: left 500ms linear; )
Now you can change the left property dynamically through the style object:
Function Slideshow(element) ( this.el = document.querySelector(element); this.init(); ) Slideshow.prototype = ( init: function() ( this.wrapper = this.el.querySelector(".slider-wrapper "); this.slides = this.el.querySelectorAll(".slide"); //... ), _slideTo: function(pointer) ( var currentSlide = this.slides; this.wrapper.style.left = "- " + currentSlide.offsetLeft + "px"; ) );
Now we need to create a click event for each control. In jQuery you can use the .on() method, and in pure JS you can use the addEventListener() method.
You also need to check whether the pointer has reached the list boundaries - 0 for “Previous” and the total number of slides for “Next”. In each case, you need to hide the corresponding button:
(function($) ( $.fn.slideshow = function(options) ( options = $.extend(( wrapper: ".slider-wrapper", slides: ".slide", previous: ".slider-previous", next : ".slider-next", //... speed: 500, easing: "linear" ), options); var slideTo = function(slide, element) ( var $currentSlide = $(options.slides, element). eq(slide); $(options.wrapper, element).animate(( left: - $currentSlide.position().left ), options.speed, options.easing); ); return this.each(function() ( var $element = $(this), $previous = $(options.previous, $element), $next = $(options.next, $element), index = 0, total = $(options.slides).length; $next.on("click", function() ( index++; $previous.show(); if(index == total - 1) ( index = total - 1; $next.hide(); ) slideTo(index, $element); )); $previous.on("click", function() ( index--; $next.show(); if(index == 0) ( index = 0; $previous.hide(); ) slideTo(index, $element); )); )); ); ))(jQuery);
And in pure JS it looks like this:
Function Slideshow(element) ( this.el = document.querySelector(element); this.init(); ) Slideshow.prototype = ( init: function() ( this.wrapper = this.el.querySelector(".slider-wrapper "); this.slides = this.el.querySelectorAll(".slide"); this.previous = this.el.querySelector(".slider-previous"); this.next = this.el.querySelector(".slider -next"); this.index = 0; this.total = this.slides.length; this.actions(); ), _slideTo: function(pointer) ( var currentSlide = this.slides; this.wrapper.style.left = "-" + currentSlide.offsetLeft + "px"; ), actions: function() ( var self = this; self.next.addEventListener("click", function() ( self.index++; self.previous.style. display = "block"; if(self.index == self.total - 1) ( self.index = self.total - 1; self.next.style.display = "none"; ) self._slideTo(self.index ); ), false); self.previous.addEventListener("click", function() ( self.index--; self.next.style.display = "block"; if(self.index == 0) ( self .index = 0;self.previous.style.display = "none"; ) self._slideTo(self.index); ), false); ) );
Paginated Slideshow In this type of slideshow, each link is responsible for one slide, so there is no need for an index. The animations don't change; the way the user moves through the slides does. For jQuery we will have the following code:(function($) ( $.fn.slideshow = function(options) ( options = $.extend(( wrapper: ".slider-wrapper", slides: ".slide", nav: ".slider-nav", speed : 500, easing: "linear" ), options); var slideTo = function(slide, element) ( var $currentSlide = $(options.slides, element).eq(slide); $(options.wrapper, element). animate(( left: - $currentSlide.position().left ), options.speed, options.easing); ); return this.each(function() ( var $element = $(this), $navigationLinks = $( "a", options.nav); $navigationLinks.on("click", function(e) ( e.preventDefault(); var $a = $(this), $slide = $($a.attr("href ")); slideTo($slide, $element); $a.addClass("current").siblings(). removeClass("current"); )); )); ))(jQuery);
In this case, each anchor corresponds to the ID of a specific slide. In pure JS, you can use both it and the data attribute, which stores the numeric index of the slides inside the NodeList:
Function Slider(element) ( this.el = document.querySelector(element); this.init(); ) Slider.prototype = ( init: function() ( this.links = this.el.querySelectorAll("#slider-nav a"); this.wrapper = this.el.querySelector("#slider-wrapper"); this.navigate(); ), navigate: function() ( for (var i = 0; i< this.links.length; ++i) { var link = this.links[i]; this.slide(link); } }, slide: function(element) { var self = this; element.addEventListener("click", function(e) { e.preventDefault(); var a = this; self.setCurrentLink(a); var index = parseInt(a.getAttribute("data-slide"), 10) + 1; var currentSlide = self.el.querySelector(".slide:nth-child(" + index + ")"); self.wrapper.style.left = "-" + currentSlide.offsetLeft + "px"; }, false); }, setCurrentLink: function(link) { var parent = link.parentNode; var a = parent.querySelectorAll("a"); link.className = "current"; for (var j = 0; j < a.length; ++j) { var cur = a[j]; if (cur !== link) { cur.className = ""; } } } };
Since IE10 you can manage classes via classList:
Link.classList.add("current");
And with IE11, data attributes can be obtained through the dataset property:
Var index = parseInt(a.dataset.slide, 10) + 1;
Paged Slideshows with Controls These slideshows present some complexity to the code - you have to combine the use of index and page hashes. That is, the current slide must be selected based on both the pointer position and the slide selected through links.This can be synchronized through the number index of each link in the DOM. One link - one slide, so their indexes will be 0, 1, 2, etc.
In jQuery the code will be like this:
(function($) ( $.fn.slideshow = function(options) ( options = $.extend(( //... pagination: ".slider-pagination", //... ), options); $. fn.slideshow.index = 0; return this.each(function() ( var $element = $(this), //... $pagination = $(options.pagination, $element), $paginationLinks = $(" a", $pagination), //... $paginationLinks.on("click", function(e) ( e.preventDefault(); var $a = $(this), elemIndex = $a.index(); // DOM numerical index $.fn.slideshow.index = elemIndex; if($.fn.slideshow.index > 0) ( $previous.show(); ) else ( $previous.hide(); ) if($. fn.slideshow.index == total - 1) ( $.fn.slideshow.index = total - 1; $next.hide(); ) else ( $next.show(); ) slideTo($.fn.slideshow. index, $element); $a.addClass("current"). siblings().removeClass("current"); )); )); ); //... ))(jQuery);
You can immediately see that the visibility of the cursor has changed - the index is now declared as a property of the slideshow object. This way we avoid scope problems that can be created by callbacks in jQuery. The cursor is now available everywhere, even outside the plugin namespace, since it is declared as a public property of the slideshow object.
The .index() method gives the numeric index of each link.
There is no such method in pure JS, so it's easier to use data attributes:
(function() ( function Slideshow(element) ( this.el = document.querySelector(element); this.init(); ) Slideshow.prototype = ( init: function() ( this.wrapper = this.el.querySelector( ".slider-wrapper"); this.slides = this.el.querySelectorAll(".slide"); this.previous = this.el.querySelector(".slider-previous"); this.next = this.el. querySelector(".slider-next"); this.navigationLinks = this.el.querySelectorAll(".slider-pagination a"); this.index = 0; this.total = this.slides.length; this.setup() ; this.actions(); ), //... setup: function() ( var self = this; //... for(var k = 0; k< self.navigationLinks.length; ++k) { var pagLink = self.navigationLinks[k]; pagLink.setAttribute("data-index", k); // Или pagLink.dataset.index = k; } }, //... }; })();
Now we can connect our procedures with references and use the data attributes we just created:
Actions: function() ( var self = this; //... for(var i = 0; i< self.navigationLinks.length; ++i) { var a = self.navigationLinks[i]; a.addEventListener("click", function(e) { e.preventDefault(); var n = parseInt(this.getAttribute("data-index"), 10); // Или var n = parseInt(this.dataset.index, 10); self.index = n; if(self.index == 0) { self.index = 0; self.previous.style.display = "none"; } if(self.index >0) ( self.previous.style.display = "block"; ) if(self.index == self.total - 1) ( self.index = self.total - 1; self.next.style.display = "none "; ) else ( self.next.style.display = "block"; ) self._slideTo(self.index); self._highlightCurrentLink(this); ), false); ) )
Understanding Dimensions Let's return to the following CSS rule:Slider-wrapper ( width: 9999px; height: 683px; position: relative; transition: left 500ms linear; )
If we have a lot of slides, then 9999 may not be enough. You need to adjust the sizes for the slides on the fly based on the width of each slide and the number of slides.
In jQuery it's simple:
// Full width slideshow return this.each(function() ( var $element = $(this), total = $(options.slides).length; //... $(options.slides, $element ).width($(window).width()); $(options.wrapper, $element).width($(window).width() * total); //... ));
Take the width of the window and set the width of each slide. The total width of the internal wrapper is obtained by multiplying the width of the window and the number of slides.
// Fixed width slideshow return this.each(function() ( var $element = $(this), total = $(options.slides).length; //... $(options.wrapper, $element) .width($(options.slides).eq(0).width() * total); //... ));
Here the initial width is set to the width of each slide. You just need to set the overall width of the wrapper.
The inner container is now wide enough. In pure JS this is done approximately the same way:
// Full width slideshow Slideshow.prototype = ( init: function() ( this.wrapper = this.el.querySelector(".slider-wrapper"); this.slides = this.el.querySelectorAll(".slide "); //... this.total = this.slides.length; this.setDimensions(); this.actions(); ), setDimensions: function() ( var self = this; // Viewport"s width var winWidth = window.innerWidth || document.documentElement.clientWidth || document.body.clientWidth; var wrapperWidth = winWidth * self.total; for(var i = 0; i< self.total; ++i) { var slide = self.slides[i]; slide.style.width = winWidth + "px"; } self.wrapper.style.width = wrapperWidth + "px"; }, //... }; // Слайд-шоу фиксированной ширины Slideshow.prototype = { init: function() { this.wrapper = this.el.querySelector(".slider-wrapper"); this.slides = this.el.querySelectorAll(".slide"); //... this.total = this.slides.length; this.setDimensions(); this.actions(); }, setDimensions: function() { var self = this; var slideWidth = self.slides.offsetWidth; // Single slide"s width var wrapperWidth = slideWidth * self.total; self.wrapper.style.width = wrapperWidth + "px"; }, //... };
Fade Effects Fade effects are often used in slide shows. The current slide disappears and the next one appears. jQuery has fadeIn() and fadeOut() methods that work with both the opacity and display properties, so the element is removed from the page when the animation completes (display:none).In pure JS, it's best to work with the opacity property and use the CSS positioning stack. Then initially the slide will be visible (opacity: 1), and the others will be hidden (opacity: 0).
The following set of styles demonstrates this method:
Slider ( width: 100%; overflow: hidden; position: relative; height: 400px; ) .slider-wrapper ( width: 100%; height: 100%; position: relative; ) .slide ( position: absolute; width: 100 %; height: 100%; opacity: 0; ) .slider-wrapper > .slide:first-child ( opacity: 1; )
In pure JS you need to register the CSS transition of each slide:
Slide ( float: left; position: absolute; width: 100%; height: 100%; opacity: 0; transition: opacity 500ms linear; )
With jQuery, to use the fadeIn() and fadeOut() methods, you need to change the opacity and display:
Slide ( float: left; position: absolute; width: 100%; height: 100%; display: none; ) .slider-wrapper > .slide:first-child ( display: block; )
In jQuery the code is as follows:
(function($) ( $.fn.slideshow = function(options) ( options = $.extend(( wrapper: ".slider-wrapper", previous: ".slider-previous", next: ".slider-next" , slides: ".slide", nav: ".slider-nav", speed: 500, easing: "linear" ), options); var slideTo = function(slide, element) ( var $currentSlide = $(options.slides , element).eq(slide); $currentSlide. animate(( opacity: 1 ), options.speed, options.easing). siblings(options.slides). css("opacity", 0); ); //. .. ); ))(jQuery);
When animating opacity, you also need to change the values of this property for the remaining slides.
In JavaScript it would be:
Slideshow.prototype = ( //... _slideTo: function(slide) ( var currentSlide = this.slides; currentSlide.style.opacity = 1; for(var i = 0; i< this.slides.length; i++) { var slide = this.slides[i]; if(slide !== currentSlide) { slide.style.opacity = 0; } } }, //... };
Media Elements: Video We can include video in a slideshow. Here's an example of a video slideshow from Vimeo:
Videos are included via iframe. This is the same replaceable inline-block as the picture. Replaceable – because the content is taken from an external source.
To create a full-page slideshow, you need to change the styles as follows:
Html, body ( margin: 0; padding: 0; height: 100%; min-height: 100%; /* Height should be the entire page */ ) .slider ( width: 100%; overflow: hidden; height: 100 %; min-height: 100%; /* Height and width to full */ position: absolute; /* Absolute positioning */ ) .slider-wrapper ( width: 100%; height: 100%; /* Height and width to full */ position: relative; ) .slide ( float: left; position: absolute; width: 100%; height: 100%; ) .slide iframe ( display: block; /* Block element */ position: absolute; /* Absolute positioning */ width: 100%; height: 100%; /* Full height and width */ )
Automatic Slideshows Automatic slideshows use timers. Each time the setInterval() timer function is called back, the cursor will be incremented by 1 and thus the next slide will be selected.When the cursor reaches the maximum number of slides, it must be reset.
Endless slideshows quickly become boring for users. The best practice is to stop the animation when the user hovers over it and resume when the cursor moves away.
(function($) ( $.fn.slideshow = function(options) ( options = $.extend(( slides: ".slide", speed: 3000, easing: "linear" ), options); var timer = null; // Timer var index = 0; // Cursor var slideTo = function(slide, element) ( var $currentSlide = $(options.slides, element).eq(slide); $currentSlide.stop(true, true). animate (( opacity: 1 ), options.speed, options.easing). siblings(options.slides). css("opacity", 0); ); var autoSlide = function(element) ( // Initialize the sequence timer = setInterval( function() ( index++; // Increase the cursor by 1 if(index == $(options.slides, element).length) ( index = 0; // Reset the cursor ) slideTo(index, element); ), options.speed ); // The same interval as in the method.animate() ); var startStop = function(element) ( element.hover(function() ( // Stop the animation clearInterval(timer); timer = null; ), function () ( autoSlide(element); // Resume the animation )); ); return this.each(function() ( var $element = $(this); autoSlide($element); startStop($element); )); ); ))(jQuery);
Both parameters of the .stop() method are set to true, because we don't need to create an animation queue from our sequence.
In pure JS, the code becomes simpler. We register a CSS transition for each slide with a certain duration:
Slide ( transition: opacity 3s linear; /* 3 seconds = 3000 milliseconds */ )
And the code will be like this:
(function() ( function Slideshow(element) ( this.el = document.querySelector(element); this.init(); ) Slideshow.prototype = ( init: function() ( this.slides = this.el.querySelectorAll( ".slide"); this.index = 0; // Cursor this.timer = null; // Timer this.action(); this.stopStart(); ), _slideTo: function(slide) ( var currentSlide = this. slides; currentSlide.style.opacity = 1; for(var i = 0; i< this.slides.length; i++) { var slide = this.slides[i]; if(slide !== currentSlide) { slide.style.opacity = 0; } } }, action: function() { var self = this; // Initializes the sequence self.timer = setInterval(function() { self.index++; // Увеличим курсор на 1 if(self.index == self.slides.length) { self.index = 0; // Обнулим курсор } self._slideTo(self.index); }, 3000); // Тот же интервал, что и у перехода CSS }, stopStart: function() { var self = this; // Останавливаем анимацию self.el.addEventListener("mouseover", function() { clearInterval(self.timer); self.timer = null; }, false); // Возобновляем анимацию self.el.addEventListener("mouseout", function() { self.action(); }, false); } }; })();
Keyboard Navigation Advanced slideshows offer keyboard navigation, i.e. Scroll through slides by pressing keys. For us, this simply means that we need to register the handling of the keypress event.To do this, we will access the keyCode property of the event object. It returns the code of the pressed key (list of codes).
Those events that we attached to the “Previous” and “Next” buttons can now be attached to the “left” and “right” keys. jQuery:
$("body").on("keydown", function(e) ( var code = e.keyCode; if(code == 39) ( // Left arrow $next.trigger("click"); ) if( code == 37) ( // Right arrow $previous.trigger("click"); ) ));
In pure JS, instead of the simple .trigger() method, you will have to use dispatchEvent():
Document.body.addEventListener("keydown", function(e) ( var code = e.keyCode; var evt = new MouseEvent("click"); // mouse click if(code == 39) ( // Left arrow self .next.dispatchEvent(evt); ) if(code == 37) ( // Right arrow self.previous.dispatchEvent(evt); ) ), false);
In decent projects it is not customary to do this. We would need to define the functionality that provides flipping in a public method, and then call it when the button is clicked. Then if another part of the program needed to implement this functionality, there would be no need to emulate DOM events, but could simply call this method.
Callbacks It would be nice to be able to attach some code to any slideshow action that would be executed when that action is performed. This is the purpose of callback functions - they are executed only when a certain action occurs. Let's say our slideshow has captions and they are hidden by default. At the time of animation, we need to show a caption for the current slide or even do something with it.In jQuery you can create a callback like this:
(function($) ( $.fn.slideshow = function(options) ( options = $.extend(( //... callback: function() () ), options); var slideTo = function(slide, element) ( var $currentSlide = $(options.slides, element).eq(slide); $currentSlide. animate(( opacity: 1 ), options.speed, options.easing, // Callback for the current slide options.callback($ currentSlide)). siblings(options.slides). css("opacity", 0); ); //... ); ))(jQuery);
In this case, the callback is a function from .animate() that takes the current slide as an argument. Here's how you can use it:
$(function() ( $("#main-slider").slideshow(( callback: function(slide) ( var $wrapper = slide.parent(); // Shows the current caption and hides the others $wrapper.find(" .slide-caption").hide(); slide.find(".slide-caption").show("slow"); ) )); ));
In pure JS:
(function() ( function Slideshow(element, callback) ( this.callback = callback || function()); // Our callback this.el = document.querySelector(element); this.init(); ) Slideshow. prototype = ( init: function() ( //... this.slides = this.el.querySelectorAll(".slide"); //... //... ), _slideTo: function(slide) ( var self = this; var currentSlide = self.slides; currentSlide.style.opacity = 1; for(var i = 0; i< self.slides.length; i++) { var slide = self.slides[i]; if(slide !== currentSlide) { slide.style.opacity = 0; } } setTimeout(self.callback(currentSlide), 500); // Вызывает функцию по окончанию перехода } }; // })();
The callback function is defined as the second parameter of the constructor. You can use it like this:
Document.addEventListener("DOMContentLoaded", function() ( var slider = new Slideshow("#main-slider", function(slide) ( var wrapper = slide.parentNode; // Shows the current caption and hides the others var allSlides = wrapper. querySelectorAll(".slide"); var caption = slide.querySelector(".slide-caption"); caption.classList.add("visible"); for(var i = 0; i< allSlides.length; ++i) { var sld = allSlides[i]; var cpt = sld.querySelector(".slide-caption"); if(sld !== slide) { cpt.classList.remove("visible"); } } }); });
External APIs So far our work scenario is simple: all the slides are already in the document. If we need to insert data into it from outside (YouTube, Vimeo, Flickr), we need to populate the slides on the fly as we receive external content.Since the response from the third-party server may not be immediate, you need to insert a loading animation to show that the process is in progress:
Previous Next
It can be a gif or a pure CSS animation:
#spinner ( border-radius: 50%; border: 2px solid #000; height: 80px; width: 80px; position: absolute; top: 50%; left: 50%; margin: -40px 0 0 -40px; ) # spinner:after ( content: ""; position: absolute; background-color: #000; top:2px; left: 48%; height: 38px; width: 2px; border-radius: 5px; -webkit-transform-origin: 50% 97%; transform-origin: 50% 97%; -webkit-animation: angular 1s linear infinite; animation: angular 1s linear infinite; ) @-webkit-keyframes angular ( 0%(-webkit-transform:rotate(0deg );) 100%(-webkit-transform:rotate(360deg);) ) @keyframes angular ( 0%(transform:rotate(0deg);) 100%(transform:rotate(360deg);) ) #spinner:before ( content: ""; position: absolute; background-color: #000; top:6px; left: 48%; height: 35px; width: 2px; border-radius: 5px; -webkit-transform-origin: 50% 94% ; transform-origin: 50% 94%; -webkit-animation: ptangular 6s linear infinite; animation: ptangular 6s linear infinite; ) @-webkit-keyframes ptangular ( 0%(-webkit-transform:rotate(0deg);) 100 %(-webkit-transform:rotate(360deg);) ) @keyframes ptangular ( 0%(transform:rotate(0deg);) 100%(transform:rotate(360deg);) )
The steps will be like this:
- request data from outside
- hide bootloader
- parse data
- build HTML
- display a slide show
- process slide shows
Let's say we select a user's most recent videos from YouTube. jQuery:
(function($) ( $.fn.slideshow = function(options) ( options = $.extend(( wrapper: ".slider-wrapper", //... loader: "#spinner", //... limit: 5, username: "learncodeacademy" ), options); //... var getVideos = function() ( // Get videos from YouTube var ytURL = "https://gdata.youtube.com/feeds/api/ videos?alt=json&author=" + options.username + "&max-results=" + options.limit; $.getJSON(ytURL, function(videos) ( // Get the video as a JSON object $(options.loader).hide( ); // Hiding the loader var entries = videos.feed.entry; var html = ""; for(var i = 0; i< entries.length; ++i) { // Разбираем данные и строим строку HTML var entry = entries[i]; var idURL = entry.id.$t; var idVideo = idURL.replace("http://gdata.youtube.com/feeds/api/videos/", ""); var ytEmbedURL = "https://www.youtube.com/embed/" + idVideo + "?rel=0&showinfo=0&controls=0"; html += ""; html += ""; html += ""; } $(options.wrapper).html(html); // Выведем слайд-шоу }); }; return this.each(function() { //... getVideos(); // Обрабатываем слайд-шоу }); }; })(jQuery);
In pure JavaScript there is an extra step - creating a method for getting JSON:
(function() ( function Slideshow(element) ( this.el = document.querySelector(element); this.init(); ) Slideshow.prototype = ( init: function() ( this.wrapper = this.el.querySelector( ".slider-wrapper"); this.loader = this.el.querySelector("#spinner"); //... this.limit = 5; this.username = "learncodeacademy"; ), _getJSON: function(url , callback) ( callback = callback || function() (); var request = new XMLHttpRequest(); request.open("GET", url, true); request.send(null); request.onreadystatechange = function() ( if (request.status == 200 && request.readyState == 4) ( var data = JSON.parse(request.responseText); // JSON object callback(data); ) else ( console.log(request.status) ; ) ); ), //... ); ))();
Then the procedures are similar:
(function() ( function Slideshow(element) ( this.el = document.querySelector(element); this.init(); ) Slideshow.prototype = ( init: function() ( this.wrapper = this.el.querySelector( ".slider-wrapper"); this.loader = this.el.querySelector("#spinner"); //... this.limit = 5; this.username = "learncodeacademy"; this.actions(); ) , _getJSON: function(url, callback) ( callback = callback || function(); var request = new XMLHttpRequest(); request.open("GET", url, true); request.send(null); request .onreadystatechange = function() ( if (request.status == 200 && request.readyState == 4) ( var data = JSON.parse(request.responseText); // JSON object callback(data); ) else ( console. log(request.status); ) ); ), //... getVideos: function() ( var self = this; // Get YouTube video var ytURL = "https://gdata.youtube.com/feeds/api /videos?alt=json&author=" + self.username + "&max-results=" + self.limit; self._getJSON(ytURL, function(videos) ( // Get the video as a JSON object var entries = videos.feed.entry ; var html = ""; self.loader.style.display = "none"; // Hiding the loader for(var i = 0; i< entries.length; ++i) { // Разбираем данные и строим строку HTML var entry = entries[i]; var idURL = entry.id.$t; var idVideo = idURL.replace("http://gdata.youtube.com/feeds/api/videos/", ""); var ytEmbedURL = "https://www.youtube.com/embed/" + idVideo + "?rel=0&showinfo=0&controls=0"; html += ""; html += ""; html += ""; } self.wrapper.innerHTML = html; // Выводим слайд-шоу }); }, actions: function() { var self = this; self.getVideos(); // Обрабатываем слайд-шоу } }; })(); Добавить метки
If the slides contain only pictures, you can slightly change the structure:
Previous Next
Don't forget to add a meaningful value to the alt attribute.
To use page links, you can do the following:
... ... ... 1 2 3
Previous Next 1 2 3
Note the use of “data” attributes - some slide shows can insert pictures as a background, and these attributes will be used in the script as places to connect the background and the slide.
Using Lists A semantically correct approach would be to use list items as slides. In this case, the structure will be like this:
If the order of the slides is well defined (for example, in a presentation), you can use numbered lists
CSS Let's start with the following structure:
Previous Next
Because Since the slideshow will run from right to left, the outer container will have a fixed size, and the inner one will be wider since it contains all the slides. The first slide will be visible. This is set via overflow:
Slider ( width: 1024px; overflow: hidden; ) .slider-wrapper ( width: 9999px; height: 683px; position: relative; transition: left 500ms linear; )
Inner wrapper styles include:
Large width
- fixed height, maximum slide height
- position: relative, which will allow you to create slide movement
- CSS transition left, which will make the movement smooth. For simplicity, we have not included all prefixes. You can also use CSS transformations (together with translation) for this.
Slides have a float attribute to make them line up. They are positioned relatively so that you can get their left offset in JS. We use it to create a sliding effect.
Slide ( float: left; position: relative; width: 1024px; height: 683px; )
Although we have set a certain width, in the script we can change it by multiplying the number of slides by the slide width. You never know what width you might need.
Navigation is carried out through the “Previous” and “Next” buttons. We reset their default styles and assign our own:
Slider-nav ( height: 40px; width: 100%; margin-top: 1.5em; ) .slider-nav button ( border: none; display: block; width: 40px; height: 40px; cursor: pointer; text-indent : -9999em; background-color: transparent; background-repeat: no-repeat; ) .slider-nav button.slider-previous ( float: left; background-image: url(previous.png); ) .slider-nav button .slider-next ( float: right; background-image: url(next.png); )
When using page links instead of buttons, you can create the following styles:
Slider-nav ( text-align: center; margin-top: 1.5em; ) .slider-nav a ( display: inline-block; text-decoration: none; border: 1px solid #ddd; color: #444; width: 2em; height: 2em; line-height: 2; text-align: center; ) .slider-nav a.current ( border-color: #000; color: #000; font-weight: bold; )
These classes will be assigned dynamically from the script.
This approach is suitable for the sliding effect. If we want to achieve the fade-in effect, we need to change the styles, since float adds horizontal padding between slides. That is, we don’t need slides on one line - we need a “pack” of slides:
Slider ( width: 1024px; margin: 2em auto; ) .slider-wrapper ( width: 100%; height: 683px; position: relative; /* Creates a context for absolute positioning */ ) .slide ( position: absolute; /* Absolute positioning of all slides */ width: 100%; height: 100%; opacity: 0; /* All slides are hidden */ transition: opacity 500ms linear; ) /* Initially only the first one is visible */ .slider-wrapper >
We use the opacity property to hide slides because screen readers will skip the content of elements that have display: none (see CSS in Action: Invisible Content Just for Screen Reader Users).
Thanks to CSS contextual positioning, we created a “stack” of slides, with the last slide in the source being in front of the others. But that's not what we need. To maintain the order of the slides, we need to hide all slides except the first.
JS uses CSS transition, changing the value of the opacity property of the current slide, and resetting this value to zero for all others.
JavaScript code Slideshow without pagination Slideshow without pagination works by clicking the “Next” and “Previous” buttons. They can be thought of as increment and decrement operators. There is always a pointer (or cursor) that will be increased or decreased each time you press the buttons. Its initial value is 0, and the goal is to select the current slide in the same way as array elements are selected.So when we click Next the first time, the pointer increases by 1 and we get a second slide. By clicking on Previous, we reduce the pointer and get the first slide. Etc.
Along with the pointer, we use jQuery's .eq() method to get the current slide. In pure JS it looks like this:
Function Slideshow(element) ( this.el = document.querySelector(element); this.init(); ) Slideshow.prototype = ( init: function() ( this.slides = this.el.querySelectorAll(".slide") ; //... ), _slideTo: function(pointer) ( var currentSlide = this.slides; //... ) );
Remember - NodeList uses indexes just like an array. Another way to select the current slide is with CSS3 selectors:
Slideshow.prototype = ( init: function() ( //... ), _slideTo: function(pointer) ( var n = pointer + 1; var currentSlide = this.el.querySelector(".slide:nth-child(" + n + ")"); //... ) );
The CSS3:nth-child() selector counts elements starting from 1, so you need to add a 1 to the pointer. After selecting a slide, its parent container must be moved from right to left. In jQuery you can use the .animate() method:
(function($) ( $.fn.slideshow = function(options) ( options = $.extend(( wrapper: ".slider-wrapper", slides: ".slide", //... speed: 500, easing : "linear" ), options); var slideTo = function(slide, element) ( var $currentSlide = $(options.slides, element).eq(slide); $(options.wrapper, element). animate(( left : - $currentSlide.position().left ), options.speed, options.easing); ); //... ); ))(jQuery);
There is no .animate() method in regular JS, so we use CSS transitions:
Slider-wrapper ( position: relative; // required transition: left 500ms linear; )
Now you can change the left property dynamically through the style object:
Function Slideshow(element) ( this.el = document.querySelector(element); this.init(); ) Slideshow.prototype = ( init: function() ( this.wrapper = this.el.querySelector(".slider-wrapper "); this.slides = this.el.querySelectorAll(".slide"); //... ), _slideTo: function(pointer) ( var currentSlide = this.slides; this.wrapper.style.left = "- " + currentSlide.offsetLeft + "px"; ) );
Now we need to create a click event for each control. In jQuery you can use the .on() method, and in pure JS you can use the addEventListener() method.
You also need to check whether the pointer has reached the list boundaries - 0 for “Previous” and the total number of slides for “Next”. In each case, you need to hide the corresponding button:
(function($) ( $.fn.slideshow = function(options) ( options = $.extend(( wrapper: ".slider-wrapper", slides: ".slide", previous: ".slider-previous", next : ".slider-next", //... speed: 500, easing: "linear" ), options); var slideTo = function(slide, element) ( var $currentSlide = $(options.slides, element). eq(slide); $(options.wrapper, element).animate(( left: - $currentSlide.position().left ), options.speed, options.easing); ); return this.each(function() ( var $element = $(this), $previous = $(options.previous, $element), $next = $(options.next, $element), index = 0, total = $(options.slides).length; $next.on("click", function() ( index++; $previous.show(); if(index == total - 1) ( index = total - 1; $next.hide(); ) slideTo(index, $element); )); $previous.on("click", function() ( index--; $next.show(); if(index == 0) ( index = 0; $previous.hide(); ) slideTo(index, $element); )); )); ); ))(jQuery);
And in pure JS it looks like this:
Function Slideshow(element) ( this.el = document.querySelector(element); this.init(); ) Slideshow.prototype = ( init: function() ( this.wrapper = this.el.querySelector(".slider-wrapper "); this.slides = this.el.querySelectorAll(".slide"); this.previous = this.el.querySelector(".slider-previous"); this.next = this.el.querySelector(".slider -next"); this.index = 0; this.total = this.slides.length; this.actions(); ), _slideTo: function(pointer) ( var currentSlide = this.slides; this.wrapper.style.left = "-" + currentSlide.offsetLeft + "px"; ), actions: function() ( var self = this; self.next.addEventListener("click", function() ( self.index++; self.previous.style. display = "block"; if(self.index == self.total - 1) ( self.index = self.total - 1; self.next.style.display = "none"; ) self._slideTo(self.index ); ), false); self.previous.addEventListener("click", function() ( self.index--; self.next.style.display = "block"; if(self.index == 0) ( self .index = 0;self.previous.style.display = "none"; ) self._slideTo(self.index); ), false); ) );
Paginated Slideshow In this type of slideshow, each link is responsible for one slide, so there is no need for an index. The animations don't change; the way the user moves through the slides does. For jQuery we will have the following code:(function($) ( $.fn.slideshow = function(options) ( options = $.extend(( wrapper: ".slider-wrapper", slides: ".slide", nav: ".slider-nav", speed : 500, easing: "linear" ), options); var slideTo = function(slide, element) ( var $currentSlide = $(options.slides, element).eq(slide); $(options.wrapper, element). animate(( left: - $currentSlide.position().left ), options.speed, options.easing); ); return this.each(function() ( var $element = $(this), $navigationLinks = $( "a", options.nav); $navigationLinks.on("click", function(e) ( e.preventDefault(); var $a = $(this), $slide = $($a.attr("href ")); slideTo($slide, $element); $a.addClass("current").siblings(). removeClass("current"); )); )); ))(jQuery);
In this case, each anchor corresponds to the ID of a specific slide. In pure JS, you can use both it and the data attribute, which stores the numeric index of the slides inside the NodeList:
Function Slider(element) ( this.el = document.querySelector(element); this.init(); ) Slider.prototype = ( init: function() ( this.links = this.el.querySelectorAll("#slider-nav a"); this.wrapper = this.el.querySelector("#slider-wrapper"); this.navigate(); ), navigate: function() ( for (var i = 0; i< this.links.length; ++i) { var link = this.links[i]; this.slide(link); } }, slide: function(element) { var self = this; element.addEventListener("click", function(e) { e.preventDefault(); var a = this; self.setCurrentLink(a); var index = parseInt(a.getAttribute("data-slide"), 10) + 1; var currentSlide = self.el.querySelector(".slide:nth-child(" + index + ")"); self.wrapper.style.left = "-" + currentSlide.offsetLeft + "px"; }, false); }, setCurrentLink: function(link) { var parent = link.parentNode; var a = parent.querySelectorAll("a"); link.className = "current"; for (var j = 0; j < a.length; ++j) { var cur = a[j]; if (cur !== link) { cur.className = ""; } } } };
Since IE10 you can manage classes via classList:
Link.classList.add("current");
And with IE11, data attributes can be obtained through the dataset property:
Var index = parseInt(a.dataset.slide, 10) + 1;
Paged Slideshows with Controls These slideshows present some complexity to the code - you have to combine the use of index and page hashes. That is, the current slide must be selected based on both the pointer position and the slide selected through links.This can be synchronized through the number index of each link in the DOM. One link - one slide, so their indexes will be 0, 1, 2, etc.
In jQuery the code will be like this:
(function($) ( $.fn.slideshow = function(options) ( options = $.extend(( //... pagination: ".slider-pagination", //... ), options); $. fn.slideshow.index = 0; return this.each(function() ( var $element = $(this), //... $pagination = $(options.pagination, $element), $paginationLinks = $(" a", $pagination), //... $paginationLinks.on("click", function(e) ( e.preventDefault(); var $a = $(this), elemIndex = $a.index(); // DOM numerical index $.fn.slideshow.index = elemIndex; if($.fn.slideshow.index > 0) ( $previous.show(); ) else ( $previous.hide(); ) if($. fn.slideshow.index == total - 1) ( $.fn.slideshow.index = total - 1; $next.hide(); ) else ( $next.show(); ) slideTo($.fn.slideshow. index, $element); $a.addClass("current"). siblings().removeClass("current"); )); )); ); //... ))(jQuery);
You can immediately see that the visibility of the cursor has changed - the index is now declared as a property of the slideshow object. This way we avoid scope problems that can be created by callbacks in jQuery. The cursor is now available everywhere, even outside the plugin namespace, since it is declared as a public property of the slideshow object.
The .index() method gives the numeric index of each link.
There is no such method in pure JS, so it's easier to use data attributes:
(function() ( function Slideshow(element) ( this.el = document.querySelector(element); this.init(); ) Slideshow.prototype = ( init: function() ( this.wrapper = this.el.querySelector( ".slider-wrapper"); this.slides = this.el.querySelectorAll(".slide"); this.previous = this.el.querySelector(".slider-previous"); this.next = this.el. querySelector(".slider-next"); this.navigationLinks = this.el.querySelectorAll(".slider-pagination a"); this.index = 0; this.total = this.slides.length; this.setup() ; this.actions(); ), //... setup: function() ( var self = this; //... for(var k = 0; k< self.navigationLinks.length; ++k) { var pagLink = self.navigationLinks[k]; pagLink.setAttribute("data-index", k); // Или pagLink.dataset.index = k; } }, //... }; })();
Now we can connect our procedures with references and use the data attributes we just created:
Actions: function() ( var self = this; //... for(var i = 0; i< self.navigationLinks.length; ++i) { var a = self.navigationLinks[i]; a.addEventListener("click", function(e) { e.preventDefault(); var n = parseInt(this.getAttribute("data-index"), 10); // Или var n = parseInt(this.dataset.index, 10); self.index = n; if(self.index == 0) { self.index = 0; self.previous.style.display = "none"; } if(self.index >0) ( self.previous.style.display = "block"; ) if(self.index == self.total - 1) ( self.index = self.total - 1; self.next.style.display = "none "; ) else ( self.next.style.display = "block"; ) self._slideTo(self.index); self._highlightCurrentLink(this); ), false); ) )
Understanding Dimensions Let's return to the following CSS rule:Slider-wrapper ( width: 9999px; height: 683px; position: relative; transition: left 500ms linear; )
If we have a lot of slides, then 9999 may not be enough. You need to adjust the sizes for the slides on the fly based on the width of each slide and the number of slides.
In jQuery it's simple:
// Full width slideshow return this.each(function() ( var $element = $(this), total = $(options.slides).length; //... $(options.slides, $element ).width($(window).width()); $(options.wrapper, $element).width($(window).width() * total); //... ));
Take the width of the window and set the width of each slide. The total width of the internal wrapper is obtained by multiplying the width of the window and the number of slides.
// Fixed width slideshow return this.each(function() ( var $element = $(this), total = $(options.slides).length; //... $(options.wrapper, $element) .width($(options.slides).eq(0).width() * total); //... ));
Here the initial width is set to the width of each slide. You just need to set the overall width of the wrapper.
The inner container is now wide enough. In pure JS this is done approximately the same way:
// Full width slideshow Slideshow.prototype = ( init: function() ( this.wrapper = this.el.querySelector(".slider-wrapper"); this.slides = this.el.querySelectorAll(".slide "); //... this.total = this.slides.length; this.setDimensions(); this.actions(); ), setDimensions: function() ( var self = this; // Viewport"s width var winWidth = window.innerWidth || document.documentElement.clientWidth || document.body.clientWidth; var wrapperWidth = winWidth * self.total; for(var i = 0; i< self.total; ++i) { var slide = self.slides[i]; slide.style.width = winWidth + "px"; } self.wrapper.style.width = wrapperWidth + "px"; }, //... }; // Слайд-шоу фиксированной ширины Slideshow.prototype = { init: function() { this.wrapper = this.el.querySelector(".slider-wrapper"); this.slides = this.el.querySelectorAll(".slide"); //... this.total = this.slides.length; this.setDimensions(); this.actions(); }, setDimensions: function() { var self = this; var slideWidth = self.slides.offsetWidth; // Single slide"s width var wrapperWidth = slideWidth * self.total; self.wrapper.style.width = wrapperWidth + "px"; }, //... };
Fade Effects Fade effects are often used in slide shows. The current slide disappears and the next one appears. jQuery has fadeIn() and fadeOut() methods that work with both the opacity and display properties, so the element is removed from the page when the animation completes (display:none).In pure JS, it's best to work with the opacity property and use the CSS positioning stack. Then initially the slide will be visible (opacity: 1), and the others will be hidden (opacity: 0).
The following set of styles demonstrates this method:
Slider ( width: 100%; overflow: hidden; position: relative; height: 400px; ) .slider-wrapper ( width: 100%; height: 100%; position: relative; ) .slide ( position: absolute; width: 100 %; height: 100%; opacity: 0; ) .slider-wrapper > .slide:first-child ( opacity: 1; )
In pure JS you need to register the CSS transition of each slide:
Slide ( float: left; position: absolute; width: 100%; height: 100%; opacity: 0; transition: opacity 500ms linear; )
With jQuery, to use the fadeIn() and fadeOut() methods, you need to change the opacity and display:
Slide ( float: left; position: absolute; width: 100%; height: 100%; display: none; ) .slider-wrapper > .slide:first-child ( display: block; )
In jQuery the code is as follows:
(function($) ( $.fn.slideshow = function(options) ( options = $.extend(( wrapper: ".slider-wrapper", previous: ".slider-previous", next: ".slider-next" , slides: ".slide", nav: ".slider-nav", speed: 500, easing: "linear" ), options); var slideTo = function(slide, element) ( var $currentSlide = $(options.slides , element).eq(slide); $currentSlide. animate(( opacity: 1 ), options.speed, options.easing). siblings(options.slides). css("opacity", 0); ); //. .. ); ))(jQuery);
When animating opacity, you also need to change the values of this property for the remaining slides.
In JavaScript it would be:
Slideshow.prototype = ( //... _slideTo: function(slide) ( var currentSlide = this.slides; currentSlide.style.opacity = 1; for(var i = 0; i< this.slides.length; i++) { var slide = this.slides[i]; if(slide !== currentSlide) { slide.style.opacity = 0; } } }, //... };
Media Elements: Video We can include video in a slideshow. Here's an example of a video slideshow from Vimeo:
Videos are included via iframe. This is the same replaceable inline-block as the picture. Replaceable – because the content is taken from an external source.
To create a full-page slideshow, you need to change the styles as follows:
Html, body ( margin: 0; padding: 0; height: 100%; min-height: 100%; /* Height should be the entire page */ ) .slider ( width: 100%; overflow: hidden; height: 100 %; min-height: 100%; /* Height and width to full */ position: absolute; /* Absolute positioning */ ) .slider-wrapper ( width: 100%; height: 100%; /* Height and width to full */ position: relative; ) .slide ( float: left; position: absolute; width: 100%; height: 100%; ) .slide iframe ( display: block; /* Block element */ position: absolute; /* Absolute positioning */ width: 100%; height: 100%; /* Full height and width */ )
Automatic Slideshows Automatic slideshows use timers. Each time the setInterval() timer function is called back, the cursor will be incremented by 1 and thus the next slide will be selected.When the cursor reaches the maximum number of slides, it must be reset.
Endless slideshows quickly become boring for users. The best practice is to stop the animation when the user hovers over it and resume when the cursor moves away.
(function($) ( $.fn.slideshow = function(options) ( options = $.extend(( slides: ".slide", speed: 3000, easing: "linear" ), options); var timer = null; // Timer var index = 0; // Cursor var slideTo = function(slide, element) ( var $currentSlide = $(options.slides, element).eq(slide); $currentSlide.stop(true, true). animate (( opacity: 1 ), options.speed, options.easing). siblings(options.slides). css("opacity", 0); ); var autoSlide = function(element) ( // Initialize the sequence timer = setInterval( function() ( index++; // Increase the cursor by 1 if(index == $(options.slides, element).length) ( index = 0; // Reset the cursor ) slideTo(index, element); ), options.speed ); // The same interval as in the method.animate() ); var startStop = function(element) ( element.hover(function() ( // Stop the animation clearInterval(timer); timer = null; ), function () ( autoSlide(element); // Resume the animation )); ); return this.each(function() ( var $element = $(this); autoSlide($element); startStop($element); )); ); ))(jQuery);
Both parameters of the .stop() method are set to true, because we don't need to create an animation queue from our sequence.
In pure JS, the code becomes simpler. We register a CSS transition for each slide with a certain duration:
Slide ( transition: opacity 3s linear; /* 3 seconds = 3000 milliseconds */ )
And the code will be like this:
(function() ( function Slideshow(element) ( this.el = document.querySelector(element); this.init(); ) Slideshow.prototype = ( init: function() ( this.slides = this.el.querySelectorAll( ".slide"); this.index = 0; // Cursor this.timer = null; // Timer this.action(); this.stopStart(); ), _slideTo: function(slide) ( var currentSlide = this. slides; currentSlide.style.opacity = 1; for(var i = 0; i< this.slides.length; i++) { var slide = this.slides[i]; if(slide !== currentSlide) { slide.style.opacity = 0; } } }, action: function() { var self = this; // Initializes the sequence self.timer = setInterval(function() { self.index++; // Увеличим курсор на 1 if(self.index == self.slides.length) { self.index = 0; // Обнулим курсор } self._slideTo(self.index); }, 3000); // Тот же интервал, что и у перехода CSS }, stopStart: function() { var self = this; // Останавливаем анимацию self.el.addEventListener("mouseover", function() { clearInterval(self.timer); self.timer = null; }, false); // Возобновляем анимацию self.el.addEventListener("mouseout", function() { self.action(); }, false); } }; })();
Keyboard Navigation Advanced slideshows offer keyboard navigation, i.e. Scroll through slides by pressing keys. For us, this simply means that we need to register the handling of the keypress event.To do this, we will access the keyCode property of the event object. It returns the code of the pressed key (list of codes).
Those events that we attached to the “Previous” and “Next” buttons can now be attached to the “left” and “right” keys. jQuery:
$("body").on("keydown", function(e) ( var code = e.keyCode; if(code == 39) ( // Left arrow $next.trigger("click"); ) if( code == 37) ( // Right arrow $previous.trigger("click"); ) ));
In pure JS, instead of the simple .trigger() method, you will have to use dispatchEvent():
Document.body.addEventListener("keydown", function(e) ( var code = e.keyCode; var evt = new MouseEvent("click"); // mouse click if(code == 39) ( // Left arrow self .next.dispatchEvent(evt); ) if(code == 37) ( // Right arrow self.previous.dispatchEvent(evt); ) ), false);
In decent projects it is not customary to do this. We would need to define the functionality that provides flipping in a public method, and then call it when the button is clicked. Then if another part of the program needed to implement this functionality, there would be no need to emulate DOM events, but could simply call this method.
Callbacks It would be nice to be able to attach some code to any slideshow action that would be executed when that action is performed. This is the purpose of callback functions - they are executed only when a certain action occurs. Let's say our slideshow has captions and they are hidden by default. At the time of animation, we need to show a caption for the current slide or even do something with it.In jQuery you can create a callback like this:
(function($) ( $.fn.slideshow = function(options) ( options = $.extend(( //... callback: function() () ), options); var slideTo = function(slide, element) ( var $currentSlide = $(options.slides, element).eq(slide); $currentSlide. animate(( opacity: 1 ), options.speed, options.easing, // Callback for the current slide options.callback($ currentSlide)). siblings(options.slides). css("opacity", 0); ); //... ); ))(jQuery);
In this case, the callback is a function from .animate() that takes the current slide as an argument. Here's how you can use it:
$(function() ( $("#main-slider").slideshow(( callback: function(slide) ( var $wrapper = slide.parent(); // Shows the current caption and hides the others $wrapper.find(" .slide-caption").hide(); slide.find(".slide-caption").show("slow"); ) )); ));
In pure JS:
(function() ( function Slideshow(element, callback) ( this.callback = callback || function()); // Our callback this.el = document.querySelector(element); this.init(); ) Slideshow. prototype = ( init: function() ( //... this.slides = this.el.querySelectorAll(".slide"); //... //... ), _slideTo: function(slide) ( var self = this; var currentSlide = self.slides; currentSlide.style.opacity = 1; for(var i = 0; i< self.slides.length; i++) { var slide = self.slides[i]; if(slide !== currentSlide) { slide.style.opacity = 0; } } setTimeout(self.callback(currentSlide), 500); // Вызывает функцию по окончанию перехода } }; // })();
The callback function is defined as the second parameter of the constructor. You can use it like this:
Document.addEventListener("DOMContentLoaded", function() ( var slider = new Slideshow("#main-slider", function(slide) ( var wrapper = slide.parentNode; // Shows the current caption and hides the others var allSlides = wrapper. querySelectorAll(".slide"); var caption = slide.querySelector(".slide-caption"); caption.classList.add("visible"); for(var i = 0; i< allSlides.length; ++i) { var sld = allSlides[i]; var cpt = sld.querySelector(".slide-caption"); if(sld !== slide) { cpt.classList.remove("visible"); } } }); });
External APIs So far our work scenario is simple: all the slides are already in the document. If we need to insert data into it from outside (YouTube, Vimeo, Flickr), we need to populate the slides on the fly as we receive external content.Since the response from the third-party server may not be immediate, you need to insert a loading animation to show that the process is in progress:
Previous Next
It can be a gif or a pure CSS animation:
#spinner ( border-radius: 50%; border: 2px solid #000; height: 80px; width: 80px; position: absolute; top: 50%; left: 50%; margin: -40px 0 0 -40px; ) # spinner:after ( content: ""; position: absolute; background-color: #000; top:2px; left: 48%; height: 38px; width: 2px; border-radius: 5px; -webkit-transform-origin: 50% 97%; transform-origin: 50% 97%; -webkit-animation: angular 1s linear infinite; animation: angular 1s linear infinite; ) @-webkit-keyframes angular ( 0%(-webkit-transform:rotate(0deg );) 100%(-webkit-transform:rotate(360deg);) ) @keyframes angular ( 0%(transform:rotate(0deg);) 100%(transform:rotate(360deg);) ) #spinner:before ( content: ""; position: absolute; background-color: #000; top:6px; left: 48%; height: 35px; width: 2px; border-radius: 5px; -webkit-transform-origin: 50% 94% ; transform-origin: 50% 94%; -webkit-animation: ptangular 6s linear infinite; animation: ptangular 6s linear infinite; ) @-webkit-keyframes ptangular ( 0%(-webkit-transform:rotate(0deg);) 100 %(-webkit-transform:rotate(360deg);) ) @keyframes ptangular ( 0%(transform:rotate(0deg);) 100%(transform:rotate(360deg);) )
The steps will be like this:
- request data from outside
- hide bootloader
- parse data
- build HTML
- display a slide show
- process slide shows
Let's say we select a user's most recent videos from YouTube. jQuery:
(function($) ( $.fn.slideshow = function(options) ( options = $.extend(( wrapper: ".slider-wrapper", //... loader: "#spinner", //... limit: 5, username: "learncodeacademy" ), options); //... var getVideos = function() ( // Get videos from YouTube var ytURL = "https://gdata.youtube.com/feeds/api/ videos?alt=json&author=" + options.username + "&max-results=" + options.limit; $.getJSON(ytURL, function(videos) ( // Get the video as a JSON object $(options.loader).hide( ); // Hiding the loader var entries = videos.feed.entry; var html = ""; for(var i = 0; i< entries.length; ++i) { // Разбираем данные и строим строку HTML var entry = entries[i]; var idURL = entry.id.$t; var idVideo = idURL.replace("http://gdata.youtube.com/feeds/api/videos/", ""); var ytEmbedURL = "https://www.youtube.com/embed/" + idVideo + "?rel=0&showinfo=0&controls=0"; html += ""; html += ""; html += ""; } $(options.wrapper).html(html); // Выведем слайд-шоу }); }; return this.each(function() { //... getVideos(); // Обрабатываем слайд-шоу }); }; })(jQuery);
In pure JavaScript there is an extra step - creating a method for getting JSON:
(function() ( function Slideshow(element) ( this.el = document.querySelector(element); this.init(); ) Slideshow.prototype = ( init: function() ( this.wrapper = this.el.querySelector( ".slider-wrapper"); this.loader = this.el.querySelector("#spinner"); //... this.limit = 5; this.username = "learncodeacademy"; ), _getJSON: function(url , callback) ( callback = callback || function() (); var request = new XMLHttpRequest(); request.open("GET", url, true); request.send(null); request.onreadystatechange = function() ( if (request.status == 200 && request.readyState == 4) ( var data = JSON.parse(request.responseText); // JSON object callback(data); ) else ( console.log(request.status) ; ) ); ), //... ); ))();
Then the procedures are similar:
(function() ( function Slideshow(element) ( this.el = document.querySelector(element); this.init(); ) Slideshow.prototype = ( init: function() ( this.wrapper = this.el.querySelector( ".slider-wrapper"); this.loader = this.el.querySelector("#spinner"); //... this.limit = 5; this.username = "learncodeacademy"; this.actions(); ) , _getJSON: function(url, callback) ( callback = callback || function(); var request = new XMLHttpRequest(); request.open("GET", url, true); request.send(null); request .onreadystatechange = function() ( if (request.status == 200 && request.readyState == 4) ( var data = JSON.parse(request.responseText); // JSON object callback(data); ) else ( console. log(request.status); ) ); ), //... getVideos: function() ( var self = this; // Get YouTube video var ytURL = "https://gdata.youtube.com/feeds/api /videos?alt=json&author=" + self.username + "&max-results=" + self.limit; self._getJSON(ytURL, function(videos) ( // Get the video as a JSON object var entries = videos.feed.entry ; var html = ""; self.loader.style.display = "none"; // Hiding the loader for(var i = 0; i< entries.length; ++i) { // Разбираем данные и строим строку HTML var entry = entries[i]; var idURL = entry.id.$t; var idVideo = idURL.replace("http://gdata.youtube.com/feeds/api/videos/", ""); var ytEmbedURL = "https://www.youtube.com/embed/" + idVideo + "?rel=0&showinfo=0&controls=0"; html += ""; html += ""; html += ""; } self.wrapper.innerHTML = html; // Выводим слайд-шоу }); }, actions: function() { var self = this; self.getVideos(); // Обрабатываем слайд-шоу } }; })(); Добавить метки
Sometimes I have to solve problems related to the frontend, despite the fact that I don’t like it :)
As a matter of fact, you could estimate my attitude towards everything related to “beautiful” from the design of this site, which was developed by me alone :)
However, relatively recently I was faced with the need to implement a slider in JavaScript, and this had to be done without any ready-made libraries and even without everyone’s favorite jQuery.
This need was caused by the fact that the result should have been a JS script that would be connected to the site through a third-party service. Consequently, ready-made carousels in JavaScript were no longer needed, because To integrate them, it was necessary to add a library connection to the site’s HTML code via a script tag and copy the files themselves either to the server or pull them via cdn, but this would again require editing the resource code.
How to make a JavaScript slider: the beginningToday, I think that everyone who found themselves in a similar situation began by searching for existing developments, because... when the task of making a JS carousel is within the scope of work, it should always be done as quickly as possible. And under such conditions, no one will allow you to sit and invent your own bicycles.
Customers always don’t care about how the code is written, what its architecture is, the main thing is to see the result!
As a result, as you understand, before writing a slider in JavaScript without jQuery, I decided to find a ready-made one and modify it to suit my needs. Why no jQuery? Yes, because on the target resource, where I planned to connect my slider through the service, the jQuery call in the code was located later than the script connected by the service. Therefore, jQuery constructs in my code were simply not perceived.
As a basis, I took this JavaScript image slider - https://codepen.io/gabrieleromanato/pen/pIfoD.
I decided to stop there, because... its JS code was written using OOP principles and its classes are based on prototypes, not on banal functions.
To be honest, I deeply do not understand and do not recognize the current hype around JavaScript using OOP, frameworks and other architectural things in a language that was originally intended to be a simple dynamic scripting language. Just like JS itself, I frankly dislike it with its syntactic vinaigrette, which allows the same constructions to be written in several ways.
But, unfortunately, in the modern world few people share my positions, because... this language is developing at a crazy pace and is even making attempts to win the minds of backend developers using Node.js as an alternative to Java, PHP, C#, Ruby and other monsters.
As a result, in order not to simply be left without work, you have to quietly figure out JavaScript. And in the pure JavaScript slider implementation I chose, I encountered something that, as you understand, I despise in this language. That’s why I chose it, so that there would be at least some reason to work and understand JavaScript OOP and prototype classes - otherwise I would never have voluntarily touched them in my life :)
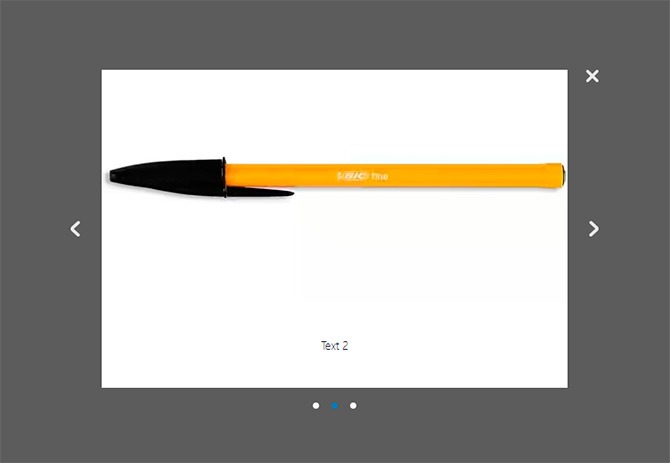
Based on the code I found, I needed to develop a slider in pure JS in a pop-up window (this thing is also called a popup, popup, etc.), which would have buttons for switching slides and clickable indicators of the current slide. It was also necessary to make a button to close this window.
This is what I ended up with.
Making a slider JS libraryFirst, I decided to implement everything wisely and make a JavaScript slider for the site in the form of a library that can be connected to the site with a single script, in which the slider components, divided into subdirectories, will be called. I decided to call it popupSlider.js in honor of its original purpose.
Its code can be found on GitHub at this address - https://github.com/Pashaster12/popupSlider.js
The library structure is as follows:

The slides folder is for slide images. Controls contains pictures of JS carousel controls (buttons for closing the slider and switching slides). And in assets there are static elements of the JS slider: HTML markup and a file with CSS styles.
Well, the popupSlider.js file is the heart of the library itself, in which the JavaScript actions of the carousel are written and a connection is established with other files. It is this one that we will connect on the site, and it will call the others.
I decided to start with the HTML markup of our JS image carousel, which in my case looks like this:
 Text 1
  Text 2
  Text 3
To design the slider in JavaScript as a popup, I used the following styles:
#slider ( margin: auto; width: 600px !important; overflow: hidden; ) #slider-wrapper ( width: 9999px; height: 343px; position: relative; transition: left 400ms linear; ) .slide ( float: left; width : 600px; position: relative; overflow: hidden; ) .caption ( width: 600px; height: 110px; line-height: 1.5; font-size: 15px; font-weight: 300; text-align: center; color: # 000; display:table; ) .caption-container ( display: table-cell; vertical-align: middle; padding: 0 20px; ) #slider-nav ( position: absolute; bottom: -36px; text-align: center; left: 50%; transform: translateX(-50%); ) #slider-nav a ( width: 8px; height: 8px; text-decoration: none; color: #000; display: inline-block; border-radius: 50%; margin: 0 5px; background-color: #fafafa; ) #slider-nav a.current ( background-color: #337ab7; ) .horizontal-controls ( position: absolute; display: inline-block; width: 12px ; height: 20px; top: 50%; margin-top: -10px; ) #prev ( background: url(../controls/arrow_left_inactive.png); left: -40px; ) #prev:hover ( background: url(../controls/arrow_left_active.png); ) #next ( background: url(../controls/arrow_right_inactive.png); right: -40px; ) #next:hover ( background : url(../controls/arrow_right_active.png); ) #cq-popup ( width: 600px; z-index: 23; left: calc(50%); top: calc(50%); position: fixed !important ; background-repeat: no-repeat; background-position: right; background-color: #fff; font-family: "Roboto","Segoe UI","Helvetica","Georgia","Calibri","Verdana" ; transform: translate(-50%, -50%) scale(1); ) #cq-popup .header ( display: inline-block; font-size: 17px; font-weight: 500; ) #cq-popup > div ( width: 500px; font-size: 22px; line-height: 36px; ) #cq-popup-btclose ( text-decoration: none; position: absolute; right: -40px; top: 0; background: url(. ./controls/btn_delete_inactive.png); height: 16px; width: 16px; ) #cq-popup-btclose:hover ( background: url(../controls/btn_delete_active.png); ) #cq-popup-bg ( position : fixed; top:0; width: 100%; height: 100%; background: rgba(51,51,51,0.8); z-index: 22; )
As a result of applying these JS styles, the carousel looks like this:
I moved both the HTML markup and CSS styles into separate files popupSlider.html and popupSlider.css, which are located in the assets directory of the JavaScript slider library. I did this on purpose so that when using this code, users could easily adjust the markup and design without messing around in the JS code, where what would have to be written out would have to be written directly.
In addition, many people still like to minimize JS to speed up site loading. So it would be very difficult to customize this solution under the specified conditions.
As a result, I decided to simply include ready-made files in the main library file popupSlider.js, which for my task took the following form:
Function Slider(element) ( this.loadStatic(); this.el = document.querySelector(element); this.init(); ) Slider.prototype = ( init: function () ( this.links = this.el.querySelectorAll ("#slider-nav a"); this.wrapper = this.el.querySelector("#slider-wrapper"); this.nextBtn = this.el.querySelector("#next"); this.prevBtn = this. el.querySelector("#prev"); this.navigate(); ), navigate: function () ( var self = this; for (var i = 0; i< this.links.length; ++i) { var link = this.links[i]; link.addEventListener("click", function (e) { self.slide(this); }); } self.prevBtn.style.display = "none"; self.nextBtn.addEventListener("click", function (e) { var currentSlideNumber = document.querySelector("#slider-nav a.current").getAttribute("data-slide"); var nextSlide = document.querySelector(""); nextSlide.click(); }, false); self.prevBtn.addEventListener("click", function (e) { var currentSlideNumber = document.querySelector("#slider-nav a.current").getAttribute("data-slide"); var prevSlide = document.querySelector(""); prevSlide.click(); }, false); self.close(); }, slide: function (element) { this.setCurrentLink(element); var index = parseInt(element.getAttribute("data-slide"), 10) + 1; var currentSlide = this.el.querySelector(".slide:nth-child(" + index + ")"); this.wrapper.style.left = "-" + currentSlide.offsetLeft + "px"; if (index < this.links.length) this.nextBtn.style.display = "block"; else if (index == this.links.length) this.nextBtn.style.display = "none"; if (index >1) this.prevBtn.style.display = "block"; else if (index == 1) this.prevBtn.style.display = "none"; ), setCurrentLink: function (link) ( var parent = link.parentNode; var a = parent.querySelectorAll("a"); link.className = "current"; this.currentElement = link; for (var j = 0; j< a.length; ++j) { var cur = a[j]; if (cur !== link) { cur.className = ""; } } }, loadStatic: function () { var self = this; var link = document.createElement("link"); link.rel = "stylesheet"; link.href = "assets/popupSlider.css"; document.head.appendChild(link); var sliderHTML = ""; var xhr = new XMLHttpRequest(); xhr.open("GET", "assets/popupSlider.html", false); xhr.send(); if (xhr.status != 200) { alert("Can not load the popupSlider.html. Got the error " + xhr.status + ": " + xhr.statusText); } else { sliderHTML = xhr.responseText; } var div = document.createElement("div"); div.innerHTML = sliderHTML; document.body.appendChild(div); }, close: function () { document.getElementById("cq-popup-btclose").onclick = function () { document.getElementById("cq-popup-bg").remove(); document.getElementById("cq-popup").remove(); } } };
A few comments about the above code. The contents of the popupSlider.js file is a single JavaScript Slider class, which, like in PHP, contains a constructor and class methods. Only in JS, the definition of a constructor, unlike PHP, is mandatory.
The constructor is defined using the following construct:
Function Slider(element) ( //constructor code)
Inside the constructor, the actions that will be performed when creating a class object must be specified.
The class methods themselves will be located inside the prototype and will be available to all instances of this JavaScript class. The JS prototype in my case is described by the following design:
Slider.prototype = ( //methods )
They will be called outside the class body as follows:
Var slider = new Slider(); slider.class_method();
And inside the class code itself, the following method is available:
This.class_method();
The main thing is not to forget that in JavaScript the value of this depends on the context of the call, so in the bodies of some methods in which it was necessary to call methods and properties of a class, there is such a construction:
Var self = this; self.class_method(); //to access a method that is one level higher than the code of the described method
It seems like I talked about all the nuances of writing code. Now a few words about the methods of our JavaScript class, which contain descriptions of the JS actions of the image carousel.
loadStatic()
The very first method called when creating an instance of a class in the constructor. Responsible for adding slider markup and a file with styles to the HTML code of the website page.
First, a new link tag is created in memory using the JavaScript function document.createElement() and the values of all the necessary attributes are assigned to it, including the path to the CSS file with the JS slider styles. And finally, it is added to the HTML page using the JavaScript appendChild() method at the end of the head section, where styles should be.
Next, we do the same for the file with the HTML markup of our slider in pure JavaScript. There’s just a small nuance here: you can’t just include an HTML file inside the same one, as we did with a CSS file. There are special libraries for this, for example, in order to include HTML in HTML, the lib from w3.org is excellent - https://www.w3schools.com/howto/howto_html_include.asp
But then it would have to either be included in the slider library itself, or ask users to install it themselves. But all this is suboptimal, because... requires a lot of body movements and slows down the site loading speed due to additional scripts.
In the end, I decided to take the contents of the HTML file inside the JavaScript code and load it into a new div element created in memory, just like I did earlier to include a CSS file in JavaScript. The generated element is included at the very end of the body section of the HTML code of the site page.
If you want to insert a div with slider markup not just at the end of the body, but in a specific container, you can use the following code instead:
Var div = document.createElement("div"); div.innerHTML = sliderHTML; document.body.appendChild(div);
Enter the following, specifying the desired identifier of the target container (in my case, the HTML JS slider will be located in the element with id popupSlider):
Var target = document.querySelector("#popupSlider"); target.innerHTML = sliderHTML;
The method, which is called in the constructor after loadStatic(), is needed to initialize the class properties corresponding to the main HTML elements that we will access in the following code.
At the end, the navigate() method is called.
navigate()
In this method, the actions that occur when you click on the slide switch buttons and navigation elements located under the slider itself are indicated in the form of circles.
For convenience, I moved the JavaScript code for changing slides into a separate slide() method, but in this one I just attach it to the click event for each round button in the loop.
When you click on the “previous slide” / “next slide” buttons, as you can see, I decided to just emulate a click on the corresponding circle, defining the desired one relative to the current one, which has a CSS class current.
slide(element)
The method “responsible for the magic” of the JavaScript carousel itself, which contains the code that changes the positions of the slides. At the very beginning, the setCurrentLink() method is called, which we will talk about a little later.
The JS slider navigation button object in the form of a circle is passed to it as an input parameter.
The slide switch itself works like this:
At the end of the method, the behavior for the “previous slide”/”next slide” buttons, designed as left/right arrows, respectively, is described. If the current slide is the first of the entire list, then the button to go to the previous slide is hidden. If the latter, then remove the button to move to the next slide.
setCurrentLink(link)
This method of our JavaScript slider class is responsible for highlighting the navigation round button corresponding to the current element. Those. if we have the second slide selected, the second button will be highlighted.
The object of the button that should be selected as the current one is passed as an input parameter to the function.
The logic for highlighting the current element is simple:
The very last method of the class, which defines the action when clicking the close button of the slider in the form of a cross. Here, in fact, the code is the most understandable of all contained in the JS slider class.
When you click on the close button, which is accessed by its identifier, the slider element and the element that sets the translucent background are removed from the page. They are also, in turn, obtained by unique identifiers.
The method itself is called inside the previously described navigate(), which contains all the scenarios of actions taking place on our JavaScript slider.
By the way, if you want to close the slider when you click outside of it, then just add the following code to this method:
Document.getElementById("cq-popup-bg").onclick = function () ( document.getElementById("cq-popup-bg").remove(); document.getElementById("cq-popup").remove() ;
JavaScript slide show based on the developed librarySometimes in practice you may need to make a JS scrolling carousel, which is often called a slide show. In my case this was not required, but I still decided to make one based on the final library code for a case where it might be useful.
In fact, the JavaScript implementation of a slide show differs quite slightly from a regular slider. The only difference is that in a slide show, the slides switch automatically at a given time interval, while in the case of a regular JS carousel they change manually using navigation elements.
SlideShow: function (timeout) ( var sliderCount = this.links.length; var self = this; this.slideCycle = setInterval(function () ( var currentSlideNumber = document.querySelector("#slider-nav a.current").getAttribute ("data-slide"); var slideId = parseInt(currentSlideNumber, 10) + 1; self.slide(document.querySelector("")); ), timeout); )
I think it’s clear what’s happening here. To create this method, I copied the code from the click event of the manual slide buttons and placed it inside a JavaScript call to the setInterval() function, which performs the specified action after a specified period of time.
The action script is passed as the first argument as an anonymous function, and the time interval is passed as the second, which I decided to make as a variable whose value is passed when slideShow() is called.
The only modification to the code inside setInterval() that was required was to determine the number of slides and compare the index of the current slide with it to cycle the automatic switching.
Well, in order for this code to work, the method itself must be called. I decided to do all this in the same navigate(), which is precisely a collection of all sorts of scripts. I placed the call at the very end, passing as an argument the value of the time interval for automatically changing slides in our JS slide show (I chose 2000 milliseconds or 2 seconds, you can change this number as necessary):
self.slideShow(2000);After this, check the operation of the JavaScript slider, not forgetting to clean your browser.
In theory, everything should work. If not, study the errors in the browser console and share them in the comments.
As a result, we got a JS slide show in which the slides switch automatically and in a circle, i.e. when the last slide is reached, the show goes into a new loop and the show starts again from the very first element.
When working with various JS libraries for image carousels and reviews, I noticed that developers actively use this practice, but with some addition. In all the solutions I've seen, the automatic slide show is interrupted if the user makes a manual switch. So I decided to do the same in my library.
To interrupt the automatic display of JavaScript carousel slides, I decided to use the standard JS function clearInterval(), to which I pass as an argument the identifier of the time interval returned by the setInterval() function when it is set.
As a result, I got the following code, which I decided not to write as a separate method:
ClearInterval(self.slideCycle);
And placed it in places where the actions are described when clicking on various navigation elements, i.e. in the following:
Link.addEventListener("click", function (e) (...)); self.prevBtn.addEventListener("click", function (e) (...)); self.nextBtn.addEventListener("click", function (e) (...));
It is better to call clearInterval() closer to the click event itself, the main thing is before it, and not after it.
Integration of JavaScript slider on the siteSo, our slider in pure JS is ready. Now all that remains is to connect it to the site.
To do this, you need to perform the following steps sequentially, which are standard actions when integrating any third-party JavaScript libraries in general.
Step 1 . We copy the library files to our website in a separate directory.
Step 2. Add the following code to the HTML of the pages where the slider will need to be displayed, placing it before the closing body tag:
Step 3. We place the following code for calling the JS carousel in any existing JavaScript file, which is included on the page after connecting the slider itself:
Var aSlider = new Slider("#slider");
As you can see, this code is essentially creating an object of the Slider class, which is contained in popupSlider.js. That is why it should be called only after connecting the class file itself to the page.
Adding new slides to a JavaScript carouselEverything is very simple here. Since our slides are taken from a separate directory of the slides library, when adding new pictures you will just need to throw the necessary files into it, having first given them the same size as the others.
And then in the code of the file assets/popupSlider.html add a new block to the container with id slider-wrapper :
 Text
Text
In principle, you can simply copy a similar existing one and change the path to the image file and the text of the signature (if it is needed at all).
You will also need to add a new navigation element in the form of a circle, because... At the moment, its automatic addition has not yet been implemented. To do this, you will need to add the following code to the container with the slider-nav id, writing it at the very end:
The value of the data-slide attribute must be greater than the largest value of the other elements. It is enough just to increase the maximum current by one.
Packing JS carousel into a single scriptThat's it, the JavaScript slider is ready and connected. I personally recommend using this option in practice if you need it at all :)
To speed up its operation, by the way, you can further compress static components: CSS, HTML and JavaScript files. I didn’t do this and offer you minified code, because there are a lot of frontend build systems now: Gulp, Grunt, Webpack and others. And each of them has its own algorithms for compressing and connecting files.
In addition, minified results may work differently on different OSes. In general, there are many reasons.
And the source codes themselves, I think, are not so heavy that they need this procedure. But if you need them, then configure the minification yourself, taking into account your OS and collector.
As I wrote at the very beginning, in order to solve the task initially set for me, I needed to get a single JS file for the correct use of my slider through a third-party service on the site. For this reason, I, strictly speaking, did not use ready-made third-party libraries.
Then the option of a single JavaScript carousel script will come in handy for you, because... all content will be contained directly in it, including HTML/CSS code, which in the case of a library is stored in separate files.
The script in my case consists of two parts. The first part contained the contents of the popupSlider.js file, which I will not present a second time. Insert it yourself, removing the description of the loadStatic() method and its call from the class code, because we won't need them.
The second part of a single JavaScript slider script for the site is a handler for the DOMContentLoaded event, which occurs when the page content is loaded.
There we will add the carousel JS code to the HTML/CSS page and create an object of the Slider class, which is equivalent to activating the slider itself.
Schematically the code looks like this:
/* contents of popupSlider.js without describing the loadStatic() method and its call */ document.addEventListener("DOMContentLoaded", function())( var str = "\ \ /*css code*/ \ /* html code */ "; var div = document.createElement("div"); div.innerHTML = str; document.body.appendChild(div); var aSlider = new Slider("#slider");
Since in my case the option of uploading files to the server was completely closed, I had to upload the image files of the JavaScript carousel controls to the cloud and instead of the paths to them in the HTML and CSS code, write the links generated during saving.
If you don’t have such difficulties, then you don’t have to change anything, but don’t forget to copy the slides and controls library directories to the server and specify the correct paths to them.
Custom JS slider - development prospectsTo be honest, I don’t plan to engage in targeted support and development of the solution I created :) At the moment, there are a bunch of similar sliders and a small cart, which, unlike mine, have their own history, are thoroughly tested and are supported by a large community of users and developers.
It’s somehow not interesting for me to start this whole journey from scratch alone and create another bike, and I don’t really have time for it. But, on the other hand, this JavaScript slider is an excellent opportunity to practice development by refactoring its code and implementing new interesting functions that may not yet exist.
So if you, like me, need a code base for experiments and you have at least some extra free time, copy the code of the JavaScript slider I described or join the contributors on GitHub. The repository is open, and I provided a link to it at the beginning of the article.
If you want to improve your front-end skills on my creation, I can even give you a small list of edits and improvements that the code needs and which may be of interest to you in terms of their implementation:
The list of edits I have given is, of course, not final and can be supplemented. Write about your suggestions, thoughts and wishes in the comments below the article and share with your friends via social networks to also involve them in the development.
I ask you not to judge my code strictly, because, as I already said, I do not consider myself a Frontend specialist and am not. I am also open to all your comments on coding style and hope that I can learn something from you, and you from me, i.e. fulfill the main purpose of developing and supporting OpenSource products.
Join the project communities, subscribe to updates, and you can even help me financially using the form right under the article itself, if I was able to help you with something or you just like what I do :)
That's all I wanted to say! All the best! 🙂
P.S. : if you need a website or need to make changes to an existing one, but there is no time or desire for this, I can offer my services.
More than 5 years of experience in professional website development. Working with PHP, OpenCart, WordPress, Laravel, Yii, MySQL, PostgreSQL, JavaScript, React, Angular and other web development technologies.
Experience in developing projects at various levels: landing pages, corporate websites, online stores, CRM, portals. Including support and development of HighLoad projects. Send your applications by email [email protected].
Hello everyone!
Developers of all stripes, when creating their next web project, are often interested in the question of how to present their users with various types of images, be they photographs or sets of pictures. For this, the inquisitive minds of the online space, for the most part of course this is a “bourgeois” space, are looking for more and more new solutions to create spectacular, colorful, and most importantly functional slide shows and photo galleries. For the most part, they are customized by developers to fit the design of the template of the web project being created, or in the form of plugins and modules for a specific site management engine. It’s worth looking at modern templates for, not a single theme, with rare exceptions, can do without some kind of plug-in slider or simple image rotator. So it’s understandable that many web developers want to have something like this in their arsenal and surprise their readers to the fullest by effectively presenting images on their sites.
Continuing the ongoing series of reviews of emerging new solutions when creating, I decided to put together a more complete collection of the most interesting and effective slideshows and photo galleries I have ever encountered, created using the magic of jQuery.
I would like to warn you right away that the resources discussed in the review are mainly in English, but I think whoever needs it will figure it out intuitively or with the help of translators, of whom there are a dime a dozen. And if you search hard enough, you can find descriptions of the technique for creating some galleries and sliders in Russian, since many of our web developers translate while working on a particular project, first for themselves, and then post detailed descriptions of all their manipulations for free access .
For example, this is what I did, when I was working on the mechanism for creating , I first found a gallery option that was suitable for me in the burzhunet, translated it for a better understanding of what I was doing, and in the future this turned out, I dare to hope, not a bad article about using the Highslide script, with examples of work in various application variations.
And so, enough of the unnecessary lyrics, let's move on directly to the review, watch, read brief explanations and choose from a huge number of new jQuery plugins and scripts for implementing interesting image sliders, photo galleries, slide shows on your sites: with automatic and manual change sliders, background image sliders, with and without thumbnails, etc. and so on...
Of.Site | Demo


A complete, customizable jQuery image gallery with slideshow elements, transition effects, and multiple album options. Compatible with all modern desktop and mobile browsers.

A tutorial on how to create a full screen gallery using jQuery. The idea is for a thumbnail of the featured full-screen image to appear to the side, with a reflection as you move through the images using the arrows or mouse click. Large images move up or down in a slideshow style depending on the transition you choose. The ability to scale the image, which makes the image in the background viewable in full screen mode or adjusted to the page size.
Parallax Slider
Parallax Slider is an interesting solution for organizing the display of images in the form of a slide show with manual control elements. The original placement of thumbnail pictures attracts attention. The official website has a complete breakdown of how to integrate and configure the slider.

Minimalistic Slideshow Gallery with jQuery is an excellent image gallery with elements for automatically changing pictures, as well as the ability to manually control display and select images from a drop-down block with a grid of thumbnails. One of the disadvantages is the lack of viewing full-size images, but this is the minimalism of this gallery.

This is a full-screen slideshow with automatically changing images, no mind-blowing effects, everything is simple and tasteful.

Minimit Gallery is a highly customizable jQuery plugin with a large selection of image transitions. Using the Minimit gallery, you can organize a display of images in the form of a carousel, slide show, a simple rotator, and a regular image scroller.

is a tiny (2kb) jQuery plugin that provides a simple, no-nonsense way to display images as a slideshow.

is a nice looking javascript gallery, with intuitive controls and seamless compatibility on all computers, iPhones and mobile devices. Very easy to install and configure

Unlike many Javascript and jQuery image sliders, Slider.js is a hybrid solution, powered by CSS3 transitions and animations.

This is a one-page template for creating various presentations in HTML5 and CSS3.

Diapo slideshow is an open source project. If you want, you can suggest changes or improvements. You can download and use it for free, and nothing and no one is stopping you from using this slider in your projects. The slider is easy to customize, there are interesting transitions between the presented content, and you can place anything in the slider, it works quite quickly, without any jambs.

is nothing more than another tool for creating slideshows on websites and other web projects. Supports all modern browsers, horizontal and vertical animations, support for custom transitions, callback API and much more. You can use any HTML elements in your slides, it is understandable and accessible for beginners, and is distributed completely free of charge.
JavaScript Slideshow for Agile Development
Implement your slideshows with this awesome jQuery plugin. Highly customizable tool so you can build your content presentation according to your requirements. To provide easier integration with external data or data from your CMS, the . This is a new version and written from scratch. The developers tried to describe the entire process of working with their brainchild very clearly and intelligibly.

is a jQuery plugin that allows you to transform unordered lists into slideshows with attractive animation effects. In a slide show, you can display a list of slides, either using numbers or thumbnails, or using the Previous and Next buttons. The slider has many original animation types, including cube (with various sub-types), pipe, block and more.

A complete set of tools for organizing all kinds of presentations of various content on your web projects. The bourgeois guys did their best, including almost all types of various sliders and galleries using the magic of jQuery. Photo slider, photo gallery, dynamic slide show, carousel, content slider, tabs menu and much more, in general there is room for our irrepressible imagination to run wild.

This is a jQuery slideshow plugin that is built with simplicity in mind. Only the most useful set of functions is packed, both for beginners and advanced developers, providing the opportunity to create simple, but at the same time very effective slideshows that are user-friendly.

— a simple slider built on jQuery, simple in all respects, not requiring special skills, I think many will find it useful for implementing slide shows on their websites. The plugin was tested in all modern browsers, including the slow IE browser.

jbgallery is a kind of user interface widget written in javascript of the jQuery library. Its function is to show one large image as the background of the site in full-screen mode, several images in the form of a slider. All viewing modes have viewing controls. It’s an interesting solution in its own way, and in some cases it’s not even standard.

It is an easy-to-use jQuery plugin for displaying your photos as a slideshow with transition effects between images (you've seen more interesting ones). jqFancyTransitions is compatible and extensively tested with Safari 2+, Internet Explorer 6+, Firefox 2+, Google Chrome 3+, Opera 9+.

is a freely distributed jQuery plugin for viewing images and other information in the Lightbox form. Popup window with controls, shaded background and all that, simple and tasteful.

Another jQuery plugin from the Lightbox series, although it weighs outrageously little (9 KB), but has a ton of functionality. There is a decently designed interface that you can always improve or customize using CSS.

Already from the name it becomes clear that there is nothing fancy, we have a very simple automatic image scroller, with completely missing controls. Who knows, maybe this slider will attract your attention precisely with its minimalism.

Image rotator with different types of transitions. It works both automatically and by clicking, and is quite easy to set up.

— a full-fledged image gallery rather than just a slider. Preview of thumbnails and the ability to select transition effects, full support for all browsers, detailed description of integration into a web project and free distribution.

This is an implementation of ready-to-use slideshows using scriptaculous/prototype or jQuery. Horinaja is somewhat of an innovative solution because it allows you to use a wheel to scroll through the content placed in the slider. When the mouse pointer is outside the slideshow area, scrolling occurs automatically; when the pointer is placed over the slideshow, scrolling stops.

This is a feature from a series of simple image scrollers, albeit with viewing controls, and therefore works in both automatic and manual modes.

s3Slider is a jQuery plugin that creates a slideshow from an unordered list of images and can be easily implemented on any web platform.

This is a jQuery plugin that is optimized for processing large volumes of photos while saving bandwidth.
Vegas Background
Vegas Background jQuery plugin allows you to add beautiful full-screen background images to web pages, all with slideshow elements. If you carefully study the intricacies of working with the plugin, you can find many interesting solutions, of course, only if you need it.

— a slider as a slider, no more, no less, with captions for images or announcements of articles and simple controls, at random.

is a lightweight (about 5 KB) javascript for organizing image viewing. Automatic resizing and scaling of large images allows you to view the picture in full size within the browser window

Version 4 of PikaChoose jQuery Image Gallery is available! Pikachoose is a lightweight jQuery slideshow with great features! Integration with Fancybox, excellent themes (though not free) and much more are offered to your attention by the plugin developers.

Checks the number of images in your listing and dynamically creates a set of photo links as digital navigation. In addition, clicking on each image will move forward or backward, and you can also scroll through the images depending on the area you click on the picture (for example: clicking on the left side of the picture will move the slides back and forth, respectively, for the right side of the image).

Another jQuery slider that will fit perfectly into any WordPress template.

Another development of “Nivo”, like everything the guys from this studio do, the plugin is made with high quality, contains 16 unique transition effects, keyboard navigation and much more. This version includes a dedicated plugin directly for WordPress. So for all fans of this blogging engine, Nivo Slider will be just right for you.

jQuery plugin that allows you to quickly create a simple, effective and beautiful slider for images of any size.

Pirobox is a lightweight jQuery “lightbox” script, viewing is carried out in a pop-up block that automatically adjusts to the image size, with all controls.

The creators of this gallery offer a rather original presentation of the pictures. The images are displayed in miniatures in the form of a wave, when you click on the thumbnail, we will see a medium-sized version of the image, click a second time and you will see a large image. You can consider this an experiment, but you must admit that something new and unusual is always interesting.
Fullscreen slideshow with HTML5 and jQuery
To create slideshows and display pictures in full screen mode, the developers used the already familiar Vegas jQuery plugin, which contains many ideas and techniques previously described in detail in the group’s articles. The presence of HTML5 audio elements and the style of transitions between images are attractive.


Another development from the Codrops team, a full-fledged and functional image gallery, but there’s no point in describing it, you have to see it.

Image slideshow, pictures disappear right before your eyes, the effect is simply wonderful.

Is a JavaScript image gallery framework built on top of the jQuery library. The goal is to simplify the process of developing a professional image gallery for web and mobile devices. You can view it in a pop-up window or in full screen mode.

We are quietly starting to get used to it and wait for new works from the Codrops team. Please get an excellent image slider with a magnificent 3D transition effect to view images in full screen mode.

Another WordPress plugin from the slideshow organizer series. Easily integrates into almost any design and offers many customization options for experienced users and non-experienced ones too.

Another plugin written for WordPress, it will make it much easier to organize a slideshow of pictures or any other content on your blogs.

A good slideshow plugin for integration into WordPress. Xili-floom-slideshow is installed automatically, and personal settings are also allowed.

Slimbox2 is a well-established WordPress plugin for displaying images with a Lightbox effect. Supports automatic slideshow and resizing of images in the browser window. And in general, this plugin has many advantages over other plugins in this series.

This plugin/widget allows you to create dynamic, controlled slideshows and presentations for your website or blog running on the WordPress engine.

This WordPress plugin transforms embedded gallery images into a simple and flexible slideshow. The plugin uses FlexSlider jQuery image slider and user personal settings.

is a WordPress plugin for organizing slideshows of photos, pictures from SmugMug, Flickr, MobileMe, Picasa or Photobucket RSS feed, works and displays using pure Javascript.

A simple slider for WordPress and more. Nothing superfluous or cumbersome, the work is done in a minimalist style, the emphasis is on stability and speed, it connects perfectly to the blog management engine.

In my opinion, Skitter is one of the best sliders that supports working with WordPress. I am attracted by the stability and speed of operation, not too prominent controls, transition effects and a fairly simple connection to the theme.

is a plugin for WordPress with which you can easily and quickly organize an image gallery on your website with the ability to view it in slide show mode. The display can be either automatic or fully controlled with demonstration of thumbnails and captions for images.
Of.Site | Demo

Shows all pictures for a post/page as a slideshow. Easy installation. This plugin requires Adobe Flash for the version with transition animations, if Flash is not found the slider works as usual.

Another simple slider for WordPress, it shows images for posts and short announcements of articles. I use just such a plugin on this blog from time to time.

Meteor Slides is a jQuery WordPress slider with over twenty transition styles to choose from. The author called the plugin a “meteor”, probably implying the speed of operation; perhaps I didn’t notice anything meteoric.

oQey Gallery is a full-fledged image gallery with slideshow elements for WordPress, with built-in video and music capabilities.

It is a slideshow with flash animation elements for viewing images and videos on websites and blogs. You can place this slider on any website, in any size and with any content you like.

Flash Gallery plugin turns your regular galleries into stunning image walls, with support for multiple albums per post, full screen viewing and slideshow mode.

WOW Slider is a jQuery image slider for WordPress with amazing visual effects (Explosion, Fly, Blinds, Squares, Fragments, Basic, Fade, Stack, Vertical Stack and Linear) and professionally designed templates.

Promotion Slider is a jQuery plugin that makes it easy to create a simple slideshow, or implement multiple zones of rotating ads on a page, because it is a highly customizable tool, you will have full control over what you show in the slider and over how the module works generally.
| Demo

New in version 2.4: support for drag-n-drop photo sorting directly through the WordPress editor, as well as the ability to add photo links to main images. (IE8 may have some bugs, works fine in all major browsers. The authors promise full support for IE8 in the future.)
| Demo

The final chord of this review will be this plugin for WordPress, another slider with interesting visual effects for selecting and changing images.
I look at everything described above and am amazed, what a flight of fancy these people have, but this is not all that various web developers have come up with lately on the topic of organizing images on web projects. It's great that it is now possible to implement such wonderful solutions for creating galleries and slide shows.
I dare to quietly hope that in this collection you will find something interesting for yourself, create your own unique gallery or slider, to the delight of your users and, of course, your beloved self, and where would we be without this...
When developing a web project, you probably catch yourself thinking that it would be nice to find some simple but useful photo galleries or slide shows. But imagine that a huge number of galleries developed in AJAX, CSS, javascript, Lightbox, and Flash are already in your hands! We hope that this article will be extremely useful to you, and you will be able to find exactly what you were looking for.
Free slideshow and lightbox scripts
This is a free Flash gallery designed by Christopher Einarsrud.

Create dazzling presentations, slideshows, banners using Active Slideshow Pro. The utility aims to increase the likelihood of success when creating slideshows, and gives you control over the slides, text, transitions and audio.

Select your favorite images to fill the entire screen. This application, based on a combination of PicLens and Media RSS technology, allows you to easily add slideshows to your own website. These exported galleries can also be used as full-fledged web pages.

This is a new generation of free photo gallery systems. The web application is not cluttered with unnecessary functions and settings. But this does not mean that the utility is bad; it can offer you what you need to work with images.

It is an online service for viewing almost all media formats published on the Internet. The service is written in javascript and CSS, which is why it is easy to design it as you wish.

Creating transitions between images.

Galleriffic was inspired by the Cycle plugin created by Mike Alsup. But with functionality for producing large volumes of photographs.


A utility for displaying images, HTML content, and multimedia in a Mac lightbox style that floats on the surface of a web page.

If you're making a cute little gallery, then a handmade layout will do just fine. But if we are talking about large galleries, then you are unlikely to want to write all this manually; there are other ways, namely Auto Generating Gallery!
Dynamic Image Gallery and Slideshow - no longer works


Probably everyone has already seen Barack Obama's website, which is clearly the best of those websites that were made for presidential candidates. It not only exemplifies modern creative design, but also provides ease of operation and navigation.

A jQuery plugin that automatically detects the extension of each media file and adds it to the appropriate player.

A free gallery developed on a compact, modular and object-oriented platform using the MooTools javascript library. Point it to a folder with images and it will automatically download them using PHP.

Flickrshow is a lightweight, cross-browser JavaScript slideshow that provides an easy way to display Flickr images on your site's pages.
Protoflow - the resource has ceased to exist

The application is written in javascript using Prototype and Scriptaculous to do the heavy lifting. It also uses Reflection.js to create a reflection of the image.

A very beautiful template developed in Flash. Each image you flip leaves a small reflection on the floor. The dimensions of the displayed images are edited in the template files. It's also very easy to add a background image.

A photo gallery developed in AJAX and aimed at ease of management. Based on javascript and the AJAX library for MooTools. No server side scripting required! Flash knowledge is also not required. Even if your images are on Flickr, SmugMug, or your own server, this utility will be able to display them.


A free web app that lets you display Flickr or Picasa images on your blog or website.

Photo gallery with smooth transitions, pictograms and pleasant reflections.

Free Flash image viewer with the ability to change the design. The interface consists of a lot of postcards scattered around the table.

A javascript platform that allows you to quickly develop web pages using AJAX. Don't understand anything about javascript? This is no longer a problem. The application is designed to look more like HTML and CSS, so that anyone with a basic knowledge of website building can create the next generation of web applications using AJAX as well.


This template uses the excellent Lightbox javascript developed by Lakesh Dakar.

A photo album maker that allows you to create and publish rich and interactive photo galleries on your website.

This application allows you to post photo galleries on your website, even if you don't understand anything about web programming. All this thanks to the MooTools javascript platform. Just add some javascript and CSS files.


Free 3D Flash image viewer with the ability to change the design.
Publications on the topic
-
 File database brakes - how to avoid (from recent experience) 1s 8 slows down
2. Features of the program. Often, even with optimal settings, 1C works very slowly. Performance drops especially dramatically...
-
 Error: We were unable to configure Windows updates
Having trouble updating Chrome on your computer? You're probably seeing one of the following messages: The update failed. Updates...