
How to install downloaded Windows 7 without a disk. How to reinstall Windows: step-by-step instructions

The article discusses a way to install Windows without a flash drive and disk, bypassing the boot devices that are (or should, at least) each user. But, as in the article, we will only use the installation files on a hard drive with working Windows: we will install a second Windows without a flash drive or disk.
Hello everyone, today we continue to solve the issues of installing Windows on “problem” devices. Now we are faced with a task like:
- There is a laptop or computer that does not have or does not have ANY device for exchanging data through connected drives. USB ports do not function, disk drive is missing or not working. Only hard drive, live Windows and Internet
- there is a hard drive that will subsequently move to another configuration ( to another computer or laptop); Using this method, you can prepare to install the system right now by connecting and setting up a SATA hard drive through the box, and the system will install itself as soon as you insert this HDD into your “computer without a drive and USB” and turn it on. However, some steps and commands will be different when installing on the SAME DISK with a new partition and ANOTHER HARD DRIVE.
STRAIGHTAWAY . In articles like this one, I try to cover all the stages. It's not water, but it makes a lot. So try to read everything carefully or skip something: I describe all the processes in such detail with the goal that even the most novice user can do this.
How to install Windows without a flash drive and disk: what do you need?
- working version of Windows (starting from Vista)
- among others, an installed archiver program (RAR or 7zip, any will do) - it will work with the Windows image of your version (Windows Vista, 7, 8 and 10); You can also use the ISO image reader (Daemon Tools)
- a hard drive with a single partition, the size of which is sufficient to create an additional partition and install another system, or a new unformatted HDD
How to install Windows without a flash drive and disk: main stages of work
Go.
- go to the disk management console (command diskmgmt.msc from string Execute) and look what we have:
click to enlarge
As you can see, there is only one volume and it is not broken. Let's close the console.
- launch the console as administrator cmd and run the utility in it diskpart. Let's check the list of volumes by analogy with the Disk Management console, but from the “point of view” of the utility. All the same:

I'll pinch off a piece for a future system. It seems to come from nowhere, but Windows itself will decide where to go for free space. I decided to split the disk approximately in half, and enter the split command shrink as:
Shrink minimum=10240 desired=51200

- minimum=xxxx – minimum volume size (10 GB)
- desired=xxxx – desired size of the future volume. Both numbers are in megabytes, so I just multiplied:
50 GB x 1024 = 51200 MB
This is what you see in the picture above.
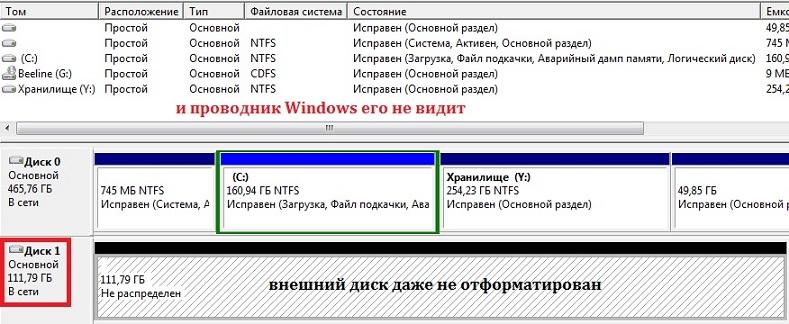
But okay. You can check the results of the utility in Disk Management Consoles. The new volume is not displayed in Explorer, a letter is not assigned to it (no letter - no disk), but the console already sees it:

- create a partition in the new volume:
and assign a letter to it with a command like:
assign letter X
where X is the desired letter (I have F):

The system explorer instantly wakes up and is about to format it. You can do this through Windows (File) Explorer, and Windows Explorer is called that, or you can use the command from the terminal cmd(at the same time I’ll give it a name – label to distinguish it from other volumes):
format fs=ntfs quick label="Windows7"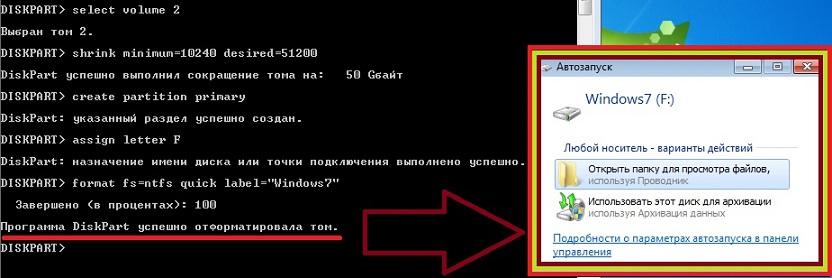
And again a new window (now with Autorun): the system is completely ready to work with the created partition.
- now attention: ACTIVATE the volume; Moreover, after a reboot, the system will look for bootloader files on it ( the same operation can be performed in the disk management console, marking the disks as Active step by step - this is what we will do at the end, after installation; in the meantime, get used to the console). There aren't any yet, so don't turn off the computer:
And we continue. What will he say? Diskpart per team list volume:

We finish working with diskpart by typing the command
- Download the Windows image. Open it using an archiver or image reader and mark the following files:
- Sources
- Boot
- Bootmgr
- Setup.exe
These four folder files must be copied to the newly created partition (I have volume F). This will take time.
In the cmd console you need to enter the last command. It will force Windows to correctly assess the situation and begin its own installation (watch the drive letters):
F:\boot\bootsect.exe /nt60 F:
Once the specified files are on disk, reboot the computer. The installation has started. In the installer menu I select drive F. We are waiting for the download to complete.
How to install Windows without a flash drive or disk: manipulating boot records.
- The new operating system is ready and more or less functional (no device drivers). However, when you reboot, you will not see the previous OS in the boot menu. What to do? Right - you need to reactivate the disk with the previous system (C:) or mark active Reserved 100 MB partition (this is exactly what I will do: I initially have it, and this is very good for security purposes). You already know how to do this in two ways (focus on the size of the volumes):
- more thorny - team active drive letter from the running utility diskpart(see above article)
- faster - from the disk management console, marking the required disks as active. See:


Please note - the drive letters in this Windows are different
bcdboot F:\Windows
where F is the drive letter with the new Windows. That's all, you can reboot and check. You can do this without restarting Windows. You can find out about the list of systems available in the boot menu again from the console by entering:

Everything is in place. Now, with a little practice, you can install Windows without a flash drive or disk very quickly.
How to install Windows without a flash drive and disk: installation on an external HDD
In this paragraph I will repeat the procedure, but this time we will use a hard drive in a box. We connect via a USB port (the speeds here are not the same as directly via the SATA interface, but the situation is the most realistic). By the way, most of the operations here are also available using third-party programs, for example AOMEY Partition Assistant, which may already be installed. But Windows itself can do almost everything.
- Let's look at the Control Console from working Windows:
- open the cmd console as administrator and enter the commands, starting with launching the Diskpart utility:
- X is the letter automatically assigned to the new volume (I bet it's E). Let's go out as a team exit, disconnect the box, and the disk is transferred from the box to any other configuration, where the missing drivers are installed in place.
Few people know, but using a hard drive it is possible to install a new OS on your PC. The HDD is responsible for storing all system files, the command line is also subject to it.
The process of “updating” the OS itself takes place using command line directly at the stage of turning on the PC. This method allows you to clear all partitions and create new ones. To begin the first stages of system installation, you need download disk image the version of the operating system you need. You can find this very image on the Microsoft website or through some torrent client. Be careful when downloading files through third-party resources. The image will be installed on the computer as an archive, which must be unpacked to drive C. Now the user is required to follow the instructions below:

As you can see, this method of installing an OS is practically no different from methods involving a disk or flash drive.
It should be mentioned that you need to pay attention to the bitness of the downloaded system. In other words, if you had a 32-bit system, then you should install a 32-bit one.
Installation image and virtual drive
The simplest method of installing Windows is to download a disk image from the network and run it through virtual drive. The entire process of downloading the archive is absolutely no different from what we discussed just above, but you do not need to unpack this archive. The image format itself makes it possible to install any application, etc., without using a disk drive, but using a virtual one.
All users of the XP/7 operating systems should definitely download additional software that provides the ability to work with disk images. Starting from the eighth version, this is not required, since the software is already installed on the system.
Now I should give you some useful recommendations that you should follow when installing a new OS.
- Not worth it download files from “suspicious” resources
- be careful with downloading the OS with built-in modifications. As a rule, all modifications contain viruses and spyware, the purpose of which is to steal your personal data, passwords and credit card numbers.
- Download images only from trusted resources, for example, from the official Microsoft website. You can also consider the option of specialized utilities for installing a new OS. In the selected utility that can work with disk images, organize a virtual disk with the new operating system. To create a new disk, you should select the desired iso image in the utility. Immediately after this, the program itself will provide the necessary instructions. The entire creation process lasts no more than one minute. Then double-click on the disk that appears, after which the OS installation process begins.
In the process, you will format the local drive that contains the current version of Windows. Simply put, before installing a new system there, you will have to erase all old data from it. The contents of the remaining disks should remain unchanged. But it’s better to play it safe and first copy absolutely all data from your computer that you are afraid of losing to the cloud or to physical media.
If paid programs are installed on your computer, be sure to read their documentation for the rules for working with licenses when reinstalling Windows, otherwise you may lose them.
2. Create a boot disk or flash drive
If you want to install/reinstall a licensed version of Windows, make sure you have the appropriate activation key. Even if you are already using an activated system and just want to install the same version again, the old activation key may come in handy again.
- If you already have a bootable USB flash drive or disk with the version of Windows that you are going to install, you can proceed to step 3. Otherwise, you need to download a Windows image from the Internet and burn it to any of the listed media according to the instructions below.
- Decide on the version of Windows you will be installing and check that your computer meets its system requirements. This information can be found on the official Microsoft website or on the disk with your purchased Windows. Don't forget to also check that your computer supports the new version's bit depth: 32 or 64 bits. To be on the safe side, you can install a version with the same bit depth as your current version of Windows.
- To create a bootable USB flash drive with any Windows image found on the Internet, you can use the program (with UEFI support) and proceed to step 3.
And below I will tell you how to create a boot disk or flash drive with an official system image using Windows 10 as an example.

3. Boot the system from a disk or flash drive
Now that you have physical media with the desired Windows image, you need to go to the special BIOS software environment and select a disk or flash drive here as the boot source.

Perhaps instead of the classic BIOS you will see a more modern graphical interface. In addition, even in different older BIOS versions, the settings may differ. But in any case, the procedure will be approximately the same: go to the boot menu, select the desired media as the source and save the changes.
After this, the computer should boot from the selected disk or flash drive.
4. Run the installation wizard
 If you did everything correctly, the Windows Setup Wizard will appear on the screen. Further actions are no more complex than installing an ordinary office program. All you have to do is follow the system prompts and wait for the files to be unpacked. Unless you have to select a local disk to install the operating system and format it.
 Also, be prepared to enter your activation key during the process. But if you are reinstalling Windows 10 that has already been activated on your computer, then you can skip the step with the key.
Once the installation is complete, your computer should boot into normal operating mode.
5. Install drivers
 softotor.net
 Modern versions of Windows load drivers themselves. But if, after reinstalling the system, you notice that the video card, speakers, or anything else is not working correctly, you can use the driver autoload utility. For example, the free Driver Booster is suitable.
Having completed all of the above, you can get to work. The computer must be ready.
How to reinstall Windows 7 without a disk? This topic is relevant today. Moreover, it concerns the new OS developments that appeared not so long ago. And now in more detail! Windows 7, or simply “seven,” is one of the latest operating systems from Microsoft, and at the same time the most successful of them. At least that's what many experts think.
What does installing from a boot drive mean?
How to reinstall Windows 7 without a disk? The standard model for installing any operating system is from a hard drive. And in addition to a disk, a drive can be used as it. The installation option from a flash drive is quite reliable. As with a disk, the host system is installed at a lower level in the computer's software hierarchy. In other words, “from under the old system.” In addition, this method of loading a new “OS” allows you to format the hard drive on which the previous system was located. This will protect the OS from old programs that may be malicious, as well as from “under-deleted” parts of files that are invisible at first glance, but remain in the system and interfere with its normal operation. Such “scraps” of unnecessary documents hinder the speed of the system. Malfunctions may occur. You should consider how to reinstall Windows 7 without a disk and without a flash drive.
If there is neither a flash drive nor a disk
The standard installation method is not always possible. For example, if there is no disk, but there is an OS file on the computer or laptop itself. What to do in such a situation? How to reinstall Windows 7 without a disk or flash drive on a computer? The system file can be presented in the form of an image, an archive, or simply an installer. To install the system from an image, you must run a special program. It is necessary for reading/writing exactly this kind of formats. For example, Daemon Tools. Having launched the image in the program and mounted it, you should select the installation file. If the OS is available as an archive, then there is no need to unpack it. How to reinstall Windows 7 without a disk or flash drive on a computer in such a situation? Click on the archive and select the installer file from the drop-down list. It has ".exe" permission. This file is located mainly towards the end of the list of archive contents. There will be no difference in launching the installer even if the operating system is simply located in some folder.
What do you need to remember?
If you are installing a production system for the first time, there are some rules to keep in mind. You need to know them if you need to answer the question of how to reinstall Windows 7. Whether this will be done without a disk or with it does not play an important role.
Firstly, the installation of a new OS may occur due to the computer being infected with viruses. This is a useless process if it is not accompanied by formatting. The fact is that infected files do not disappear anywhere with this type of installation of the main working environment. They are saved in the previously installed system. Subsequently, they will simply switch to a new shell.
Secondly, the best, and most importantly, the safest installation method is still to use a hard drive. Reinstalling Windows 7 without a disk in such a situation is not difficult. It is enough to have a bootable USB flash drive. If it does not exist, then it is created using simple steps. There is a program specifically for this that writes images to media. For example, Ultra ISO. Accordingly, if the files are not in disk image format, you should create one. Usually the same Daemon Tools is used for this.
How to reinstall Windows 7 without a disk on a laptop or computer? It should be remembered that when installing a new system, you should always use only verified files. The fact is that with modern progress, handicraft assemblies are found everywhere. When downloading Windows 7 from the Internet, no one can say with confidence that it is not “hard-wired” with malicious software.
First actions
How to reinstall Windows 7 without a disk on a laptop or computer? Let's look at how to do this in the simplest way. Find the folder with the operating system and run the installation file. After this, the installation window will open. It will display the ability to configure the following settings:
For our country, naturally, you should choose the Russian language option everywhere.
After clicking the “Next” button, a window with the “Install” button opens. By clicking on installation, we go to the license agreement. We accept it by checking the box next to the appropriate inscription.
The most popular types of systems
The installer may contain several system options. The most commonly used:
If you are wondering how to reinstall Windows 7 without a disk or flash drive on a laptop or computer, then you should understand that this is an incomplete list of possible systems.
Don't forget about the bit depth
All programs of this type differ in their bit depth, that is, 32-bit (X86) and 64-bit (X64). This parameter is indicated after the system name. For example, Windows 7 Ultimate X86.
The choice of the level of the system to be installed should be made based on the power of the computer's resources. If the laptop or PC is relatively weak, it is recommended to install X86 OS (32-bit version). It is best to install Windows 7 X64 if the RAM size exceeds 4GB. The thing is that the 32-bit version is simply unable to “see” such a volume.
What to do when formatting is needed?
Let's get back to how to reinstall Windows 7 without a disk. The next OS installer window will offer the option of completely installing the system on your computer and updating. You must opt for a full installation. Otherwise, only an update to the pre-existing operating system will occur.
After selecting the preliminary parameters, a window appears with the ability to select a hard drive. This method will not allow you to format it. This is due to the fact that the installer was launched from a running system. If it is necessary to format the disk, which is desirable when installing the OS, then this point can be bypassed. This happens as follows. Until the new “seven” is installed, take any other partition of the disk and clear it of files (move them if you need them, and just don’t touch them if you don’t need them). After that, format the partition. You should not change the drive letter in this situation. When answering the question of how to reinstall Windows 7 without a disk or flash drive on a laptop or computer, you should keep in mind that when you boot the new system, the drive letters will change automatically. The formatted partition should be selected for system installation.
If cleaning is not needed
If formatting is not necessary, you can simply select the drive to install the new system and continue. In such a situation, the old system will remain in the “Windows old” folder. It will be located on the “C” drive. It will also be possible to start and work from it. But it is not recommended to do this, since two identical operating systems on the same disk may “conflict”. This, in turn, will lead to a malfunction. The old OS can be removed or moved to another medium. There is another very significant point that you should remember when answering the question of how to reinstall Windows 7 without a disk on a laptop from Asus, Lenovo, HP, etc.
If the partition on which the new OS is installed does not have enough space for two operating systems, the installation process will not be able to start. This occurs due to the fact that the old shell is not removed and continues to occupy space. It is important to remember that frequent reinstallation of the operating system leads to disk destruction. This can be avoided by using different types of defragmenters. For example, the Victoria program.
This problem is not so bad for computers. There is nothing easier than buying a new hard drive and installing it. This is easy to do yourself. However, if the hard drive breaks on a laptop, then, in addition to the cost of the disk itself, you will have to pay for repair services. You should know about this if you are interested in the question of how to reinstall Windows 7 without a disk from a flash drive.
What do you need to enter after installation?
Having selected the disk (partition) for installation, click “Next”, which will lead to unpacking and subsequent installation of the new Windows 7. This process is fully automated. It will last for 25-30 minutes, depending on the power of the computer (laptop). After completing the installation, you need to enter the following parameters:
If the input is incorrect, the system will tell you about it and ask you to correct the symbols, indicating the error.
Entering the password and key
During installation, you will be asked to assign a password and a hint in case you lose it. After this, a window appears in which you must enter the key to activate the operating system. If it is missing, simply click “Next” after unchecking the box next to “Activation while connected to the Internet.” Then you will be able to activate the system in any convenient way. This is done as follows:
You need to protect your computer from external threats
Let's return to the question of how to reinstall Windows 7 without a disk on a computer or laptop. The next step is the protection settings. You can use the recommended service, or you can postpone the decision and configure it later. Protecting your computer is one of the most important aspects of installing an operating system. The fact is that the security of the equipment will depend on how well you limit access parameters from other people’s devices. This menu is nothing more than offering an option to select a data protection set created by Microsoft specialists. It should be understood that they already provide and set the recommended parameters. By skipping this point, many people forget to perform the configuration manually in the future, putting their files at risk.
So, having decided on security, click “Next” and configure the time and date (time zone, etc.) in the new window.
Next, the installer displays the network parameters window. It can be either home or public. Due to this, the settings in the Internet properties are changed. As for the general understanding, the home network looks more conservative regarding the configuration. A public network, on the contrary, provides greater access to the resources of a laptop or computer.
What can be changed after installation?
This was the last step, after which you will get a practically empty desktop of the newly installed Windows 7 operating system. Basic settings (for example, adding the My Computer folder or user files to the desktop) can be done by left-clicking on the desktop space and selecting the "Personalization" tab.
There you can also set a different background image, change the default theme (usually Windows 7 Aero), change the screen resolution, and much more.
Standard licensed Windows 7 comes without additional programs. However, among the numerous assemblies you can find options that include many additional elements, software, and so on.
Conclusion
This article described how to reinstall Windows 7 without a disk or flash drive. You will install it on a netbook, laptop, computer - it does not play a big role. The principle of the installation process for a new system is the same.
Most laptop users are faced with situations where they need to reinstall the operating system, often while keeping the licensed Windows. This publication discusses several methods of how to reinstall Windows 7 on a laptop, and also talks about the nuances of the process of installing the OS on laptops from different manufacturers.
Restoring the system using a Windows 7 backup
Most mobile computer manufacturers create backup storage for 7 distributions or any other OS. Reinstalling Windows 7 on a laptop from these memory areas is done using built-in utilities.
To start the reinstallation, reboot your laptop and press:
- for Windows on an HP laptop on F11;
- on an ASUS laptop on F9, boot immediately when you start;
- for Windows 7 on a Lenovo laptop on F11;
- On an Acer laptop, the key combination Alt + F10 is suitable;
- for Windows 7 on a SAMSUNG laptop on F4.
After pressing the desired key, instead of the standard Windows 7 boot, the OS recovery interface will open:
After downloading the program, follow the instructions to restore Windows.
But remember that all settings will be reset, and data from the previous copy of the system may be deleted.
Reinstalling from disk
When reinstalling from disk, remember that to restore the license you need to use a distribution kit with exactly the same OS as was installed previously. You can find out the version of the installed system on a sticker, which is usually located on the back of the laptop. By the way, the license key for your copy of Windows is also located there.

Remember that when you reinstall, a new operating system is deployed from the disk, and to avoid problems in the future, you should delete the data from the previous Windows.
This is accomplished by formatting the system partition, so take care in advance to transfer all the necessary data from the selected hard drive volume to install Windows. It is not advisable to transfer installed programs, since this will lose connection with the registry, and many of them may not start. Don't be lazy, install them again after replacing the OS.
The installation disk distribution does not include drivers for all laptops, so download the drivers for your device in advance from the manufacturer’s official resource. If this is not done, then after installation there is a high probability of the following problems occurring:
- The network card does not work;
- Wi-Fi does not work;
- Applications do not launch.
If you reinstalled the OS without this, then to troubleshoot network equipment you will have to download the driver distribution using another computer and transfer them using removable media, so before reinstalling, do not forget to play it safe and download drivers for the network card and Wi-Fi module.
To begin the installation process, insert the disc into the drive and restart your laptop. After your computer starts, open the boot menu and select boot from DVD.

This dialog is called up on most laptops using the F12 key, and on HP devices the combination F9 + Esc is used.
Often on older computers this function is missing, so you will need to open the BIOS and edit the boot priority yourself. To go to the BIOS on laptops, manufacturers use the following keys:
- Acer, Asus, Samsung, Lenovo - F2;
- hp - F10 + Esc .
If the brand of your device is not in this list, then find out the actual key for it on the window that loads when you turn on the PC.

The BIOS interface from different manufacturers is not similar in appearance, but the sequence of actions for changing the boot priority is almost identical. Navigation through the windows of a running BIOS of all versions is carried out using the arrows on the keyboard and the Enter, Esc, +, - keys.
Sequence of actions for BIOS AMI:

Sequence of action for BIOS Phoenix-Award:

Windows installation
After making a change to the BIOS and rebooting, a dialog will appear with the message: “Press any key to boot from CD or DVD.”

Further installation of Windows 7 is not difficult, do the following:
- Press any keyboard key.
- Wait until the file unpacker completes; a screen with the entry “Windows is loading files...” is displayed.

- In the dialogue " Windows installation» Specify the language and click on the Next button.

- In the window that appears, click on the large Install button.

- Select the version of the system to install that has a license code. You will need to enter it after reinstalling Windows 7.

- Agree to the licensing terms.

- Select installation method - " Full installation».

- Select the drive volume on which you are going to install the OS and prepare it by clicking on the item " Disk setup».
 There are situations when a reserved drive partition is present in the list; be sure to select another volume.
  If you have disks with a capacity of more than 250 GB, it is worth splitting them into several. Typically, a separate partition of up to 100 GB in size is allocated for system installation.
- Format the selected drive partition. A warning will appear that all information on it will be deleted. Confirm your consent, because you have previously saved all the necessary data. Wait for the installation to complete and click on Next.

- Wait for the installation process to complete; on average, it lasts from fifteen to twenty-five minutes, the duration depends on the configuration of the laptop.

- Fill in the fields provided with your username and PC name.

- Protect your account with a password, or you can skip this step.

- Enter the key copied from the sticker on your laptop.

- Select your security options.

- Set the date and time.

- If you have a network connection, specify the connection type.

Reinstalled Windows is ready to go. If you changed the boot priorities in the BIOS, return the hard drive to first place in the list, otherwise the computer will constantly try to start from the DVD.
Reinstallation from a flash drive
Many compact PCs, such as netbooks, do not have a DVD drive. Therefore, the question arises of how to properly reinstall Windows 7 on them. The answer is simple - use removable media.
To reinstall from a flash drive, you need to download the Windows 7 distribution image in ISO format and write it to this media using a special utility. Remember, in order to properly reinstall a licensed Windows system, you need to download a container with the same OS version. The flash drive itself must have a capacity of at least four gigabytes.
Burning Windows to media using the most popular utility among analogues Ultra ISO is performed according to the following algorithm:

The installation flash drive is ready, but to start the installation, you need to select " USB-HDD" How to set up the BIOS is described above, all steps are similar, you just need to select another entry from the available list. Further installation is no different from installing Windows 7 from DVD.
Often after reinstalling Windows does not work. To solve this problem, take another OS distribution and repeat the installation process. In addition, many users ignore the need to format the partition and reinstall the seven on a disk that already has an installed copy of the system. Avoid this as it can also cause problems.
Conclusion
This article covered reinstalling Windows 7 in several ways. If there is no backup copy, then this procedure should be carried out from a disk on which exactly the same version of the OS is recorded. Some laptops do not have a CD-ROM, so reinstallation can only be done using external media, for example, a flash drive.
Video on the topic
Publications on the topic
-
 Limited functionality mode in word (Word) - how to remove it?
Users of older versions of Word receive a message indicating reduced functionality mode when opening documents. The question arises that...
-
 What does frozen order mean?
Sometimes it happens that a product that was previously paid for by customers may, after some time, acquire the status “Order frozen”....