
Firmware for htc desire. Step by step: How to install custom firmware on HTC? Preparing HTC to install custom firmware

Every smartphone owner wants to make their device better, turn it into a more functional and modern solution. If the user cannot do anything with the hardware, then anyone can improve the software. HTC One X is a high-end phone with excellent technical characteristics. How to reinstall or replace the system software on this device will be discussed in the article.
Considering the NTS One X from the point of view of the firmware capabilities, it should be noted that the device in every possible way “resists” interference in its software part. This state of affairs is due to the manufacturer’s policy, therefore, before installing the firmware, you should pay special attention to studying the concepts and instructions and only after fully understanding the essence of the processes proceed to direct manipulations with the device.
Every action carries a potential danger to the device! Responsibility for the results of manipulations with the smartphone lies entirely with the user who carries them out!
As with other Android devices, the success of HTC One X firmware procedures is largely determined by proper preparation. We carry out the following preparatory operations, and before carrying out actions with the device, we thoroughly study the proposed instructions, download the necessary files, and prepare the tools that are supposed to be used.

Drivers
The simplest way to add interaction components to the system software tools with memory partitions One X is the installation HTC Sync Manager proprietary program manufacturer to work with your smartphones.


Backing up information
Using the methods described below for installing system software into the device in question involves erasing user data contained in the smartphone. After installing the OS, you will have to restore the information, which is impossible without a previously created backup. The official way to save data is as follows.


Necessary
To operate with HTC One X memory partitions, in addition to drivers, the PC as a whole will need functional and convenient software tools. Be sure to download and unpack the package with and into the root of drive C:. Below in the description of methods we will not dwell on this issue, implying that Fastboot is present in the user’s system.

Run in different modes
For installation of various system software you will need to switch the phone to special operating modes - "BootLoader" And "Recovery".


Unlocking the bootloader
The instructions for installing modified firmware below assume that the device's bootloader is unlocked. It is recommended to carry out the procedure in advance, and this is done using the official method offered by HTC. And it is also assumed that before performing the following, Sync Manager and Fastboot are installed on the user’s computer, and the phone is fully charged.
- Follow the link to the official website of HTC Developer Center and press the button "Register".
- Fill out the form fields and press the green button "Register".
- Go to your mail, open the letter from the HTCDev team and click on the link to activate your account.
- After activating your account, enter your username and password into the appropriate fields on the HTC Developer Center web page and click "Login".
- In area "Unlock bootloader" click "Get Started".
- On the list "Supported Devices" you need to select all supported models and then use the button "Begin Unlock Bootloader" to proceed to further steps.
- We confirm our awareness of the potential danger of the procedure by clicking "Yes" in the request window.
- Next, check both checkboxes and press the button to go to unlocking instructions.
- In the instructions that open, skip all the steps

and scroll through the instructions to the very end. We only need a field to insert an identifier.
- We put the phone into mode "Bootloader". In the list of commands that opens, select "FASTBOOT", then connect the device to the PC using a USB cable.
- Open the command line and write the following:
cd C:\ADB_Fastboot

- The next step is to find out the device ID value required to obtain unlock permission from the developer. To obtain information, you need to enter the following in the console:
fastboot oem get_identifier_token

and start executing the command by pressing "Enter".
- Select the resulting set of characters using the arrow buttons on the keyboard or with the mouse,

and copy the information (using the combination "Ctrl" + "WITH") in the appropriate field on the HTCDev web page. It should look like this:

To go to the next step, click "Submit".
- If the above steps are completed successfully, we receive an email from HTCDev containing Unlock_code.bin– a special file for transferring to the device. Download the file from the letter and place the downloaded file in the Fastboot directory.
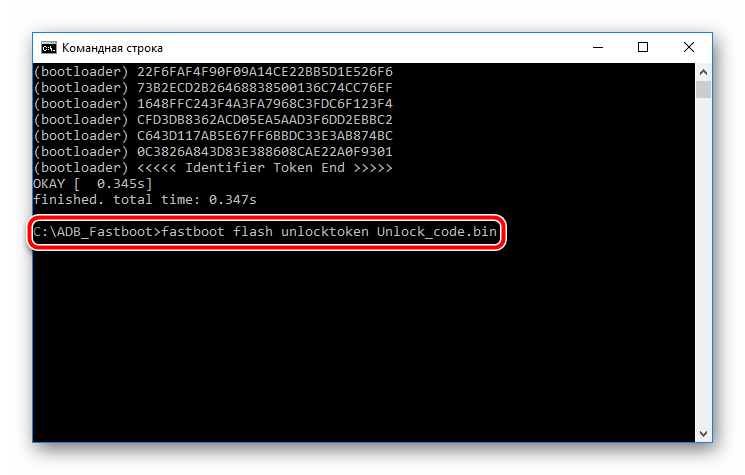
- We send the command via the console:
fastboot flash unlocktoken Unlock_code.bin
- Executing the command above will result in a prompt appearing on the device screen: "Unlock bootloader?". Place a mark next to "Yes" and confirm readiness to start the process using the button "Inclusion" on the device.
- As a result, the procedure will continue and the Bootloader will be unlocked.
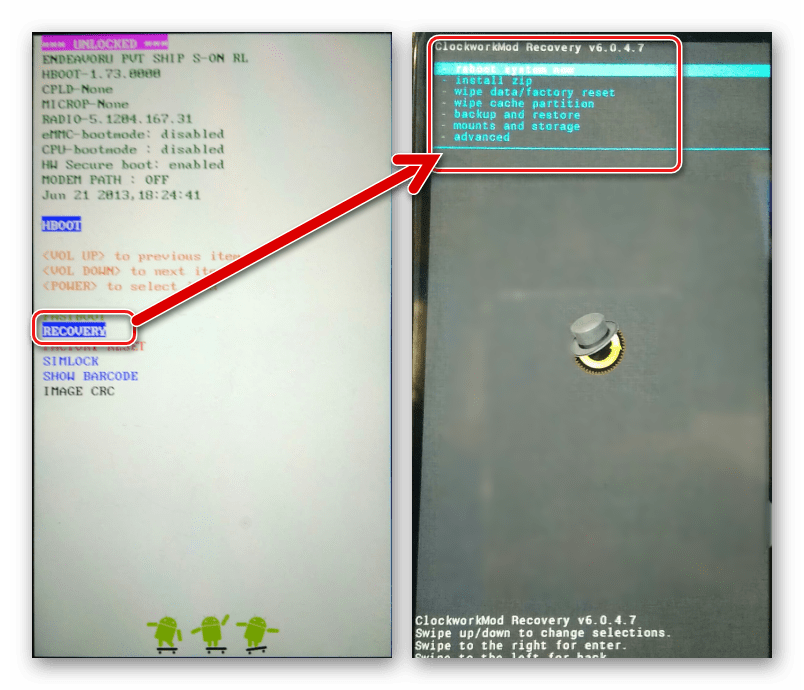
- Confirmation of successful unlocking is the inscription "***UNLOCKED***" at the top of the main mode screen "Bootloader".


Installing custom recovery
For any serious manipulations with the HTC One X system software, you will need a modified recovery environment (custom recovery). Provides a lot of possibilities for the model in question. Let's install one of the ported versions of this recovery environment into the device.


Firmware
In order to bring certain improvements to the software part of the device in question, upgrade the Android version to a more or less current one, and also diversify the functionality, you should resort to using unofficial firmware.
To install custom and ports, you will need a modified environment, which can be installed according to the instructions above in the article, but first you can simply update the version of the official software.
Method 1: Android application “Software Updates”
The only method of working with the smartphone system software officially approved by the manufacturer is to use the tool built into the official firmware "Software Updates". During the life cycle of the device, that is, while system updates were released from the manufacturer, this feature regularly reminded itself of itself with persistent notifications on the device screen.

Today to update official version The OS or make sure that the latter is up to date, you need to do the following.


Method 2: Android 4.4.4 (MIUI)
Software from third-party developers can breathe new life into your device. The choice of a modified solution lies entirely with the user; the available set of different packages for installation is quite wide. As an example, below we use the firmware ported by the MIUI Russia team for HTC One X, which is based on Android 4.4.4.

- We install the modified recovery using the method described above in the preparatory procedures.
- Download the software package from the official web resource of the MIUI Russia team:
- Place the zip package in internal memory apparatus.
- Loading the phone into "Bootloader", further in "RECOVERY". And we ALWAYS make a backup by selecting the corresponding items in CWM one by one.
- We do wipes (cleaning) of the main system partitions. To do this you will need an item "wipe data/factory reset".
- Let's go to "install zip" on the main CWM screen, indicate to the system the path to the zip package with the software, having previously selected “choose zip from storage/sdcard” and start installing MIUI by clicking “Yes – Install...”.
- We are waiting for the success confirmation message to appear - "Install from sd card complete", back to main screen environment and select "advanced", and then reboot the device into Bootloader.
- Unpack the firmware with an archiver and copy it boot.img to the catalog from Fastboot.
- We put the device into mode "FASTBOOT" from the Bootloader, connect it to the PC if it was disconnected. Run the Fastboot command line and flash the image boot.img:
fastboot flash boot boot.img
- Reboot into updated Android using the item "REBOOT" on the menu "Bootloader".
- You will have to wait a bit for the MIUI 7 components to initialize, and then carry out the initial system setup.

It is worth noting that MIUI on HTC One X works very well.


Additionally. If the smartphone does not boot into Android, which makes it impossible to copy packages into memory for further installation, you can use OTG capabilities. That is, copy the package from the OS to a USB flash drive, connect it via an adapter to the device and, during further manipulations in recovery, indicate the path to "OTG-Flash".


Method 3: Android 5.1 (CyanogenMod)
In the world of Android devices, there are not many smartphones that have successfully performed their functions for more than 5 years and at the same time are popular with enthusiastic developers who successfully continue to create and port firmware based on new versions of Android.

Probably, HTC One X owners will be pleasantly surprised that a fully functional Android 5.1 can be installed on the device, but by doing the following, we get exactly this result.
Step 1: Installing TWRP and new markup
Among other things, Android 5.1 brings with it the need to re-partition the device’s memory, that is, change the size of partitions to achieve best results in terms of stability and the ability to perform functions added by developers in new version systems. You can repartition and install a custom one based on Android 5 only using a special version.


Step 2: Installation of custom
So, the new markup is already installed on the phone, you can proceed to installing custom firmware with Android 5.1 as the basis. Let's install CyanogenMod 12.1 - an unofficial firmware port from a team that needs no introduction.


- "Platform" - "ARM";
- "Andriod" — "5.1";
- "Variant" - "nano".
To start downloading, press the round button with the image of an arrow pointing down.


Unpack the package cm-12.1-20160905-UNOFFICIAL-endeavoru.zip and move boot.img from it to the catalog with Fastboot.

Fastboot flash boot boot.img

Then we clear the cache by sending the command:
fastboot erase cache


and enjoy the new work Android versions, modified for the smartphone in question.

Method 4: Official firmware
If there is a desire or need to return to the official firmware from HTC after installing custom ones, you need to again turn to the capabilities of modified recovery and Fastboot.

- Download the version of TWRP for the “old markup” and place the image in the Fastboot folder.
- Download the package with the official firmware. The link below is OS for the European region version 4.18.401.3.
- Download the image of the HTC factory recovery environment.
- Unpack the archive with the official firmware and copy it boot.img from the resulting directory to the folder with Fastboot.

We put the file there recovery_4.18.401.3.img.img, containing stock recovery.
- We flash boot.img from the official firmware via Fastboot.
fastboot flash boot boot.img - Next, install TWRP for the old markup.
fastboot flash recovery twrp2810.img
- We disconnect the device from the PC and reboot into the modified recovery environment. Then we go the next way. "Wipe" - "Advanced Wipe"- mark the section "sdcard" - "Repair or Change File System". We confirm the start of the change process file system button "Change File System".
- Next, click the button "FAT" and move the switch "Swipe to Change", and then wait for the formatting to finish and return to the TWRP main screen using the button "Home".
- Select an item "Mount", and on the next screen - "Enable MTP".
- Mounting done in the previous step will allow the smartphone to be identified in the system as a removable drive. We connect One X to the USB port and copy the zip package with the official firmware to the internal memory of the device.
- After copying the package, click "Disable MTP" and return to the main recovery screen.
- We clean all partitions except "sdcard", going through the points: "Wipe" - "Advanced Wipe"- selection of sections – "Swipe to Wipe".
- Everything is ready to install the official firmware. Choose "Install", indicate the path to the package and begin installation by sliding the switch "Swipe to Confirm Flash".
- Button "Reboot System", which will appear after the firmware is completed, will reboot the smartphone into the official version of the OS; you just need to wait for the latter to initialize.
- If desired, you can restore the factory recovery with the standard Fastboot command:
fastboot flash recovery recovery_4.18.401.3.img
And also block the bootloader:
fastboot oem lock
- Thus, we get a completely reinstalled official version of the software from HTC.


In conclusion, I would like to once again note the importance of scrupulously following the instructions when installing system software on the HTC One X. Carry out the firmware carefully, evaluating each step before implementing it, and achieving the desired result is guaranteed!
The HTC Desire S smartphone is already about 4 years old. Despite the long wait for the fourth version of Android, this device it remained with Android 2.3.5 and Sense 3.0 on board.
If you are still the owner of this device, then we are glad to present you detailed instructions by updating to the unofficial version 4.2.2.
It is worth warning that after flashing the phone will return to its factory state and all your contacts from the message will be erased. Take care of their safety. The data on the SD card will remain.
Before proceeding directly to the firmware process, you need to have:
- HTC Sync – drivers for this model.
- Elements of Android SDK - a utility for working with a smartphone.
- Recovery is a system menu that allows you to work with the firmware, make backups, etc.
- The GAPPS set is a set of applications from Google.
HTC Desire S firmware instructions
- We install HTC Sync, which will help you fully work with your phone.
- Unzip the android-tools.zip archive to the root of drive C. The path should be C:\android\.
- The next stage is. Use the instructions at the link.
- Install Recovery, which you downloaded earlier. This step will later help you install the firmware on HTC Desire S and make a backup copy in case the flashing fails.
Installing Recovery on HTC Desire S
In order to enter the bootloader, you first need to jerk the battery for a few seconds. Next, hold down the Volume down key, and then the Power key. The desired menu should appear on the screen.
The next step is to connect the phone to the computer and select fastboot, after which you need to press the power key.
The Recovery archive must be unzipped into the working directory C:\android\.
Installation of recovery is carried out through the command Windows string. You must enter these commands (one by one):
fastboot flash recovery recovery.img
5. Formatting your smartphone. This stage is needed in order to eliminate any future errors in the operation of the smartphone due to the fact that files from the previous firmware remain.
To perform cleaning, go to custom recovery as already described and follow the steps wipe data/factory reset and wipe cache/dalvik cache.
6. Direct installation of the firmware. By turning on the data transfer mode via USB toggle usb storage copy the files from “CM10.1 Firmware from Andromadus” and “GAPPS Set”, which you downloaded above, and using the item install from sdcard install these archives.
7. The last step is flashing the kernel. From the firmware archive you need to copy boot.img to C:\android\ on your computer. By putting the phone into fastboot mode command line flash the kernel using this command:
fastboot flash boot boot.img
After that, all that remains is to reboot the phone on which firmware 4.2.2 will be installed! Keep a couple of screenshots new firmware for HTC Desire S s510e:

How to flash HTC Desire?


HTC Desire is a communicator (smartphone) with operating Android system. It was developed by HTC. Let's talk in more detail about how to flash HTC Desire in various ways.
Preparing for firmware
Firmware is the replacement or updating of a phone's software with a new one. Flashing a phone's firmware is the same as reinstalling Windows on personal computer. To successfully install the firmware, you must complete the following steps:
- To obtain superuser rights (root rights) on the website unrevoked.com, download the “Unrevoked” program. Root rights are a special account in UNIX systems. The owner of such an account can perform all operations without exception.
- Launch the downloaded program and select the “Hboot Driver” file. Next, follow the instructions to install the HBOOT driver. You can download drivers for self-installation at unrevoked.com.
- Next, you need to disable Desire and enable it in the HBOOT system. This can be done using the Power and Volume Down buttons. Press them at the same time.
- Then the smartphone must be connected to the PC using USB cable. We wait until the word HBOOT USB PLUG appears and go to “Device Manager”. Right-click on Android device 1.0 and select the “Update drivers” section.
- Click on “Search for drivers on this computer.” Next, you need to select the folder into which the drivers were unpacked.
- Exit the HBOOT menu. The Volume Up, Volume Down buttons (moving through menu items) and the Enter button will help you with this.
- In normal mode, start your smartphone and enable USB debugging mode.
If you installed the HTC Sync application, uninstall it, but leave the drivers. Next, launch Unrevoked and connect your device to your PC. Give your consent when asked for information. After that, wait. The device will reboot and the message “Unrevoked 3 Painless root and reflash” should appear.
How to flash HTC Desire: main part
The procedure will be as follows: first download the firmware. You can download it on the website 4pda.ru. Recommended firmwares are RuHD and InsertCoin.
Next, you need to clear all user data. To do this, in the device menu, select “Settings” -> “Privacy” -> “Data reset”. This can also be done using the firmware recovery mode. To do this, go to the Recovery menu, select the “Wipe data/factory reset -> “Yes” section. Due to this, the firmware modules will not match.
How to install the firmware file for HTC Desire?
- In the Recovery menu, select the “install zip from sd-card” file. If necessary, disable or enable signature verification (Clockwork).
- Next, find the firmware zip, select it and run it.
- When the installation is complete, you will see “Installation completed”. Restart your smartphone and wait for the download to start.
Firmware installation usually takes about fifteen to thirty minutes. As a result, you should get a new version of Android.
How to expand memory for applications?
The phone firmware itself takes a lot free space. To download various applications, in a smartphone may not be enough free memory. In this case, it will help you special program. For this:
- Download the "ROM Manager" program from the Market and run it.
- Next, find the item “Create partitions on the SD card.” Select ext partition size.
- The device should reboot and the partition will be created.
You can also read other articles on our website on similar topics: and.
Almost every user of HTC phones on the Android platform is faced with the need to flash their own gadget. This allows you to rid your phone of many problems and freezes, improve performance and change the interface.
However, this is quite difficult to do. In our article we will tell you how to flash htc android on one's own.
Preparing your phone
Initially, the phone needs to be prepared for firmware. To do this you need to do the following:
- Get ROOT rights. To do this, you need to download and install the z4root program.
- Download the Unrevoked program.
- Turn off Desire and run it in HBOOT menu mode. To do this, press the Volume Down and Power keys simultaneously.
- Connect the phone to the computer using a USB cable (you need to wait for the next text message to appear - HBOOT USB PLUG).
- Open "Device Manager".
If you did everything correctly, you will see an unidentified Android device there. Right-click on it and select “Update Drivers”.
To exit the HBOOT menu, you need to turn off the phone and then start it in standard mode.
Main part
- Download the required firmware. It is recommended to download the necessary files from the official website htc.com.
- Save all important information on your gadget. Please note that for Reserve copy files and programs, you can use the Titanium Backup utility.
- Charge your phone (at least 60%).
- Clear all user information. To do this, you need to go to “Settings” through the phone interface, and then select “Privacy” and “Data reset”. This is required to ensure that there is no mismatch between the firmware modules.
Installation
- In recovery, select “install zip from sd-card”.
- Find the downloaded zip firmware.
- Let's launch the program. If everything is fine, the installation will begin and you will see the appropriate messages. When the firmware is finished, you will see the inscription “Installation completed”.
- Reboot your phone and wait for the download to start.
As practice shows, you can flash an HTC in fifteen to thirty minutes. The first start after this operation may take a long time. Don't worry about this. If you do everything correctly, you will receive current version Android.
Possible risks
If you plan to flash your device yourself, without resorting to the help of specialists, then do not forget that there is always a possibility of certain problems arising:
- Loss of official warranty. Today, any change to the phone software entails loss of warranty.
- Inability to turn on the device. This can happen for various reasons. Perhaps something was installed incorrectly or the user made a mistake. However, there is no need to worry. As practice shows, the phone can almost always be revived without contacting a service center.
For the firmware to be installed successfully, perform all the steps described above carefully and carefully. In addition, you can always find a training video that shows the HTC flashing procedure step by step.
Most recently on the site developer.htc.com appeared official firmware For HTC Desire. This update to version Android 2.3 Gingerbread Although it is available for download to anyone, it is not available from the update menu in the smartphone itself. This is due to the fact that Desire has a rather small amount of memory and the developers do not recommend upgrading to 2.3 ordinary users. The updated firmware is missing background images, the Facebook application and some programs HTC Sense.
1. Preparing the smartphone for firmware.
The first thing you need to do is save your contacts to a memory card. To do this, click on the screen "Telephone", go to the address book (where all contacts are displayed) and press the hardware button menu. From the menu that appears on the screen, select "Import Export" and choose "Export to SD card" and get the file on the flash drive "pcsc_pcsc_00001.vcf" or another type with an extension. vcf file.
We copy all the data from the SD card to the computer, just in case, because photos and possibly others are stored there necessary files. We format the SD card to delete all no longer needed data on the card. After all, all programs will have to be installed again, and they will create directories on the card for themselves. Let's go "Settings" — "Device memory" — "Remove memory card" — "Clear SD Card".
Reset HTC Desire before the initial settings, then all installed applications will naturally disappear, but the phone will immediately free up all possible free space in the memory of the device itself and there will be no problems if free space is needed during the firmware. So let's go to "Settings", Further "Device memory" and the lowest point will be "Factory reset". After the reset, I ended up with 136 megabytes of free space.
2. Download the firmware.
Well, of course, you need the firmware itself, download it either from our website using this link - or from the official HTC website.
After downloading, we see 4 files in the archive:
- Flashlight_signed_07072011.apk- flashlight
- teeter_signed_07072011.apk- ball game
- htc_wallpaper.zip– background pictures (archived)
- – the firmware itself (archived)
Because Android 2.3.3 takes up more space, then standard programs (flashlight and toy with a ball), as well as “wallpapers” were removed by HTC developers from the firmware and made into separate applications that can be installed if you still need them.
I'll get ahead of myself and say that after resetting to factory settings, the same android 2.2(official update) on my HTC Desire, 136 megabytes freed up. After updating to firmware 2.3.3 there was 128 megabytes of free space. I think you won’t be afraid of losing 8 megabytes of free space, because now almost all applications can be moved to an SD card.
3. What is needed?
Find and unpack the firmware itself ( HTC Desire Android 2.3 Upgrade.zip). There are 2 files inside, PDF instructions and EXE which is a self-extracting installer, after launching which, the firmware and flasher are unpacked into a temporary folder and automatically launched.
Let's see what the instructions recommend. The first point is the characteristics of the PC on which the firmware will be installed. At least a gigahertz processor, 512 MB of memory or more, 150 megabytes of free disk space and USB 2.0. operating system Windows, from XP Home to 7 Ultimate.
4. Connecting and setting up HTC Desire for firmware
Install HTC Sync, if you don't have it installed yet. If installed but not running, then launch it. Download HTC Sync you can from this site, via the link - or from saya.
We connect your HTC Desire USB cable to the computer, select synchronization on the display. If everything goes well, then HTC Sync will see the device on the computer. I recommend connecting to system unit, because when connecting to a USB hub in the monitor, I got an error when flashing the firmware ( ERROR : USB CONNECTION ERROR), which reports an incorrect connection or driver problems.
We check that your computer does not go into sleep mode when inactive and after a certain number of minutes have passed. Well, I also advise you to remove the inclusion of the screensaver. Closing everything unnecessary programs on the computer.
Disable screen lock. Let's go to "Settings" — "Safety" — "Change blocking method" or ( "Set up screen lock") — "Unprotect".
Checking the battery charge level (V official instructions recommend at least 30%). Let's go "Settings" — "About the phone" — "Battery".
Launch the flasher, file " RUU_HTC Desire Android 2.3 Upgrade (Gingerbread).exe»
Attention! Don't forget to save all data from your phone (contacts and files from the memory card). Do a factory reset and clear the memory card. And remember that after flashing all your data and settings will be reset.
The firmware installation takes about 10 minutes, do not pull the cable out of the phone or computer, do not press buttons on the phone and it is not recommended to use the computer, wait until the procedure is completed.
5. Updating HTC Desire to Android 2.3 Gingerbread (flasher instructions)
Once again, make sure that you did a factory reset, which led to the removal of all installed applications on your smartphone and reset the settings.
In the first window, simply click “ Next" In the next window, we are again warned that we need to delete all data from the phone and are asked to read ReadME (instructions in English).

The third window reminds you to disable hibernation mode in windows, battery charge level and check USB connections cable.
 We check the box and click “Next”, after which the connection of the smartphone to the computer and the status of the device are checked.

After a successful check, in the next window we see the “Update” button.

Click on this button and see in the next window the firmware version on the device and the version to which your Desire will be flashed, click “Next” again.

And the last window that appears, before the update process, tells us that by clicking the “Next” button, the process of flashing the device will begin, all information will be displayed on the screen, and upon completion we will receive a message about successful update devices. It’s not too late to refuse, but we click “Next” again.

Began! This is what all this was done for, the process of updating your HTC Desire to Android 2.3.3 has begun
It all looks like a small window with a progress bar, a message that the process will take about 10 minutes, under no circumstances touch the USB cable connecting the smartphone to the PC.

Upon completion, we receive a window with a “Finish” button and a message in English that the process has been successfully completed.

Hooray! Now yours HTC Desire works under Android 2.3.3
We restore contacts and necessary data from backup copies and reinstall the necessary applications.
Possible error messages:
ERROR : FILE OPEN ERROR– file reading error, try running “RUU_HTC Desire Android 2.3 Upgrade (Gingerbread).exe” again
ERROR: MAIN BATTERY POWER– the smartphone battery charge is less than 30%, put it on charge and try it when the battery is sufficiently charged.
ERROR : MODEL ID ERROR
ERROR : CUSTOMER ID ERROR– the firmware is not intended for your smartphone model.
ERROR : IMAGE ERROR– the firmware file is incorrect or damaged, try downloading the firmware again from the website.
ERROR : USB CONNECTION ERROR– USB cable connection error. Connect the cable directly to the computer, not to USB hubs.
Publications on the topic
-
 Add to favorites Script to add to favorites for all browsers
Today I will tell you about one useful function on the site - this is a link, or a button “Add to bookmarks (favorites)”. This feature...
-
 How to remove non-reciprocal readers (followers) on Twitter Who are unfollowers
Twitter is becoming more and more integrated into modern life. Not only is the service very interesting, but its use...