
U2C resuscitation and recovery. Restoring an Openbox S4,5,6,7,8,9 receiver after unsuccessful firmware How to restore a tuner after unsuccessful firmware

A little over two years ago, the Sat-Integral company, in addition to new models of satellite receivers, introduced the world to the terrestrial DVB-T2 receiver Sat-Integral 5050 T2. Today, when the hype for over-the-air receivers has subsided and there is time to think about what to buy to receive over-the-air channels, we offer you our review of the new over-the-air receiver Sat-Integral 5052 T2.
If the previous model Sat-Integral 5050 T2 could boast of PVR capabilities, then the new product, according to the manufacturer, has quite rich multimedia functionality for this type of device.
Despite the fact that almost all the latest models of Sat-Integral satellite receivers operate on GUOXIN processors, the Sat-Integral 5052 T2 on-air receiver is built on a Sunplus 1509 processor.
Characteristics of Sat-Integral 5052 T2:
Metal case 148x98x36 mm
USB port: 2xUSB 2.0 (front and rear)
Support for WiFi adapters MT7601/RT5370
PVR and TimeShift function using external USB drives
Frequency range: 174-230 MHz (VHF) 470-862 MHz (UNF)
Signal level: -75~-20 dBm
Power supply active antenna(with short circuit protection)
Video decoder: MPEG-1, MPEG-2, MPEG-4, HD, H.264, DivX (free version)
Video resolution support: 1080p, 1080i, 720p, 576p and 576i
Image format
In the fall of 2018, the Sat-integral team pleased the satellite receiver market with two new products: the combined satellite-terrestrial receiver Sat-Integral S-1311 HD Combo and a new version of the popular receiver Sat-Integral S-1412 HD Rocket. Today, we will try to introduce you to the latter.
Taking into account the fact that analogue television has already been switched off in Ukraine, it is also worth paying attention to the combined model, which is a little simpler in functionality and hardware, but also has the ability to receive DVB-T2 standard channels. But if you have enough new TV included with the DVB-T2 tuner, we advise you to pay attention to this model.
The Sat-Integral S-1412 HD Rocket receiver, despite its potential, belongs to the segment of budget receivers. Unlike its predecessor Sat-Integral S-1223 HD Rocket which ran on Ali3511, this model uses a GUOXIN GX6621 processor with support for the H.265/HEVC codec
Packaging box, the same familiar design of the receiver in the starry sky. The front panel of the receiver in operating condition is displayed. Unfortunately, there is no remote control or rear panel. H.265/HEVC codec logo next to the Full HD icon. Brief list technical characteristics and features on the sides of the packaging, available in Russian and English.
Sat-Integral USB 2.0 - LAN Ethernet adapter (RTL8152B)- ideal for working with receivers of the S-12X8/S12X7/S1225 HD line. Compared with WiFi connection, wired connection allows you to work at higher speeds and provides a stable connection to the Internet. This guarantees faster and more convenient work with network applications receiver.
The presence of a USB2.0 port allows you to easily use the Sat-Integral USB-LAN adapter to connect a large number of devices to the network, such as PCs, laptops, tablets, etc. running popular operating systems Windows/Linux/Android/IOS.
Based on the USB2.0 standard, the adapter increases the data transfer speed to 100 Mbps, which will be enough to complete any tasks assigned to it.
Characteristics:
Type: USB – Ethernet (RJ45)
Interface: USB2.0
Chip: Realtek RTL8152B
Network speed: 10/100 Mbps
Cable length: 15cm
Size: 65x20x15 mm
Net weight: 18g
White color
After the appearance of the very successful Sat-Integral S-1225 HD Able model, which can rightfully be called a killer of SD receivers, many users wanted to see this functionality for little money, but in a metal case. The Sat-integral company took these wishes into account and released new model Sat-Integral S-1227 HD Heavy Metal. The receiver has similar functionality, but differs in the input tuner and processor revision, which in turn increased the cache. So the processor in this model comes with the letter “C” at the end GUOXIN GX6605C-Dolby and also works with clock frequency 600MHz. 64 megabytes random access memory and 4 megabytes of flash memory. Both models support Dolby Digital audio, but only the Sat-Integral S-1227 HD Heavy Metal model has an S/PDIF connector for connecting to a multi-channel audio receiver.
You can clearly compare receivers in the catalog
The packaging box is in the same colors as its predecessor, but, logically, is larger in size. On the front side the receiver is in operating mode, demonstrating the display and indication capabilities. Unfortunately, the remote control and back panel not shown on the packaging box. Below are the logos of supported formats and receiver capabilities, including support for 3G modems and Wi-Fi adapters, which is logical, since this model does not have a LAN connector. On the sides short description on
Along with new satellite receivers, Sat-integral has released the Sat-Integral 5050 T2 terrestrial DVB-T2 receiver with PVR capabilities. Considering that there is nothing special to expect from an terrestrial receiver, it is commonplace to receive 32 terrestrial channels in the national digital terrestrial broadcasting network, the ability to record necessary transmissions with subsequent viewing, and for a certain group of people the opportunity to play video-audio content with USB storage. The main needs of the market in Ukraine are a good picture and low retail cost.
For those who only need national channels and do not want to spend more money to install a satellite dish and are tired of the snow on analogue channels, you can buy this model and get a little closer to digital TV.
Small packaging box. The front panel shows the front panel of the receiver with a working display. At the bottom there are icons of supported formats and receiver capabilities. For simplicity, it is indicated by strikethrough satellite antenna and drawn ethereal. On one of the sides, ways to connect to the TV are drawn. This is an unusual practice, but for people who don't know much about it, it can help to visually determine the connectivity to, for example, their old TV. On the other side of the box is a list of technical characteristics of the Sat-Integral 5050 T2. Rear
And here, too, so as not to repeat ourselves important points, I recommend reading the preface to the article first: .
In this case, most often you will have to turn to two general options for set-top boxes on any processors - Universal remote or programmer, and proprietary options for ALi will have their own specifics.
So, if after unsuitable firmware the set-top box still boots up, but the remote control stops working, then we buy a universal remote control, for example, discussed in. Having selected the code and received control, we return the original firmware.
Or we leave someone else’s one if everything works fine with it.
In addition, an essential function appears with it - learning from the old TV remote control, i.e. It will be possible to use only 1 remote control, and not 2 (set-top boxes and TV).
Undoubtedly, the most universal, but also the most radical option is to unsolder the flash memory, program it with the original firmware and solder it back.
Of course, you can try without desoldering, through a clothespin adapter, but in addition to its cost of 200 rubles, you need to somehow resolve the issue with powering the flash drive on the board, because not only is it connected to +3.3V, but the programmer will not pull the extra load, Therefore, for programming reliability, most often the flash still has to be unsoldered. And then, of course, solder it back.
Before connecting to the set-top box, I recommend that you first check the operation in any terminal program, for example, in (HyperTerminal), connecting TX and RX to each other.
If, when you press the keys, the symbols are repeated on the screen, then the connection is working.
And if something still doesn’t work out when connecting to the set-top box, then try swapping TX and RX.
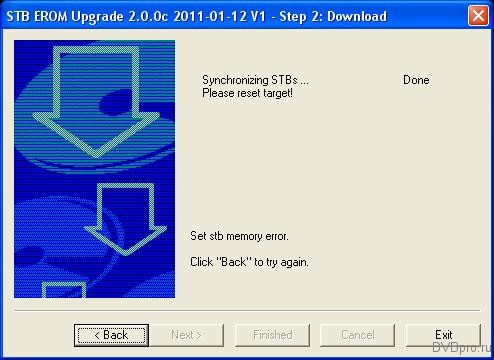
At turned off console, launch the program, specify the COM port, firmware file and click Next:

Messages will appear Synchronizing STBs... And Please reset target!
 At this moment it is necessary turn on set-top box and downloading via UART will begin.
M38xx series processors have TX and RX pins:
- ALi M3812 - 114, 115
- ALi M3821 - 8, 7
- ALi M3821 P — 8, 7
However this utility when connected to M38xx after synchronization Done, gives an error message Set stb memory error:
 Perhaps a more modern utility is required specifically for the M38xx series, but so far I have not come across one.
Of course, traditionally ALi processors always have pins:
 or, at a minimum, the corresponding control points on the back of the board, going to the processor pins:
| ALi | M3812 | M3821 | M3821 P |
| 1 TRSTJ | 109 | 105 | 40 |
| 2 TDI | 110 | 106 | 41 |
| 3 TDO | 111 | 107 | 42 |
| 4 TMS | 112 | 108 | 43 |
| 5 TCLK | 113 | 110 | 44 |
| 6 GND | GND | GND | GND |
However, despite the ease of connecting to EJTAG (for example, through the LPT port of a computer), the main problem, again, is the lack branded programs(knowing the structure of M38xx processors).
If anyone knows of certain utilities for the M38xx, please write in the Comments. Thank you!
And one more option for ALi processors, but not Emergency Recovery, but - Automatic update via USB— without even touching the remote control or front panel.
I’ll immediately stipulate the key condition and main disadvantage of this method: it will require new version software, i.e. the firmware with which we will update the set-top box should be version higher than was installed.
In order to flash the receiver automatically, you need to rename the unpacked firmware file to auto.abs(or auto1.abs, auto2.abs), place it in the root directory USB media and connect the media to working to the receiver.
After the system recognizes the USB drive, the update process will begin automatically, and you just have to wait for it to finish and auto-reboot.
Update modes:
- to update in " BY"("main codes") the file must have the name: auto.abs
- to update in " Software+channel list"("all codes") the file must have the name: auto1.abs
- to update in " Software+bootloader"("all firmware") the file must have the name: auto2.abs
For example World Vision Premium rename new version firmware in auto2.abs and connect the USB flash drive to working receiver.
As usual, the flash drive will first be detected, and then automatically The standard flashing procedure starts:
 at this time messages appear on the console:
shugltest usbupg_item_sel_callback event:1,bID:1,param1:16
shugltest usbupg_item_sel_callback event:13,bID:1,param1:0
shugltest usbupg_item_sel_callback event:2,bID:1,param1:16
shugltest usbupg_item_sel_callback event:1,bID:2,param1:16
shugltest usbupg_item_sel_callback event:13,bID:2,param1:4
shugltest win_usbfilename_remind tempstr_len:19
shugltest usbupg_item_sel_callback event:2,bID:2,param1:16
shugltest usbupg_item_sel_callback event:1,bID:3,param1:16
shugltest usbupg_item_sel_callback event:2,bID:3,param1:16
user_mem1.buf =
user_mem1.buf =
user_mem1.buf =
--sys_watchdog_reboot-
and the console reboots itself.
If you then slip it in again auto2.abs, then there will be no more flashing, because the same version is already installed.
So, 4 options:
- Universal remote.
- Programmer.
- For M360x via UART.
- Automatic update via USB.
As noted at the very beginning, most often you will have to use the first two universal ones. But nothing prevents you from trying the last two methods first.
Well, as usual, it’s worth reminding again:
EVERYTHING YOU DO WITH YOUR CONSTRUCTION IS AT YOUR OWN RISK!
OpenBox S satellite receivers are flashed with via USB flash drives. Sometimes it happens that the firmware process ends in failure and the receiver stops showing signs of life. In this case, you need to restore the OpenBox S receiver with emergency firmware using the Porter program.
To restore the OpenBox S receiver, you need to connect it with a null modem cable to the computer, having first disconnected the receiver from the 220 V electrical network.
After this, launch the porter program on the computer and select the mode work Mode-> Software. We show the path to the firmware of the OpenBox S receiver of your particular model. The COM port number can be found through the device manager by right-clicking my computer->properties->device manager.

Then you need to click the Download button and plug the receiver into a power outlet and wait for the firmware to finish.

After the firmware is installed, the word End will appear on the front panel of the OpenBox S satellite receiver, the receiver will reboot and will be in working order again.
If the Porter program does not accept the firmware you have chosen, try the factory firmware from the official OpenBox website, and then flash any other firmware in the usual way via a flash drive.
The second interesting option proposed by the moderator of the OpenBox fan club. The method is suitable for flashing OpenBox receiver firmware if you don’t have a null modem cable at hand.
- Turn off the receiver at the rear using the toggle switch.
- We insert into the receiver a flash drive, pre-formatted in FAT32 format, with a single firmware file recorded on it (.IRD file).
- Turn on the receiver with the toggle switch while holding down the CH ^ button, which is located on the front panel of the receiver.
- We wait for the firmware to start, after which we release the button and observe the process of writing the firmware into the receiver’s memory.
| Porter program for emergency firmware of OpenBox S receivers |
Although this is unpleasant, sometimes this happens and satellite receivers fail. Mainly when an attempt to flash the device's firmware fails.
Today we will try to help with such a situation, in particular if satellite receivers of the brand fail U2C.
How to restore a U2C satellite receiver after unsuccessful firmware?
It happens that during the firmware process the light went out or a child pulled the cord out of the socket, or simply the firmware file turned out to be “broken.” In short, the result is obvious (sometimes it can be done).
We have a “dead” satellite receiver.
The first and most simple method U2C recovery - try to reflash it from a flash drive in this way force_upgrade_rom.bin.
However, the firmware you need may also have this name - just rename it and throw it into the root of the flash drive.
How to flash U2C from a flash drive?
Option 1: Oldest bootloader:
We insert the flash drive into the receiver and connect it to power (the process will start automatically).
Option 2: Second version of the bootloader:
We insert the flash drive into the receiver, press the OK button on the remote control, and connect the receiver to power.
Option 3: Latest version bootloader:
We insert the flash drive into the receiver, hold down the button on the front panel (for receivers U2C MINI: button on the left; for receivers U2C MAXI button in the middle), and connect the receiver to power


After the process is complete, remove the flash drive.
If the receiver still does not respond, and you have tried with several flash drives and “clean” (without channels and keys) firmware.
Second U2C recovery option– let’s move on to preparation and firmware via COM Port. Why preparation - yes, because res U2C does not have a standard rs-232 connector, that is, COM. He has a minijack there.
We solder according to this scheme.

Next we move on to the firmware using this U2C S+ RS232 Restore or old version RestorU2C.zip.

Select the com port number, rename the firmware to a file rom.bin, and start the firmware process.
Afterwards a window like this will appear.

Don't touch anything. After the process is completed, you should receive a working device.
If not, and nothing succeeded, then the next stage will probably not be within your power. Since the bootloader or even the flash drive was damaged in the receiver.
The subsequent procedure involves unsoldering the flash drive (possibly replacing it) and flashing the bootloader or dump using a programmer.
Publications on the topic
-
 UC Browser – high-speed browser Belka Latest version of uc browser
Among the dozens of browsers common today in both the mobile and desktop worlds, one truly stands out...
-
 Program for optimizing and accelerating Windows
The Samsung SCX-3400 model of printer is a classic multifunction device that can print, copy, and scan documents. It is also a monochrome...