
Changing tp link router settings. Self-configuration of a TP Link router for the Rostelecom provider

TP-Link is one of the most famous manufacturers of routers, and the products of this company are distinguished by quality, reliability and fairly affordable prices. But after purchasing one of these devices, users often cannot configure it themselves. Moreover, some of them don’t even know how to log into the TP-LINK router and get to its main menu.
In fact, setting up a router is not such a difficult task, and after completing it once, you yourself will understand how simple it is. This article will help you understand everything and avoid making one of the common mistakes.
Preparation
Before you start connecting your TP-Link router, you need to do a little preparation. It consists of determining the network parameters of the provider and writing them down (or remembering them).
The first thing you should understand is the type of Internet connection. If you use a login and password to connect, then the connection is carried out via the PPPoE protocol and you can immediately connect a TP-Link router, the configuration of which will be discussed below.
If the login and password are not used for the connection, you must do the following:
- Open "Control Panel" and go to the "Network Management" tab.
- Now look at the sidebar (on the left). Here you need to select the line “Change adapter settings”.
- Here is a list of connections (usually there is only one). Right-click on the one that is currently active and select “Properties”.
All you have to do is select “TCP/IPv4 Protocol” and click “Properties”.
Determining the connection type
The window that opens will allow you to determine the type of connection, of which (not counting PPPoE) there are two types:
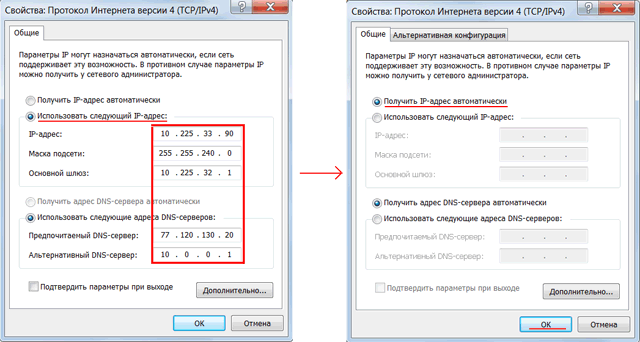
- If you have selected and filled in the “Use IP address” line, then your connection type is called “Static IP”. In this case, you need to rewrite all the settings, and then select the “Obtain IP address” option and click “OK”.
- If the “Obtain IP address” line is active immediately, it means you have a “Dynamic IP” connection. This means you don't need to rewrite anything and you can start connecting your TP-Link router.

In any case, you can now close all unnecessary windows and prepare for further actions.
Connecting a router
Now it's time to take the device out of the box and connect it to your computer. For this:
- Connect the power supply to the device.
- Connect the Internet cable to the blue port.
- Connect the device to the computer using a network cable. Any of the yellow ports will do this.

- Launch your browser. It's best if it's Internet Explorer or Edge (for Windows 10).
- Enter the TP-Link router address. Usually this is a combination of numbers “192.168.1.1”, but sometimes there are other options (they are written on the bottom panel of the device).
- A window will appear in which you must enter the username and password of the TP-Link router. By default, you need to enter the word admin in both of these lines.
- In the menu (on the left), select the Quick Setup line.
After completing the steps above, you will find yourself in the main settings menu. Here you need to indicate the connection type that you defined before logging into the TP-Link router.
Setting up for PPPoE
If your connection is via the PPPoE protocol, you need to select it in the main menu, click “Next” and enter the settings:
- User Name - login with the provider.
- Password - password for connecting to the Internet.
- Confirm Password - password again.
Now click Next and enter:
- In the SSID field - the name of the access point (your choice).
- PSK Password - create and enter a password.
- Wireless Security - specify WPA-PSK/WPA2-PSK.
After that, all you have to do is click Next and reboot the router (Reboot).
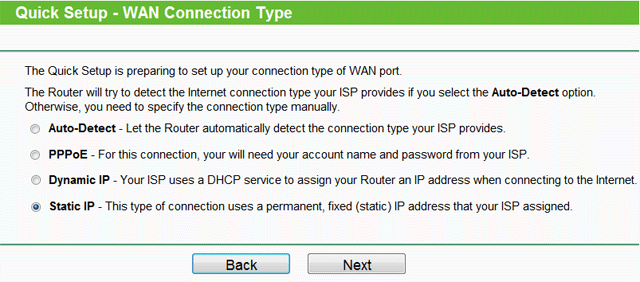
Setting up for static IP
Select the Static IP line in the main menu if your connection is made using this protocol. You see a window with several lines that you need to fill in manually. These are the same parameters that you copied from the network Windows settings, before logging into the TP-Link router.
Once you have completed all the lines, check them carefully again, and then click Next. In the next window you need to enter the name of the access point (of your choice), password (come up with it yourself), click Next and reboot the router.
Setting up for dynamic IP
If you have a dynamic IP and are using a TP-Link router, the setup will be very simple. In the menu you need to select Dynamic IP, click Next and enter the name of the access point, as well as the password for it.

After this, all you have to do is click Next and then Finish. In this case, a reboot is not required.
Setting up using a special disk
To facilitate the process of setting up a TP-Link router, a special disk can be used. It is not included with all device models, but if you have it, you can simply insert it into the CD-Rom and follow the on-screen prompts to complete the setup procedure in a few clicks.
Possible problems
Sometimes it happens that the provider blocks the connection by MAC address. In this case you need to do the following:
- Go to your router settings.
- Go to the Network section, and then select the MAC Clone sub-item.
- Here you need to click Clone MAC Address and then save the changes (Save).
By the way, it is best, before logging into a TP-Link router, to contact your provider’s support service and clarify this issue with them.
Password reset
If you don't remember the password to enter your device settings, you can reset it. To do this, press the Reset button, which you will find on the back panel, and hold it for a few seconds. This will reset all settings to factory settings and you will be able to enter the settings using the standard password (admin).

In some cases, the password initially differs from the standard one. If so, you can find it on the bottom panel of the router. The login is usually written there, as well as other data necessary to enter the device settings.
Determining your Internet provider's network settings
Before you connect your router, you need to know what network settings are needed to connect to the Internet.
The most common types of network settings are:
- Dynamic IP— dynamic settings, issued automatically via DHCP
- Static IP— static settings, entered manually
- PPPoE— Internet access is provided via the PPPoE protocol after entering the username and password
It is assumed that you have Windows 7 installed, the provider cable is connected to the computer and Internet access is configured.
Go to "Change adapter settings".

Right-click on "Connect via local network" and select "Properties"

Click on “Internet Protocol Version 4 (TCP/IPv4)” and the “Properties” button.

- If you have selected “Use the following IP address” and there are numbers, then write down all settings- these are the static settings of the provider ( Static IP). After that, select “Obtain an IP address automatically” and click the “OK” button.
- If you select the “Obtain an IP address automatically” option, then you receive network settings automatically - these are the dynamic settings of the provider via DHCP ( Dynamic IP).
There are providers that block access to the Internet via MAC address y (can be found in the contract). In this case, you need to configure the router so that it has the same MAC address that is registered with the provider.
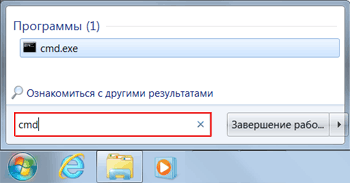
To find out the MAC address network card, click “Start”, in the “Search programs and files” window write the command cmd and press Enter.
We write the command in the console ipconfig /all and press Enter.

We are looking for “Ethernet adapter Connection via local network...”
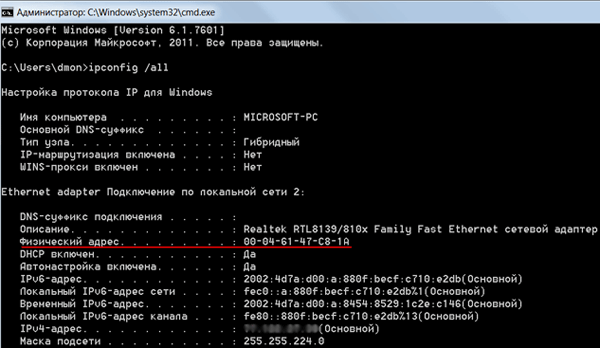
In field " Physical adress"Your MAC address of the network card is indicated. Let's rewrite it.
Connecting and setting up a TP-Link router
For Wi-Fi settings We will need a Tp-Link router:
- provider cable (Triolan, MaxNet, Vega, Volya, Airbites, or others without vpn);
- computer or laptop;
- TP-Link router, which will distribute the Internet via Wi-Fi to a laptop, TV with Wi-Fi, tablet or smartphone.
Let's connect the equipment as follows:
- Plug the power supply into the router’s “Power” connector;
- connect the Internet provider cable to the blue WAN port of the router;
- connect the computer to the router using a network cable to any yellow LAN port;
- We will connect other devices (laptop, tablet, TV with Wi-Fi, smartphone) via wireless communication Wi-Fi.

Let's move on to setting up the router.
Open Internet Explorer and enter the address 192.168.1.1
Attention! The proxy server should not be specified in the browser settings
In the window that appears, enter your username admin and password admin.

On the left side of the menu, select Quick Setup Wizard Quick Setup and press the button Next.

Dynamic IP— automatic network settings of the provider via DHCP
If you receive automatic network settings, then select Dynamic IP and press the button Next.

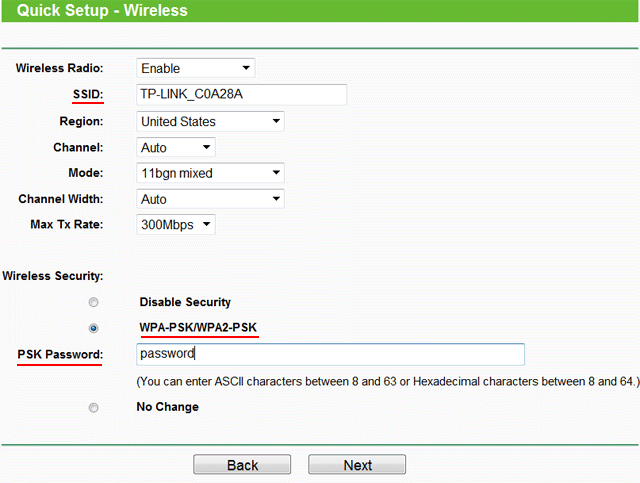
In field SSID
In chapter Wireless Security specify the encryption type WPA-PSK/WPA2-PSK
In field PSK Password:
Finish.

Network - MAC Clone.
In field WAN MAC Address enter the MAC address.
You can also click Clone MAC Address, if in the field Your PC's MAC Address

Static IP— static network settings of the provider
If network settings need to be entered manually, then select Static IP, press the button Next.
Enter the settings:
- IP Address(IP address)
- Subnet Mask(Subnet mask)
- Default Gateway(Main gate)
- Primary DNS(Preferred DNS Server)
- Secondary DNS(Alternate DNS server)
- and press Next

In field SSID Enter the name of the access point to connect via Wi-Fi.
In chapter Wireless Security select the encryption type WPA-PSK/WPA2-PSK
In field PSK Password: enter the password to access Wi-Fi point access. The password must be at least 8 characters.
The next window indicates that you have successfully completed the setup. Press the button Reboot and wait for the router to reboot.

If your provider blocks access by MAC address, select from the menu on the left Network - MAC Clone.
In field WAN MAC Address enter the MAC address.
You can also click Clone MAC Address, if in the field Your PC's MAC Address the required MAC address is located.
PPPoE— Internet access using user and password
If Internet access is provided via the PPPoE protocol after entering the username and password, then select PPPoE.

Enter the settings:
- Username:(Username)
- Password:(Password)
- Confirm Password:(Confirm password)
- and press Next

In field SSID Enter the name of the access point to connect via Wi-Fi.
In chapter Wireless Security select the encryption type WPA-PSK/WPA2-PSK
In field PSK Password: enter the password to access the Wi-Fi access point. The password must be at least 8 characters.
The next window indicates that you have successfully completed the setup.
Press the button Reboot and wait for the router to reboot.
TP-Link router security settings
To prevent anyone other than the administrator from entering the router settings, you need to change the password to enter the settings.
To do this, select from the menu on the left System Tools - Password and enter the settings:
- Old User Name: old username, enter admin
- Old Password: Old Password, enter admin
- New User Name: enter a new username, you can leave admin
- New Password: enter New Password
- Confirm New Password: confirm the new password

After this, press the button Save to save the password.
Connecting a laptop to the Internet
We will connect the laptop to the Internet via Wi-Fi.
To do this, select the wireless network management icon in the lower right corner of the monitor. After updating the list of wireless networks, our network should appear in it. Select it and click the “Connect” button.

In the next step, enter the password to connect to the Tp-Link router via Wi-Fi.

Enter the password you specified in the field PSK Password: in the router settings. After this, the Internet will appear on the laptop.
You can connect devices that support Wi-Fi, such as a TV, netbook, tablet, smartphone, to the Tp-Link Wi-Fi router. To do this, you need to select a Tp-Link access point in your device and enter a password.
Recovering the password to enter the settings of the TP-Link router
If you have forgotten the password to enter the settings of your Tp-Link router, you can restore the factory settings and password.
To do this, press the Reset button on the back of the router for 8-10 seconds.
Tp Link is a very popular brand of routers and routers, so it is better to consider its connection using a specific example. To do this, we will take the TP-Link TL-WR841N, working with which will fully illustrate what and how to do with almost any similar device.
Equipment and connection of the tp link router
If you buy a router secondhand, check the completeness of the package, as well as the functionality of all parts, simply by asking the owner to demonstrate this. The standard set includes the router itself, a power supply, a network cable, an instruction book that will greatly simplify the handling of the device, and a disk with auxiliary files. We connect the “box” marked TP-Link as follows: connect the power supply to the corresponding connector on the router and a 220 V network, using an adapter if necessary. Insert the WAN wire included in the kit into the socket marked in blue until you hear a slight click. The TP-Link TL-WR841N we use has 4 LAN ports, marked yellow. This means that you can connect 4 more computers to it using a wire (and any number via wireless communication, if your model supports it). Our router also has the following indicators and buttons on the case:
- button to turn the device on and off;
- a button that reboots and returns to factory settings;
- button to enable QSS;
- indicators of connection with local network, Internet, ADSL and others.
How to configure a TP-Link router?
To connect the router and configure it, virtually no special knowledge or specialist assistance is required. All the most common questions, including possible mistakes, are detailed in the instructions included in the kit. If it is not there or is difficult to read, follow our recommendations.
- First, you should hold down the button labeled RESET for a few seconds to reset to the recommended parameters.
- Next, to access the router’s web interface, open the browser and enter the numbers 192.168.0.1 in the address bar. or 192.168.1.1.
- The router will ask you for a standard login and password, which by default are admin and admin. You can change them later in the System Tools tab for added security.
- It is better to take the data to be entered in the “Network” and “WAN” sections from your contract with the provider or by calling technical support.
- In the “MAC Clone” item, click “Clone MAC Address” and confirm with the “Save” button.
- The “Wireless” item is responsible for setting wireless network. In “Wireless Network Name” we indicate the desired name for our Wi-Fi, and in “Wireless Security”->PSK Password - its password. Sometimes the current password is indicated on the router itself.
- Be sure to save the changes and click the reboot button on the “System Tools” tab. This will allow the changes to take effect.

Firmware update for TP-Link router
Each new update for the router brings useful features and greater ease of use. You can download the latest firmware for your device on the official TP Link website. To install it, go to the router via the web interface, in the “System Tools” -> “Firmware Upgrade” tab. Using the “Browse” button, select the resulting file and click “Upgrade”. We are waiting for the process to finish.
The manufacturer of devices for wireless Internet distribution TP Link produces a whole the lineup, from which you can select devices according to your preferences and budget. Despite the fact that all models have their own distinctive features, the connection sequences and Internet settings for the TP Link router are very similar. Next you will get acquainted with the detailed step by step instructions on connecting and setting parameters to obtain stable Internet and Wi-Fi networks.
Stages of work
First, let's make a list of procedures that you need to carry out:
- connect the device to personal computer or laptop;
- connect the internet cable;
- enter the provider settings;
- set up a wireless network.
You can read in detail below about how to install the router and configure it.
Connecting cables
Have you just taken your device out of the box and don't know where to start? Then use the tips from our article. First, let's look at all the available connectors and control buttons that you need to know. Regardless of the model, each TP Link has a standard set of interfaces. In the photo you can see back panel devices.
There is a connector for the mains power cable, a power button, 1 or 2 USB port for connecting a 3G/4G modem, a port for an Ethernet cable and 4 ports for connecting to desktop devices or laptops. Based on this, you can not only use a wireless network, but also use the device as a stationary modem, which increases the functionality of the Link router.
 The front panel contains only indicators that are responsible for the status and performance of the router. Now let's move on to the connection.
First of all, connect the Internet cable to the Ethernet connector. Make sure your provider has already connected the Internet. To configure, you will in any case have to connect the device to your computer. To do this, connect the router to one of the yellow connectors using the cable that comes with the kit. Finally, turn on the TP Link using the power supply and the power button on the back of the case. Now you can customize it.
First actions
Before setting up the Tp Link router, you must open the interface through a browser. You can do this as follows:
- open any browser through which it is most convenient for you to work;
- then in the address bar enter the following IP: 192.168.0.1 and press Enter on the keyboard. If nothing happens, then look at the address on the back of the router;
- A window will open in front of you asking you to enter your login and password. By default, the combination admin/admin is set by the manufacturer;
- Ready! Now you have entered the TP Link router settings.
Entering correct data
We have come to the most important stage - setting up an Internet connection. On the left side of the page you will see a menu with all the sections.
 We will need Network and Wireless. If you are an inexperienced user, then the remaining sections will not be useful to you.
Let's choose a connection type that will match your Internet provider. Select WAN Connection Type from the drop-down list. If necessary, you need to enter your username and password. The VPI and VCI values are also entered in the corresponding fields. It is worth noting that the login and password are those provided to you by the service provider. If you do not have such data, then select Dynamic IP.
 After entering all the data, click on the SAVE or Save button at the bottom of the page. Next, the device will begin to reboot. If your Internet connection is stable, then proceed to setting up your Wi-Fi wireless network. If the modem does not work (no website opens in the browser except page 192.168.0.1), then try again. You may also need to update the firmware, which is downloaded from the manufacturer's official website. Since devices are often sold with outdated firmware, it may not work correctly. The device is updated through the System Tools section. Before you install new version Software, make sure it is compatible with your model.
The installed and configured TP Link should provide stable access to the Internet after a reboot. If so, go to the Wi-Fi settings.
Wireless connection
For TP router Link setting wireless network is carried out through the Wireless section. Let's look at this point in more detail:
- open the Wireless Settings subsection;
- in the first field, enter the name of the Wi-Fi point;
- then select the region you are in;
- in the Channel field, select a channel, then the settings for each channel are presented;
- After setting all the parameters, click the SAVE button at the bottom of the page.
 The device will reboot again. Now turn on the Wi-Fi module on your laptop or phone to check the functionality of the wireless network.
Wi-Fi password protection
To ensure that no one but you can access your Wi-Fi, you need to protect it with a password. The TP Link router protection is configured through the Wireless Security subsection:
- select WPA/WPA2 security type;
- enter a unique password of at least 8 characters in the PSK Password field;
- Click the SAVE button to apply the changes.

After the next reboot, your Internet will be protected from unauthorized users. Now you know how to configure almost any TP Link, and you can do it yourself.
In this article I will tell you how to configure TP-LINK router. Specifically, we will talk about setting up the router TL-WR841ND, but since the admin panels of all routers from this company are very similar, you can configure another TP-LINK router. This will not be a mega-review of all the capabilities of the router, because... there are a lot of them. I will only consider the tabs that are needed to the average user to set up a router for your home.
Of course, you can set up the connection using the disk that comes with the router, but unfortunately this does not always work. Therefore, I prefer to do the setup manually. Moreover, the setup takes 10-15 minutes.
So the first thing you need to do is find out your connection type and Internet connection parameters (IP address, subnet mask, login, password). Typically, this data is provided by the provider along with the connection contract. If you did not find them or lost them, then you will have to contact the provider’s technical support service to get them.
Let's say there is data. Now let's start setting up the router.
1. Connect to the router
Insert the router's power cable and connect it to the network. Press the power button on the router.
Then insert the network cable (included with the router) with one end to the network card of your computer and the other to the LAN port of the router (yellow).

2. Go to the admin panel of the router
Now that the router is physically connected to the computer and network connection between them is configured, you need to open any browser (Internet Explorer, Opera, Firefox, Chrome) and enter the router address in the address bar (for TP-LINK by default this is the address 192.168.1.1).
Then a window will appear in which you need to enter your login and password to access the admin panel (by default Login: admin and Password: admin).

In general, the factory login and password are usually always indicated at the bottom of the device.

Therefore, even if you have a different router, even from a different manufacturer, then look at the sticker at the bottom of the device.
If you entered everything correctly, you will see home page admins:

On the right is a column of sections, in the center is the contents of the section and the fields where we will change the settings, on the right is a little help, but unfortunately for many it will not be very helpful because it's in English.
Don’t be intimidated by the many sections, but most of them are for experienced users and for fine-tuning the router. In order to simply force the router to connect to the Internet and then distribute the Internet via Wi-Fi and local network, 3-4 tabs are enough.
3. Set up an Internet connection
To set up the Internet on your TP-LINK router, go to the Network section (in the right column in the admin panel). Next, go to the WAN subsection
I hope you have already found out your settings for connecting to the Internet. In Ukraine (and in the CIS in general), providers most often use the following four connection methods: Dynamic IP, Static IP, PPPoE, PPTP. Select your connection type in the drop-down list (top center) and go to the corresponding tab below:
Connection type Dynamic IP
For this type of connection you do not need to enter anything. Just select it from the list. For some providers you may need to enter DNS server addresses, but in most cases this is not required.

After that, click on the Save button.
Connection type Static IP
For this type of connection, you need to enter your IP address, subnet mask, gateway address and, possibly, DNS server addresses. You can find out all these settings from your provider.

When you enter all the addresses, do not forget to click on the Save button
Connection type PPPoE
For this type of connection, you must enter a username, password, and password confirmation. Also, for the CIS, you will most likely have to put the Static IP point opposite Secondary Connection and enter the IP address and mask.
If you want the router to always be connected to the Internet (usually it’s better to set it this way if you don’t have per-megabyte traffic accounting), then you need to put a dot next to the Connect Automaticaly item

Connection type PPTP

If the ISP binds to the MAC address of the network card (the unique address that the network hardware), which is mainly relevant for Dynamic IP and Static IP connection types, then you need to additionally go to the MAC Clone subsection and click the Clone MAC Address button. In this case, the MAC address of the router will become the same as the MAC address of the network card and the provider will not detect that you have installed the router.

4. Set up a Wi-Fi network on TP-LINK
To set up a Wi-Fi network, we need 2 subsections. First, go to the Wireless section and the Wireless Settings subsection.
Here you only need to select your country from the list and enter the SSID network identifier. You need to come up with a unique identifier so that it does not accidentally coincide with the network identifier of your neighbors, otherwise failures may occur. Usually it is enough to add the apartment number to the network name (for example TPLINK33)

Let's briefly consider the remaining parameters (in most cases there is no need to change them):
Channel – select a radio channel, if devices do not connect well to the wi-fi network, you can try to specify the channel explicitly (I usually choose 6 or 11)
Mode - select a standard, if you do not have devices that can operate according to the 802.11n standard (which standard the device can operate on is usually indicated on the box or in the documentation on the wi-fi icon), then you can install bg mixed.
Channel width - width of the data transmission channel.
Max TX Rate – maximum transmission speed.
Enable Wireless Router Radio – turns on and off the wireless module on the router (i.e. turns on and off wi-fi)
Enable SSID Broadcast – allows you to enable or disable the visibility of a wi-fi network; if this option is disabled, then you can connect to a wi-fi network only by knowing its identifier (SSID), in a regular wi-fi search this network will not be located.
Enable WDS – this option is needed to expand the coverage of an existing Wi-Fi network.
After completing the settings, do not forget to click the Save button
5. Set up wifi security networks
To configure network security settings, you need to go to the Wireless section and the Wireless Security subsection.
Here you can configure the encryption method and password. I recommend choosing the WPA2-PSK encryption method. You can leave the encryption type as Automatic. The most important thing is to come up with a more complex password (containing letters and numbers), 10-15 characters. You'll still only have to enter it once on each new device, and for those wanting to guess the password for your network, complex password will become a more significant obstacle than a simple one. (For example, install something like ERG345tr4R).

After you've set it up wifi password networks – don’t forget to click on Save
6. Set up a local network (if necessary)
To set up a local network on a TP-LINK router, you need to go to the Network section and the LAN subsection. Here you can set the router's IP address. From the same range of IP addresses, the router will distribute addresses to devices connected to it. You don't have to change anything in this section at all.

7. Setting up an administrator password
And finally, to ensure complete safety– change the administrator password on the router (you must agree that the admin password does not look reliable). This password is used to log into the admin panel of the router.
To do this, go to the System Tools section, Password subsection. Enter the old login (admin) and password (admin), and below enter the new name (you can leave it the same) and password (but be sure to change it).

8. Reboot the router
You have probably already noticed that when you click on the Save button, the following message appears at the bottom:
This inscription says that to make changes you need to reboot the router. Click on the words click here and in the window that appears, click the reboot button. The router will reboot with the new settings.

9. Connect and work
Well, the router setup is complete. Now you need to connect to it the cable through which the provider provides Internet access. (In the blue port on the router). The yellow ports can connect up to 4 PCs or laptops.

10. Purpose of router indicators
And finally, let’s look at what the indicators on the top panel of the router show.

First indicator. – Power (power indicator) – shows whether the router is on or off.
The second indicator - System (system indicator) - blinks in the normal state; if it is just lit, the route is being initialized or an error has occurred; if it is not lit, then a system error has occurred.
The third indicator shows the status of the Wi-Fi network. Flashes when wi-fi is on and off when it's off.
Indicators 4 to 7 – show the status of the local network connection. On – the cable is connected, but there is no network activity, Flashing – data exchange between the router and PC, Off – no connection.
The eighth indicator – Internet – shows whether the Internet connection is active. On – the Internet is connected, Flashing – a connection or data exchange is in progress, Off – the Internet cable is not connected.
The last indicator shows the status of the QSS (Quick Secure Setup) function. This function is used to quickly connect devices to the router. Mainly used to connect to wi-fi router cards from TP-LINK.
Publications on the topic
-
 UC Browser – high-speed browser Belka Latest version of uc browser
Among the dozens of browsers common today in both the mobile and desktop worlds, one truly stands out...
-
 Program for optimizing and accelerating Windows
The Samsung SCX-3400 model of printer is a classic multifunction device that can print, copy, and scan documents. It is also a monochrome...