
Installing recovery without a PC. Instructions on how to install custom TWRP recovery on any Samsung Galaxy smartphone or tablet

Because the topic Android firmware devices is very relevant, I decided to write about installation CWM Recovery Android smartphone or tablet. There are several ways to do this: for some, all actions are performed on the device itself, but this requires root rights, while for others, a computer is used to install custom recovery. Whatever seems easier or more convenient to you, use it.
via ROM ManagerThe first way to flash Recovery firmware is to use the ROM Manager program. This application has a separate item that allows you to install ClockWorkMod Recovery in a couple of minutes.
I would like to note right away that ROM Manager requires root rights. You can read how to get them.
After that go to official page https://clockworkmod.com and see if your device is on the list of supported ones.
1. Now open the ROM Manager and select the first item “ Recovery Setup».

2. In the next window in the section " Install or update Recovery» select « ClockworkMod Recovery».


4. At the bottom, click on “ Install ClockworkMod».

5. The download process will begin. At good internet connection it lasts a couple of seconds.

6. At the end of the download, you will be asked to grant root access to the application. Select " Provide».

7. That's it! You will see a notification " Successfully flashed ClockworkMod recovery!" Just click " OK».

This is how easy it is to flash CWM Recovery via ROM Manager. Now you can open it and you will find new items in it that were not in the standard one.
Method 2. Install custom Recovery on Android using the FastBoot utility
All the steps described below are the same as installing TWRP Recovery:.

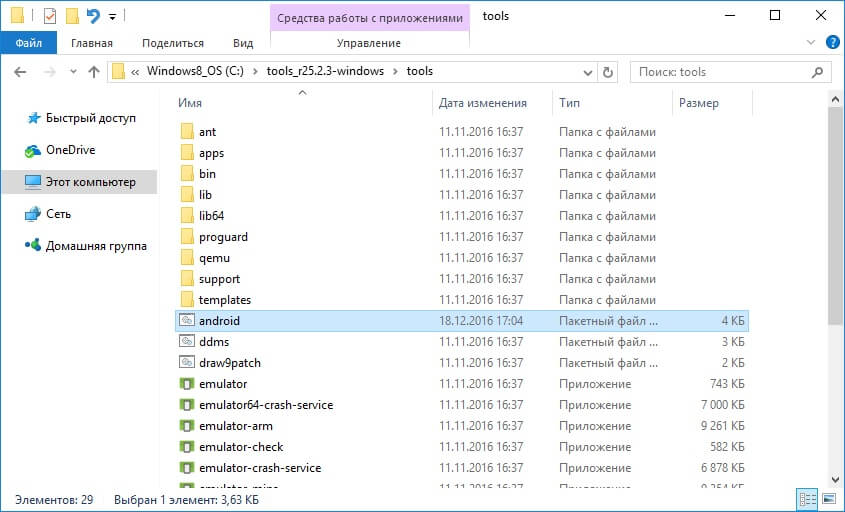
Unzip the folder to disk " C:" - there will be " inside tools", and in it the file " android" Launch it.

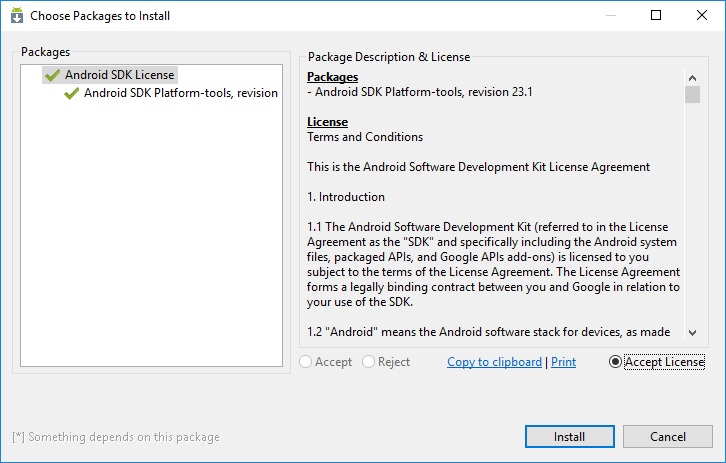
Select " Android SDK Platform-tools" and press " Install package».

Check the box " Accept License" and then click " Install».

After installation is complete, in the folder " tools_version-windows" will appear " platform-tools", and it contains " fastboot" And " adb" They will be useful to us later.

UPD: The “platform-tools” folder on my computer is in a different directory than yours. The fact is that this article was written back when there was an installer for the Android SDK. Starting from version 25, installation is carried out only from a ZIP archive: because of this, part of the instructions had to be edited. Therefore, the path to ADB and Fastboot is different from mine, everything else remains unchanged.
If you have a Sony, HTC, Nexus, Huawei or LG device (some models), then Bootloader is blocked. How to unlock it is described on our website:
- Unlock Bootloader on HTC
- For Nexus: instructions
- For Sony: instructions
- Unlock
- Unlocking Huawei bootloader
- Unlocking LG bootloader
Let's start flashing the Recovery firmware:
1. First of all, go to this page and download the file version " recovery-clockwork.img» for your device. Please note that most devices have both a touch and classic version. Download the one you like best.
2. Now place the CWM recovery file in the “ platform-tools" I also renamed it to " recovery.img"(later you will understand why). I recommend that you do the same.

3. Connect your tablet or smartphone to your computer using USB.
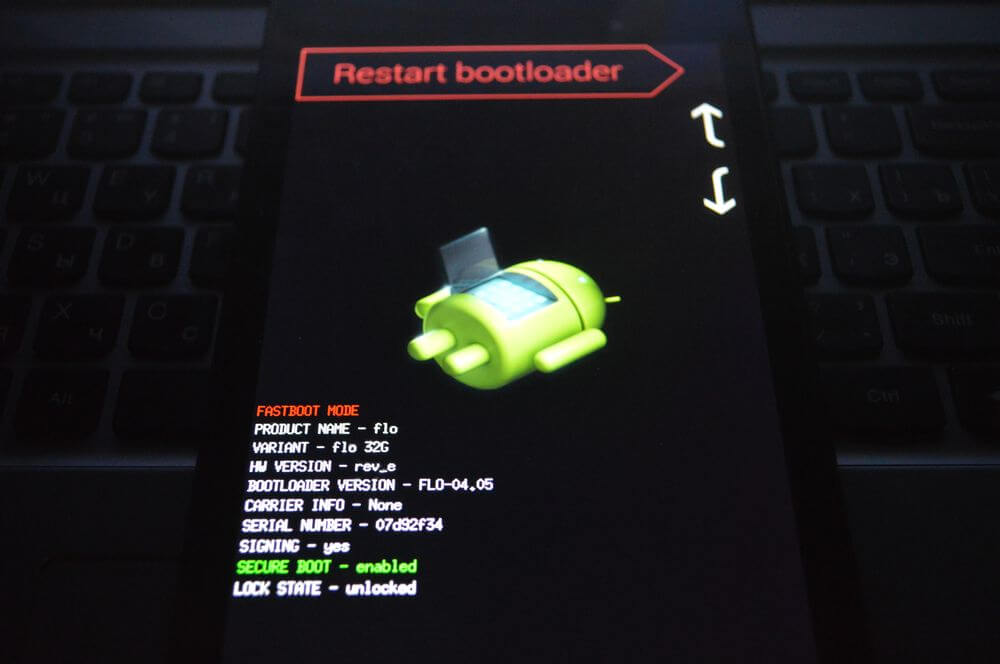
In this case, the device must be booted into fastboot mode. Typically, to do this, with the device turned off, you need to hold down the key combination: Inclusion + Volume down. But this combination may differ depending on the device manufacturer.

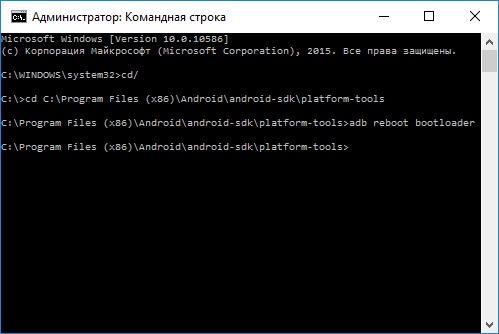
UPD: it’s much easier to switch to fastboot mode as follows: enable USB debugging on the device, go to command line(step 4 below tells you how to get into it) and enter the commands sequentially, and after each press “ Enter».
cd/ cd path to "platform-tools" adb reboot bootloaderI got it like this:
Your path will look different. If you acted exactly according to the instructions, it will come out (in any case, look at the path in the corresponding line of Explorer):
cd\tools_r25.2.3-windows\platform-toolsIn the screenshot you can see how I entered the same commands. As a result, the device will boot into fastboot mode.

4. Now open command line(or skip this point and continue to work with it if you just switched Android to fastboot mode through it). The easiest way to get there is to press the key combination “ Win» + « R" and enter:
cmdAfter that, click " OK».

5. You will be taken to the command line.

6. Now you need to specify the path to the folder with the firmware. Type the following command to go back to the folder.
cd/Click " Enter».

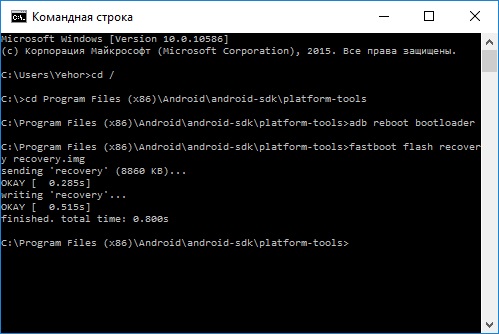
7. My path to the recovery folder is: “ C:\Program Files (x86)\Android\android-sdk\platform-tools" So I enter (you enter yours):
cd Program Files (x86)\Android\android-sdk\platform-toolsAnd again we press “ Enter».

8. All that remains is to enter:
fastboot flash recovery recovery.img« recovery.img" is the name of the file being flashed. Remember I advised you to rename the recovery file? We did this for convenience so as not to enter something like " recovery-clockwork-6.0.4.7-flo.img».
After entering this command, press “ Enter».
9. As a result, we receive the following message.

Congratulations! You have successfully installed custom recovery (CWM) using the Fastboot utility!
Method 3. Flash Recovery via the Rashr application
This method is also incredibly simple and convenient, but requires root rights. Their receipt is written at the beginning of the article in “ Method 1».
1. Install the Rashr - Flash Tool application, open it and grant Root rights.

2. In the list of options, select " CWM Recovery».

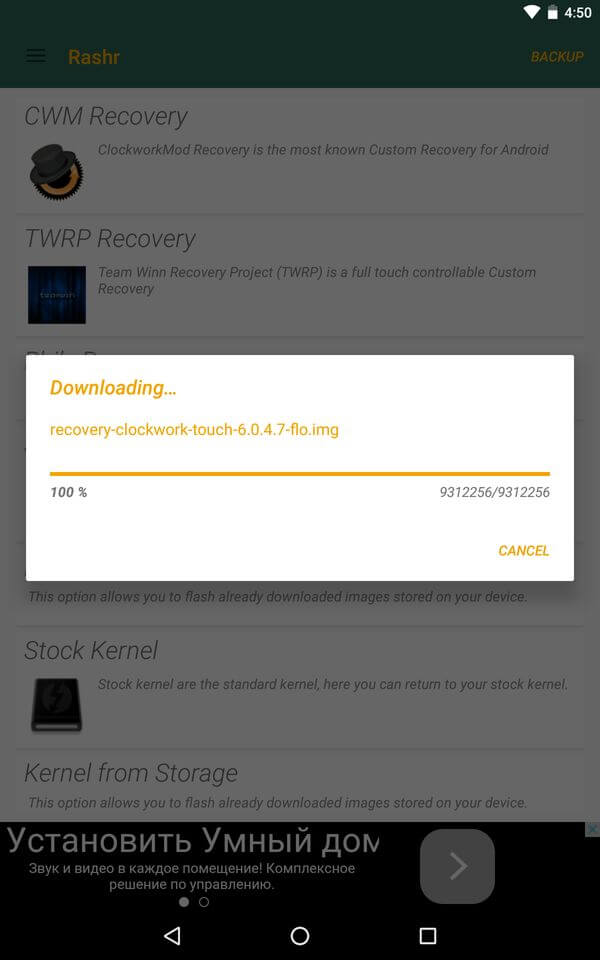
3. Then the program will display a list of available Recovery for your device. In my case, Rashr showed 2 options: ClockworkMod with support for taps on the screen and the classic option (controlled by the volume and power buttons).

4. When you see the download prompt, click " Yes».

5. Then the download of CWM Recovery for your Android smartphone or tablet.

6. At the end, a notification will appear that the firmware was successful and you now have a modified recovery installed. You can reboot into it and try it out. To do this, click " Yes».

Perhaps this installation method can be called the simplest. The only thing it needs is root rights.
Method 4. Install Recovery on Samsung in Odin
If you have samsung device, you can install ClockWorkMod Recovery on Android using the proprietary Odin utility. Here I will briefly tell you what to do.
- 1. Find and download recovery for your Samsung phone or tablet.
- 2. Connect the device to the PC via USB and put it into boot mode. How to do this is written in the full article at the link above.
- 3. Open Odin and click on " AP" (in some versions of Odin this field is called " PDA»).

- 4. Click the button Start" and wait until the firmware is completed.
That's all! I hope you found this article helpful!
Need to flash Android using FastBoot, but don't know how? This article gives detailed instructions on using the FastBoot utility and how to use it to flash an Android device.
This manual will fully explain how to use FastBoot! If you don’t know how to install archived updates, then you need the article - Clockwordmod - what is it. Instructions for CWM recovery with pictures
Downloading and installing FastBoot
Before flashing Android using FastBoot, you need to download it and install it on the desired computer.
1. You can download the FastBoot utility with the official Android SDK program (heavy weight)
why ADB RUN is better
Launch
If you downloaded Separately Fastboot
After you have downloaded and installed FastBoot, open the " Command line »

and vve Enter the commands to go to the folder with the Fastboot utility (if you installed separately FastBoot)
cd/cd adb

If you downloaded ADB RUN
If your choice fell on ADB program RUN, then launch it and select Manual -> ADB from the menu

Instructions for commands on how to flash Android using FastBoot
It is very important to write commands and firmware files as they are specified!
If your command is specified
fastboot flash cache NazvaniAFiLe.imgthen you need to write exactly like that, but not any other way. In other words, the case of letters is important, otherwise you will get an error cannot load 'image' - there is no such file.
Reboot commands into firmware mode (bootloader)
fastboot reboot-bootloaderThe command "sees" your Android PC
Get into the habit of checking before doing anything in Fastboot if the connection between your computer and Android is:
Checking whether your PC can see your Android
fastboot devicesExecute this command when the device is already in firmware mode (bootloader)
Nexus Bootloader Unlock and Lock Commands
Unlock bootloader for Nexus
fastboot oem unlockLock bootloader for Nexus
fastboot oem lockCommand to find out bootloader version
Shows the version number of the bootloader installed on Android
fastboot getvar version-bootloaderPartition formatting commands
Before flashing any partition in Android, you must first format it so that there are no problems with operation
fastboot erase Imya_razdela - erase partition: boot, radio, recovery, system, userdata and others
Erases the Cache partition
fastboot erase cacheErases the Data section
fastboot erase userdataErases the System partition
fastboot erase systemErases Recovery section
fastboot erase recoveryCommands for flashing a partition
After you have formatted the partition or partitions, you can start flashing the firmware
fastboot flash Imya_razdela imya_file.img - firmware of the selected partition: boot, radio, recovery, system, userdata and others
Flash the system partition (System)
fastboot flash system imya.imgFlash the cache partition
fastboot flash cache imya.imgFlash the data section
fastboot flash userdata imya.imgFlash the Recovery partition
fastboot flash recovery imya.img
Setting the power-on animation (firmware partition with animation)
fastboot flash splash1 splash.imgFlash all partitions (boot, recovery and system)
fastboot flashallInstead of imya.img- you need to enter the name of the file you are going to flash
Command to install update.zip
Flashes an update archive on Android in the update.zip format or ZIP archive with IMG images of various sections
fastboot update filename.zipFor Sony devices
Checking the connection of the Sony device, if the answer is 0.3 device, then it is connected
fastboot.exe -i 0x0fce getvar versionUnlock bootloader
fastboot.exe -i 0x0fce oem unlock 0xReceived_KeyMore detailed information to unlock Bootloader Sony - How to unlock Bootloader Sony
Waiting for Device error
If you have the following message on in the command window for a long time: waiting for device- Means:
- The driver is not installed or installed incorrectly - reinstall or install
- Android device is not in Bootloader mode - translate
- Incorrect connection to USB port- use the rear ones USB ports 2.0 computers, do not use USB hubs
What should you do if your Android smartphone suddenly starts to freeze and behave as if it wanted to live its own life? How to reflash Android? This question is asked by many users of modern gadgets of various brands - from top-end Samsung and Sony to the increasingly popular Chinese Xiaomi (more often colloquially - Xiaomi) and Meizu.
Possible solutions to problems
One of the simplest tips would be to reset your device to factory settings. Indeed, in this case, no third-party intervention is required - all settings and resets are done at the software level. But this trick will only work if the smartphone’s malfunctions are caused only by software and clogged memory. After resetting the settings, and in frequent cases erasing the content, the device turns on like new.
What is "Recovery" and what is it eaten with?
Many immediately give up their positions and throw out the white flag, rushing to contact service centers. But anyone advanced user will say that it is not worth doing this. After all, you can save yourself extra nerves and cash, just by following simple steps from this manual.
“Recovery” is a smartphone software based on the Android OS, which is something like a “BIOS” on a PC. That is, with the help of "Recovery" you can do full reset smartphone to factory settings, you can also install updates operating system and just flash it. When purchasing in a store, the user most often receives a device with a factory “Recovery” menu, which is slightly limited in functionality and will not allow you to successfully flash the operating system.
If we talk about “custom” (translated from English custom - “made to order”) “Recovery”, then it will allow you to more fully “communicate” with the phone system, do backups firmware and restore them, as well as perform a more complete and deep reset of the device.
How to enter "Recovery"
To flash your device via Recovery, you must first get into this very menu. This couldn’t be easier to do, especially since on many devices the input combination is exactly the same. So, if the smartphone has a physical central button or a “Home” button (most often found in older Samsung and LG devices, but it can also appear in more modern devices), you need to hold down the “Home” buttons with the gadget turned off. and “Volume +”, then, without releasing them, press the power button.

The device will turn on desired mode. If you have a more modern device without physical button To go to Home, you need to repeat the process described above, but using only the Volume + button and the Power button. If desired result was not achieved, it is worth referring to the extended list of ways to enter the “Recovery” menu for different manufacturers.
What else will you need?
In order to understand how to reflash Android, you first need to download the firmware for your device. Most often, firmware files are hidden from public view for security purposes and to protect the manufacturer’s data. That is why ordinary users create backup copies of their operating systems and form databases of stock firmware from them, links to which can be found on specialized websites. It is the firmware file itself, located in the archive with the *.zip extension, that you will need to understand how to restore Android using Recovery.

There are also times when you are tired of the old stock firmware and want something new. That is why there are always craftsmen who create custom firmware, “cutting out” the unnecessary from them or, conversely, adding something new. In such cases, it will not be possible to use the standard “Recovery”, and here those same custom CWM Recovery (ClockWorkMod Recovery) or
Installation or TWRP
It is not necessary to install Recovery on Android via a computer; most often, on the contrary, it is easier to use the stock one. All you need to do is download the necessary file, again located in an archive with the *.zip extension, and place it on the external flash card of your smartphone.

After that, going to the stock “Recovery”, you need to select the “Apply update from external storage” item and in the list that opens, select the same file with the custom “Recovery”. After confirming your choice, the installation process will begin, after which the device will prompt you to reboot. The process is complete.
How to flash Android via Recovery
Moving directly to the process of installing the firmware itself, I would like to say that all unofficial files of the Android operating system, created directly by users of certain devices, should be installed at your own peril and risk. If, however, the decision is made to install a non-native version of the software, you should make sure that the firmware is “written” specifically for the phone that you plan to reflash.

If we are talking about stock firmware, then you shouldn’t bother installing CWM Recovery or TWRP. All manipulations that need to be done are limited to downloading the factory firmware file and placing it on external card memory. After this, the process is similar to installing a custom Recovery. That is, you need to go to the stock “Recovery” menu, select “Apply update from external storage”, then specify the firmware file directly and confirm the action. After the process is completed, you need to take one more step that will help avoid freezes and glitches when turning on and operating the device. Immediately after the firmware is completed, you need to select the “Wipe data/factory reset” menu item and confirm the action. This will clear information about the previous software and files that were present on the device before the firmware process.
After completing these steps, you must select the “Reboot system now” menu item. The device will reboot and the process of setting up the smartphone from scratch will begin. If the switching process takes a long time and the device logo “hangs”, it’s worth remembering whether the settings reset item was performed after flashing.
Custom versions of Android
How to flash Android via Recovery is, in principle, clear. It remains to figure out what to do with OS versions written directly by device users. The answer is simple: the process needs to be repeated, performing the same manipulations in custom “Recovery”. The only difference is that the firmware file itself can now be placed not only on an external memory card, but also on internal memory devices. This adds convenience in the event that a flash card is simply missing. In this case, you will have to select the “Apply update from internal storage” option.

It is also worth noting that in CWM Recovery and TWRP the “Wipe data/factory reset” item has been replaced with two separate items: “Wipe data” and “Wipe cache”. After installing “Android” through “Recovery” (namely, the custom version) has succeeded, in the modified ClockWorkMod or TeamWin menu you need to select the “Wipe Dalvik cache” sub-item, which will significantly increase the chances of successfully turning on the device with the new operating system.
Restoring stock firmware
If you don’t like it or don’t get used to it, there is always the opportunity to return everything to its place. Many people ask the question: “How to restore Android through Recovery, namely the stock version?” The answer lies in the point above. Roughly speaking, returning everything to normal occurs in the same way as making the initial changes.

All you need to do is download the firmware from the manufacturer to a flash card or internal memory, then select the appropriate “Recovery” menu item and do a complete reset of settings/content. In principle, nothing complicated.
It seems that understanding how to flash Android via Recovery is not so difficult. But if some points are unclear, or you are not confident in your knowledge, it is better not to get involved with such processes. But even if something doesn’t work out, you can always restore the device’s firmware through the corresponding menu item. The main thing is to make a backup copy before flashing Android via Recovery. To do this, you will need a custom “Recovery” and a little patience, because the process of backing up the firmware takes a lot of time.
If something goes wrong, you can always turn to knowledgeable people. At least in an authorized service center will definitely help. The main thing is not to lose heart and move forward confidently. This is the only way to achieve any results. Good luck with the flashing!
Since the theme of the firmware Android devices is very relevant, I decided to write about installing CWM Recovery on an Android smartphone or tablet. There are several ways to do this: for some, all actions are performed on the device itself, but this requires root rights, while for others, a computer is used to install custom recovery. Whatever seems easier or more convenient to you, use it.
Method 1. Installing CWM Recovery via ROM Manager
The first way to flash Recovery firmware is to use the ROM Manager program, which we already talked about in the article:. This application has a separate item that allows you to install ClockWorkMod Recovery in a couple of minutes.
I would like to note right away that ROM Manager requires root rights to work. You can read how to get them and.
After that, go to the official page https://clockworkmod.com/rommanager and see if your device is in the list of supported ones.
1. Now open the ROM Manager and select the first item “Recovery Setup”.

2. In the next window, in the “Install or update Recovery” section, select “ClockworkMod Recovery”.


4. At the bottom, click on “Install ClockworkMod”.

5. The download process will begin. With a good Internet connection it lasts a couple of seconds.

6. At the end of the download, you will be asked to grant root access to the application. Select Grant.

7. That's it! You will see a notification “Successfully flashed ClockworkMod recovery!” Just click "OK".

This is how easy it is to flash CWM Recovery via ROM Manager. Now you can open it and you will find new items in it that were not in the standard one.
Method 2. Install custom Recovery on Android using the FastBoot utility
All the steps described below are the same as installing TWRP Recovery:.

Unzip the folder to the “C:” drive – there will be “tools” inside, and the “android” file in it. Launch it.
Select "Android SDK Platform-tools" and click "Install package".

Check the “Accept License” checkbox and then click “Install”.
After installation is complete, in the “tools_” folder version-windows" "platform-tools" will appear, and it contains "fastboot" and "adb". They will be useful to us later.

UPD: The “platform-tools” folder on my computer is in a different directory than yours. The fact is that this article was written back when there was an installer for the Android SDK. Starting from version 25, installation is carried out only from a ZIP archive: because of this, part of the instructions had to be edited. Therefore, the path to ADB and Fastboot is different from mine, everything else remains unchanged.
If you have a Sony, HTC, Nexus, Huawei or LG device (some models), then Bootloader is blocked. How to unlock it is described on our website:
- For HTC: ,
Let's start flashing the Recovery firmware:
1. First of all, go to this page and download the version of the “recovery-clockwork.img” file for your device. Please note that most devices have both a touch and classic version. Download the one you like best.
2. Now place the CWM recovery file in the “platform-tools” folder. I also renamed it to “recovery.img” (later you will understand why). I recommend that you do the same.

3. Connect your tablet or smartphone to your computer using USB.
In this case, the device must be booted into fastboot mode. Typically, to do this, with the device turned off, you need to hold down the key combination: Power + Volume Down. But this combination may differ depending on the device manufacturer.
UPD: It’s much easier to switch to fastboot mode as follows: turn on the device, go to the command line (step 4 below tells you how to get into it) and enter the commands in sequence, pressing “Enter” after each one.
CD path to "platform-tools"
I got it like this:
Your path will look different. If you acted exactly according to the instructions, it will come out (in any case, look at the path in the corresponding line of Explorer):
cd\tools_r25.2.3-windows\platform-tools
In the screenshot you can see how I entered the same commands. As a result, the device will boot into fastboot mode.
4. Now open the command line (or skip this item and continue working with it if you just switched Android to fastboot mode through it). The easiest way to get there is to press the key combination “Win” + “R” and enter:
After that, click "OK".

5. You will be taken to the command line.

6. Now you need to specify the path to the folder with the firmware. Type the following command to go back to the folder.
Press "Enter".

7. My path to the recovery folder is: “C:\Program Files (x86)\Android\android-sdk\platform-tools”. So I enter (you enter yours):
cd Program Files (x86)\Android\android-sdk\platform-tools
And press “Enter” again.

8. All that remains is to enter:
recovery.img“recovery.img” is the name of the file being flashed. Remember I advised you to rename the recovery file? We did this for convenience so as not to enter something like “recovery-clockwork-6.0.4.7-flo.img”.
After entering this command, press “Enter” again.
9. As a result, we receive the following message.
Congratulations! You have successfully installed custom recovery (CWM) using the Fastboot utility!
Method 3. Flash Recovery via the Rashr application
This method is also incredibly simple and convenient, but requires root rights. How to obtain them is written at the beginning of the article in “Method 1”.
1. Install the Rashr - Flash Tool application from Google Play, open it and grant Root rights.

2. In the list of options, select “CWM Recovery”.

3. Then the program will display a list of available Recovery for your device. In my case, Rashr showed 2 options: ClockworkMod with support for taps on the screen and the classic option (controlled by the volume and power buttons).

4. When you see the download prompt, click Yes.

5. Then the download of CWM Recovery for your Android smartphone or tablet will begin.
6. At the end, a notification will appear that the firmware was successful and you now have a modified recovery installed. You can reboot into it and try it out. To do this, click “Yes”.

Perhaps this installation method can be called the simplest. The only thing it needs is root rights.
Method 4. Install Recovery on Samsung in Odin
If you have a Samsung device, you can install ClockWorkMod Recovery on Android using proprietary utility Odin. Here I will briefly tell you what to do. I recommend reading our article: . It contains detailed information about using Odin.
Custom recovery is a special recovery environment assembled by third-party developers. It has a number of unique advantages and features, for example, it makes it possible to install unofficial firmware. There are quite a few ways to install custom recovery, some require a computer, and some do not.
We offer several proven instructions (universal and specialized) that will help you install recovery quickly and so that there are no problems with your smartphone.
Advantages of third-party recovery
In addition to the functions that the stock recovery mode offers, this one can do a lot of other things, namely:
- install Root without a PC;
- install.zip documents with firmware and mods;
- easy to create backups.
Disadvantages of custom recovery:
- a chance to disrupt the phone’s functionality as a result of incorrect operation;
- loss of warranty after installation.
There are many advantages, especially for geeks and those who want to install third-party firmware on Android. However, you can actually turn your phone into a “brick” by performing incorrect manipulations in recovery mode. Be careful and don't do anything you're not sure about.
What to choose, TWRP VS CWM?
There are two popular Custom recovery:
- Team Win Recovery Project (TWRP) characterized by a minimalistic interface with large buttons and user-friendly graphics. It also provides the opportunity to conduct work in Russian. The system has more features than CWM.
- ClockworkMod (CWM) has an outdated design, and navigation is done using hardware buttons (volume control and power key). Unlike TRWP, CWM does not support touch input and has fewer options on the home screen.
Preparing for installation
Before you start installation, make sure that your smartphone has everything you need for this, namely:
- working USB cable;
- USB drivers and ADB components;
- installation file with recovery.
Please note that certain installation methods do not require all steps to be followed.
Installing recovery without a PC
We offer two popular and simple ways do it.
Method No. 1 (CWM)
First of all, download the ROM Manager app from the app store.

- Open it and you will immediately see a request to grant root privileges.
- Click OK.
- You will notice the CWM installation item, click on it, confirm your phone model.
- As soon as you do this, the application will begin installing recovery on the device, after which the device will automatically restart.
Attention! Now CWM is not so actively supported, so the method may fail due to the fact that the smartphone will not have an official recovery from this development team. If this happens, move on to the second method.
Method #2 (TWRP)
The second application we will use is Flashify.


You may encounter a problem in which there will again be no official recovery on your phone. In this case, try an alternative way of working with the program, described below.
An alternative way to install recovery
It implies that you will need to download TWRP (unofficial) to your device on the Internet and place the document in the root directory of the system drive on your phone or on a memory card. Only download it from trusted sources such as XDA-developers or 4pda.

This will take some time and then you will be prompted to reboot to enter recovery.
Installing recovery via PC via ADB
If you were unable to do everything according to the instructions above or do not have root, try methods using a computer. Installing TWRP on Android via ADB - the most common method of installing custom recovery.

After that it will be installed.
Attention! It may happen that this won't work. In this case, you need to reinstall the ADB drivers by downloading them from the link adb.clockworkmod.com.
Installing TWRP using Odin on Samsung
Odin is a tool designed to be easy and effortless.


That's all, we hope the installation of custom recovery went smoothly for you. Don't forget to always back up your files before installing third-party firmware or other system modifications. There is always a small chance that a failure will occur and the operating system will stop working or begin to malfunction. If this happens, you can easily restore the saved version of Android.
Publications on the topic
-
 LLC "free choice" Public wifi user agreement for visitors
Identification of Wi-Fi users by passport data or phone number in public places is required by law (97-FZ dated 10/05/2014...
-
 The best wireless headphones for iPad
Today I would like to talk about headphones for iPad. Let's take a closer look at the original headphones that can be bought at the Apple Store...