
How to make a Windows XR system image. Creating a custom operating system image

A disc image is a complete, “photographic” copy of an optical disc (such as a CD or DVD). Unlike a simple copy of a disk, its image is not just a set of folders, but a file that contains information about the disk format, boot data, its structure and the data itself.
Disk image files very often have the extension .iso. Typically, images of bootable disks or disks circulate on the Internet in this format. computer games. Let's look at how you can create an iso disk image.
To create an ISO disk image, emulator programs are used that create virtual disk drives on the user’s machine, which, however, are perceived by the computer’s operating system as completely real. There are several such programs, but we will look at how to create an iso disk image using two of them: Daemon Tools and UltraISO.
How to create an iso disk image, Daemon Tools
The program is a simple and free version that allows you to create an iso disk image from any optical disc placed in the drive of your computer.
After installing the program on your computer, the Daemon Tools program icon will appear in the lower right corner of the Desktop. By right-clicking on it, we will see the following picture:
Using the tooltip, look for the “Image Creation” icon (second from the left). After clicking on this icon, a window with the same name will open:

In this window, after we insert the disk into the computer drive, we will mark the save folder and the format of the future disk image file (iso), decide whether we will compress it or not, and whether we will use or refuse to protect the iso file with a password.
Click “Start” and at the end of the processing operation we find the created ISO disk image in the specified folder.
How to create an iso disk image, UltraISO
UltraISO is more functional than free version Daemon Tools allows you to create an iso disk image from files stored in computer folders.
The UltraISO interface window consists of two parts, each of which has a conductor structure.

We find in the lower part the file or folder from which we want to create an iso disk image and drag it to the upper part.

Then open the “Properties” window by clicking on the button next to the “Image” field, set in this window the type-size of the desired disk image and the file name format to “standard”. Click OK in the “Properties” window, and “Save As” in the main program window.

In the window that opens, select the file format (ISO file), give it a name, specify the save folder and click “Save”. That’s it, after the processing operation we find the created iso disk image in the specified folder.
Today, many are interested in how to create an ISO disk image of the Windows 10 operating system. Let us immediately say that this is quite simple to do, but to create an image you will need a special utility developed by Microsoft. Moreover, this program allows you not only to update the current system, but also to record it on removable media(CD or).
You should start by preparing a removable drive - it is important that its volume is at least 8 gigabytes; creating such a drive is available for the following versions of the described OS:
- Windows 10 Pro;
- Windows 10 Home.
Now let's proceed directly to the process. Below is an algorithm of the required actions.
Step-by-step guide to creating an ISO disc in Windows 10 using the installer
First, connect a disk (obviously, it should be a DVD-R) or a removable drive to the computer, and then check whether the storage medium has the required amount of memory. Then follow the instructions.
Step one. Click on the "Windows 10 Setup" icon. Then a window will appear in which you need to select the second option (“Create installation media…”), as shown in the image below. After that, click the “Next” button.
Step two. In the next window, this utility will prompt you to set the required parameters, including architecture, language, etc. Having selected everything you need, click the “Next” button again.

Note! It is extremely important that the selected ISO image architecture matches the parameters of the computer itself where it is planned to be installed. Typically, the program allows you to select not only a 32/64-core system, but also both options at once.
If you chose the first option, then you will have two options:
- burn to DVD;
- first create a disk.
In the second option, accordingly, recording is possible exclusively directly to a removable storage device.
Step four. When you select the appropriate item, click “Next”. If recording occurs directly to a flash drive, the operating system will demonstrate the available media.

Note! For those who don’t know, during recording, all information on the flash drive will be deleted.
Step five. When you click Next again, the installation or recording will continue.

Step six. In the first option, that is, when it comes to selecting the “ISO file” item, several folders will be attached at once where the image or drive will be saved. It is quite obvious that there should already be a DVD-R disc containing the required amount of memory. Once saved, you can subsequently record it on any convenient medium.

Note! Such operations are possible only on computers running Windows 7 or higher.
Features of installing Windows 10 from an image
Installing the operating system is quite simple; it does not require any special skills or knowledge. To begin the installation, insert a flash drive or disk, and then, when the computer restarts, press any button after the corresponding message appears (“Press any button to boot...” or something similar, it all depends on the specific type of system). Before this, you need to click boot from disk or flash drive in the BIOS settings.

The next step is that the system will ask you to enter your product key. You will find this key on the package or, if you are just updating the OS, select the “I don’t have a key” option.

Accept the user agreement and decide on the installation type. If you are not an “advanced” user, then it is better not to use a custom installation.


Then you will find yourself in a window for selecting a partition where the operating system will be installed.

When all the required actions are completed, the system will install, after which it will ask you to configure it “for yourself.” More specifically, these settings include:
- installation/configuration of standard programs;
- creating your own account.
Here you can decide for yourself whether to leave basic settings or configure the settings again. That's all, now you know how to create an ISO image of Windows 10. For more detailed information, we recommend watching the thematic video below. Good luck!
Video - Create a Windows 10 boot disk
Any operating system is not one hundred percent protected from unexpected crashes, breakdowns, or malfunctions. Windows 7 is no exception. In order not to lose valuable system settings that you have been customizing for a long time, it is recommended to create a disk image with the iso extension at least once every six months. In this way, you will protect yourself from long and tedious recovery after failures or breakdowns operating system. You can burn the resulting file to a DVD disc, memory card, or any other digital media. And at the right time, just download it back. If you decide to do this, follow the instructions in this article.
Creating an ISO image for Windows 7 through the official Microsoft website
Not long ago, a software developer company made it possible for users to independently generate image files directly through the official website. To do this, follow the link: https://www.microsoft.com/ru-ru/software
Before you start, make sure that your storage device has more than 4 GB of memory, as well as a stable Internet connection:
- follow the link above and check out a number of tips and instructions,
- scroll down the page and you will see the input field for your Windows 7 product key,
- now minimize the browser and go to the control panel,
- select the "System and Security" tab,

- in the window that appears, click on the “System” section,

- you will be immediately redirected to a page where at the very bottom is the activation key for your product. Carefully rewrite it in the browser line and click “Check”

- wait until the system checks your Windows 7 and the relevance of its license. The process will take from a minute to five. If everything is in order with the key, then the utility in the browser will immediately begin creating an ISO image of your entire system. If there is something wrong with the key or this method does not suit you for other reasons, proceed to the second step of the instructions.

Creating an ISO image of Windows 7 without third-party programs
- You can create an image inside your computer without installing unnecessary software. To do this, go to the control panel again and find the “Backup and Restore” section.

- In the window that appears on the left, find the “Create a system image” link. Click on it.

- Wait a few minutes while Windows finds all the ways to create and burn the image.

- The system will automatically open before you all possible options for recording the image on media. Most likely, you will have three options: “hard drive”, “DVD media” and “network storage”. if you have dvd disk, paste it and choose the second method.

- If your computer only has one disk, as in the screenshot below, then you won’t have to select it. If there are several disks, then you can select one of them or all of them. Click on the “Archive” button to start burning the ISO image to disk.

- If you chose the third option: online hosting, then the process will be slightly different. Please note that the file may not be protected in a network location.

- Enter the network location address.

After pressing the “ok” button, copying will begin. It is also possible to manually record the image through programs such as Daemon Tools. The process is very similar, but takes a little longer. To do this, you need to download the program, mount the image in it and burn it to a digital medium.
If you were unable to create an image of Windows 7 after all the above points, then perhaps it will be easier for you to download ready-made ISO images from the Internet.
You can learn a few interesting words about Windows 7 images from the video below:
A disk image is a file containing full copy structure and content of data located on the disk. It stores all the information that duplicates the location and contents of a specific data storage device. The order of data sectors is repeated on the image, but the structure built on it is ignored.
The original purpose of creation was backup disk data, where the exact original structure was preserved. Nowadays, due to the spread of optical media, images in as ISO files, which can be used instead of CDs. ISO has less data - no service information.
Using archive programs that support opening this type of data, you can extract and view the contents of this file. How and with what tools you can reproduce a disk image will be discussed further.
Creating an image using ultraISO
One of the most accessible methods for creating an ISO is to use the UltraISO utility. The program is paid, but you can use the trial version, which you download from the official website.

The essence of use is as follows: yes two main fields– the directory tree of the mounted image on the left and the data stored in them on the right. Below are the directories and files stored on the computer.
Set the name future copy, for which we left-click on it, property – Rename. Introducing a new name.

Then we drag folders and files from the storage area on the computer to the image file area. To find the ones you need, use the directory explorer presented below.

Please note that at the top it is displayed overall size documents.
Actually, to complete the operation, all that remains is to save: File – Save as.

From the proposed formats we take ISO and save.
![]()
The saving process will appear, after which you will find a copy in the location you specified.

Burning an image using Daemon tools
An equally popular image burning program is Daemon Tools.
There are several variations of this software, including the free DAEMON Tools Lite. After installing the free license, you will have a virtual DVD drive.
After launch, click on the button below to create a copy of the disk.

IN settings we refer to drive unit, where the disk and folder where the image will be saved is located.
Specify copy type MDS or ISO.


Mount You can check it in a virtual drive.
Using Ashampoo Burning Studio Free
The free version of this program is free and will allow you to burn a disk image. Download from off. site, simple and straightforward installation.


After installation, the application will launch on its own. Choose Disk image – Create.

If we create it based on a real disk, first insert it into the drive.

Specify the storage location and click Further to start the process.

Once the procedure is complete, you can open the folder containing the file.

How to create a copy of a disk using CDBurnerXP
To create an ISO in the CDBurnerXP utility, select from the menu File – save project like ISO.

Specify the directory, where to save the file and click Create ISO.

Can be customized options, such as: name, description, date, identifier, copyright and other settings. Once you open Boot Options, you will see a dialog box with additional options.

ISO using ImgBurn
ImgBurn handy tool for recording ISO images. Everything is done very quickly and quite simply.
After downloading and installing the program, you will see the following window.

As you can see, here you can: write down image to disk, so make it from existing files.
In this case, we are interested in the latter.
Special additional settings you don’t need to specify (the only thing is, if you want, you can change the recording speed and number of copies), specify the drive from which you want to read data and click Reading

The copying process will begin, after which a message will signal to us that it has been successfully completed.

Free DVD ISO Maker
The program is free, easy to use and simple.

After launch you will need to select Select CD/ DVDdevice, that is, the drive for reading (specify the path). Next is the place where we will save the resulting file. Then click Covert and wait for the final completion of the copying procedure.
We use ISODisk
It is also free, download it from the official website. 
The interface, although in English, is quite intuitive. Some users do not recommend using it for mounting virtual drives, but it copes with the task of creating ISOs with a bang.
If something suddenly happens to your operating system, this may entail great amount problems. In the best case, you will have to reinstall it, search on the Internet for drivers and installers of the programs you need. In the worst case, there is a risk of completely losing all personal information, unique photographs, important documents and projects. Typically, restoring the OS is unlikely to help in this case - it only works with Windows settings. Therefore, to save your data, it is important to know how you can create a backup disk image of your Windows 7.
Types of images
You don't need to have the DVD itself for this. There is a specialized software(for example, the UltraISO utility), with which you can do everything you need right on your computer. You prepare a set of folders and files, and use the program to create a disk image.
The second type is a backup copy of the operating system. It can be done even using standard Windows tools. It is needed to restore your OS in case of unforeseen emergency situations.
In fact, this is a cast of the hard drive. The computer scans the entire contents of the specified HDD and packs it into a special archive. If something happens, you can always restore everything back.
Windows Backup
To create a backup of data on disk, you do not need to install any additional software. You just need to do the following:

The whole process can take quite a long time. The volumes of stored data are usually large. In general, the duration depends on the amount of information being copied, the generation of USB or SATA/SAS interfaces, network speed (depending on where the backup is saved) and computer performance.
Recovery disk
After completing the backup process, the system will prompt you to create a special recovery disk. This is a set of useful programs that can help users if their OS stops starting. On it you can find utilities for restoring the MBR boot sector, sets of system files necessary for startup, and so on.

Creating an ISO image
If you want to burn DVD or CD content to digital ISO format, you will need a special program. The simplest and most reliable example of such a utility is free application ImgBurn.
Often, when we buy a ready-made computer with a pre-installed operating system, we do not receive a distribution disk. In order to be able to restore, reinstall or deploy the system on another computer, we will need bootable media.
The entire process of creating a bootable XP disc comes down to burning finished image operating system onto an empty CD. The image most often has an ISO extension and already contains all the necessary files for downloading and installation.
Boot disks are created not only to install or reinstall the system, but also to check the HDD for viruses, work with file system, reset your account password. There are multiboot media for this. We will also talk about them below.
Method 1: disk from image
We will create a disk from something downloaded on the Internet. Windows image XP using the . On the question of where to get the image. Since official support for XP has ended, the system can only be downloaded from third-party sites or torrents. When choosing, you need to pay attention to the fact that the image is original (MSDN), since various assemblies may not work correctly and contain a lot of unnecessary, most often outdated, updates and programs.


The disk is ready, now you can boot from it and use all the functions.
Method 2: disk of files
If for some reason you have only a folder with files instead of a disk image, then you can also write them to a disc and make it bootable. This method will also work if you create a duplicate installation disk. Please note that you can use another option to copy a disc - create an image from it and burn it to CD-R.
In order to be able to boot from the created disk, we need boot file for Windows XP. Unfortunately, it cannot be obtained from official sources for the same reason that support has ceased, so again you will have to use a search engine. The file may have a name xpboot.bin specifically for XP or nt5boot.bin for all NT systems (universal). Search query should look like this: "xpboot.bin download" without quotes.

Multiboot disk
Multiboot disks differ from regular ones in that, in addition to the installation image of the operating system, they can contain various utilities to work with Windows without starting it. Let's look at an example with Kaspersky Rescue Disk from the laboratory.
- First, we need to download the necessary material.

- Launch Xboot and drag the Windows XP image file into the program window.
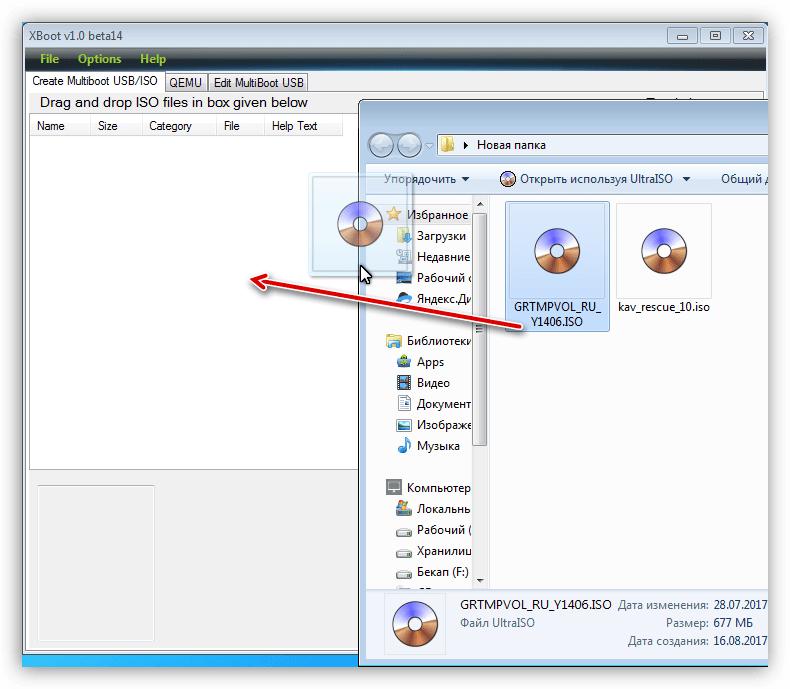
- Next you will be asked to select a bootloader for the image. Suitable for us "Grub4dos ISO image Emulation". You can find it in the drop-down list shown in the screenshot. After selecting, click "Add this file".

- In the same way we add the disk with Kaspersky. In this case, selecting a bootloader may not be necessary.

- To create an image, click the button "Create ISO" and give the new image a name, choosing a place to save it. Click OK.

- We are waiting for the program to cope with the task.

- Next, Xboot will offer to launch QEMU to check the image. It makes sense to agree to make sure it works.

- A boot menu will open with a list of distributions. You can check each one by selecting the appropriate item using the arrows and pressing ENTER.

- The finished image can be recorded onto a disc using the same UltraISO. This disc can be used both as an installation and as a “therapeutic” one.
Conclusion
Today we learned how to create bootable media with the Windows XP operating system. These skills will help you if you need to reinstall or restore, as well as in cases of virus infection and other problems with the OS.
Today, the Windows XP operating system is considered obsolete. It has been replaced by more modern systems with much greater capabilities. But at a time when Windows XP was one of the most common, most users respected it for its high reliability and stability, ease of configuration and compatibility with most existing equipment.
At the moment, the XP system is used on computers that were once designed specifically for it and do not meet the requirements for installing more modern programs.
Most users note that a system that has a limited number of programs installed that meet operating system compatibility requirements can work indefinitely without reinstallation. At the same time, a computer on which many programs, sometimes of dubious origin, are often installed and uninstalled, may at any time refuse to work due to an OS failure.
The problems are caused by the fact that as a result of installing programs, various “garbage” accumulates in the system catalog and registry of the operating system, which certain moment can be recognized by the system as working files and, naturally, lead to the “crash” of the system and the appearance of “ Blue screen of death".
So, we can name the main reasons for the need to reinstall the operating system:
- “garbage” in the registry and system directory;
- malfunction hard drive;
- changes in computer hardware configuration;
- virus attack.
“Treatment” or reinstallation
There are many special programs or utilities for cleaning and restoring operating systems, but, as experience shows, their use by inexperienced users does not bring tangible results. This is because the data action software superficial, and more complete cleaning requires a lot of experience and time. In most cases, loading a new system takes less time and does not require special skills, since most actions occur automatically.
The only exceptions are computers with installed programs, for which there are no installation images or media available, because again installed system contains only the minimum programs necessary for the computer to operate.
Why not DVD and what is the difference between a regular flash drive and a bootable and multiboot one?
Almost all installation files for installing programs, including operating systems, are supplied on CDs or DVDs. Their volume is sufficient for any purpose. But modern computers allow initial startup, before the operating system starts, from other devices, including flash drives. What advantages does this provide:

A bootable USB flash drive with Windows XP allows you to install a new operating system and the necessary set of application software on your computer in a few tens of minutes, without changing the media.
An increasing number of users prefer to use bootable flash drives. Why they are called bootable, the fact is that you cannot simply take and write the operating system files to a flash drive. In order for the computer BIOS to start booting from external storage, its structure must be designed accordingly. This applies to the structure of the drive as a whole and, in particular, its boot sector. The boot is based on the master boot record - MBR, which contains data about the boot order, the location of the loaded data and other service information. MBR structure not available for regular user, therefore, its formation requires special programs and utilities.
In addition to simple bootable flash drives, there are multiboot flash drives that allow you to select the necessary actions before installing the operating system. Such flash drives may contain:
- several OS boot options;
- several different operating systems;
- utilities for testing hardware;
- utilities for working with hard drives;
- a lightweight version of the operating system that does not require installation.

For these purposes, you need a specialized program or utility that would create the necessary partition structure of the external drive and copy installation data into it, placing them in a certain order.
The main difficulties when reinstalling the Windows XP operating system
Currently, MicroSoft Corporation has stopped supporting outdated operating systems, which, unfortunately, includes Windows XP. The biggest problem with this attitude is that when reinstalling outdated programs, sometimes a situation may arise when some hardware requires a driver. Sometimes finding the required driver takes longer than reinstalling the entire system.
Since the release and support of the Windows XP operating system has been discontinued, for recording it is necessary to use existing DVDs or download ISO images of the operating system from the Internet. Similar images are available in sufficient quantities on available file hosting services or torrent trackers. It should be especially noted that by downloading files from the Internet, users violate copyright laws, since the posted files are pirated, and do so at their own peril and risk. You also need to be aware that there is no guarantee that the installation images are correct and that they are identical to the original ones.
Programs that allow you to create an installation flash drive
Those who want to reinstall Windows have at their disposal a large number of different programs for creating bootable flash drives. Among the programs there are both paid and free programs. If you use them only for the specified purpose, then they do not have any special advantages over each other. There are only a few differences in the interface. Therefore, the use of a particular program is determined by personal preferences. In addition, paid programs usually have a limited period of use, so for one-time use to create a bootable flash drive they can also be used.
The method has wider possibilities for creating bootable, and especially multiboot flash drives Command line, however, it can only be done by trained users. For the vast majority, this method is not applicable due to its high labor intensity and complexity.

Among the most common programs for writing bootable flash drives are:
- Win32 Disk Imager;
- UNetBooting;
- PeToUsb;
- WinSetupFromUSB;
- Rufus.
For the Windows XP operating system, the bootable USB flash drive must have a capacity of up to 4 GB. It all depends on the size of the ISO image.
When creating a bootable flash drive, all data previously located on it will be irretrievably lost without the possibility of recovery.
Therefore, before you do bootable USB flash drive Windows, you need to take care of saving necessary files and data. It is not necessary to format the drive in advance, since most of the programs listed can do this on their own.
Among these utilities, .stands apart. The program allows you not only to make a bootable USB flash drive for Windows XP, but also to perform many actions to create, copy and edit ISO images. On the other hand, the abundance of functions makes it difficult for less-skilled users to use such a utility.
To create multiboot flash drives, you can use the following programs:
- WinSetupFromUSB;
- SARDU;
- Easy2Boot.
When using these programs, you can create bootable flash drives with almost any set of installation images and test utilities. The only limitation is the amount of flash memory. Very convenient to place on multiboot drives antivirus programs and driver sets for various hardware configuration options, which in some cases allow you to avoid the process of reinstalling the operating system. That is, using a bootable USB flash drive with Windows XP, you can check and “treat” the system in the event of a virus attack, test HDD for bad sectors or copy important data to a third-party drive.
How to create a bootable USB flash drive for Windows XP
In most cases, creating a bootable USB flash drive only requires specifying the location of the source image of the operating system and the designation of the drive on which the recording will be made. After a few minutes the boot Windows flash drive XP will be ready.
The Windows XP image can be on any media. If you are recording from the original installation disk, then you first need to create an image with any disk burning program, specifying an existing hard drive with the required capacity as the location of the final file. Using a bootable USB flash drive with Windows XP, copied from the original DVD, guarantees the stability of the newly installed system.
For faster installation and to avoid failures, it is recommended to disable anti-virus programs while preparing the bootable drive. The recording speed depends on many factors: the power of the computer, the DVD reading speed, the speed of the flash memory and the amount of RAM.
For example, you can show how to make a bootable USB flash drive with Windows XP using examples of the most common programs and.

To make a bootable USB flash drive using the program, you must perform the following sequence of actions:

As seen, latest program much easier to use, but has a significant “minus” - it cannot be used for anything else. In this regard, more complex software provides greater opportunities due to its versatility and multifunctionality.
Conclusion
To reinstall the Windows XP operating system, you will need a bootable or multiboot flash drive, which can be created using many special programs. The choice of a particular program depends on the preferences of the user or the goals to be achieved, since some of them are equipped with additional features. Some of the most common utilities are and.
Video on the topic
All sections of the site site
System recovery from
backup copy
Creating a Windows XP 7 system image
In the event of a hard drive failure or significant damage to operating system files, when returning to one of the restore points is useless, you can return to the original, “clean” version system files, using a disk with a backup copy of the system image.
A system image is an exact copy of Windows system files, as well as OS settings.
Please be aware that when you restore using a system image, all programs, system settings, and files will be replaced by those stored in the image.
In other words, you cannot select individual files and settings to restore. How justified is this approach?
It is known from practice that a fresh, newly installed Windows works great, but after a few months problems may appear in the system, especially if you often install and uninstall programs and devices, or visit Internet sites with a dubious reputation.
Particularly dangerous are hacker sites where you are kindly offered to download many expensive programs for free, and as an “application” - programs for hacking them.
As a rule, such utilities are infected with dangerous viruses and if you run them at least once, you risk causing serious damage to the system.
As a result, your OS may turn out to be completely inoperable and the question on the agenda will be: what to do next?
This is where a backup copy of the system, which you prudently created immediately after installing the OS and the main programs with which you constantly work, comes in handy.
If you have such a disk, you can easily and quickly restore your computer to working order.
How to create a disk with a system image
On this page we will describe a simple procedure for creating such a disk with a system image.
1. Open Control Panel and in the System and Security category, click on the link Backing up computer data.
2. On the page that appears, click the Create a system image link. The Create a system image wizard window will open, in which you must select a location to save the image.
You will be prompted to choose where to store the image.
3. By default, the wizard offers to burn the image to DVD. Accept this option and click Next.
A second wizard window appears in which you must confirm your selection.

Fig. Confirm the choice of location to save the image
4. Click the Archive button. The archiving process will begin, the progress of which will be displayed as a progress bar.
5. Upon completion of the process, a window will open asking you to insert a blank disk with a capacity of more than 1 GB into the drive.

The window will look like this: Insert a blank disc into the drive
6. Insert the blank disc and click OK.
If the disk is not formatted in advance, a window will appear asking you to perform this operation.

7. Click the Format button. The drive will be formatted with default settings, and once the process is complete, writing the system image to that drive will automatically begin.
This operation may take considerable time. Upon completion, a window will appear asking you to create a disk as well. system recovery.
As you know, using this disk you can return the system to one of its previous states.
8. Close the message window. A window will open Creating a system image with a message about the successful creation of the system image.
9. Remove from drive disk with system image and close the wizard window by clicking the Close button.
So, the disk with the system image was successfully burned. All!
Restoring the system from backup images
Now let's figure out how you can use it to restore the system if the need arises.
We will look at the most difficult case, when the computer refuses to boot, and you have neither an emergency recovery disk nor a Windows installation disk at your disposal.
1. Restart your computer using the Power button.
2. During the reboot, until the Windows logo appears, hold down the F8 key. The More Boot Options screen appears.
3. Use the cursor keys to highlight Repair your computer.
4. Press the Enter key. After downloading the files, the familiar System Recovery Options dialog will appear asking you to select a language and keyboard input method.

5. Select your language options and click Next. The System Recovery Options window appears asking you to select a username and password.

Selecting a username and entering a password
6. Select a user name, enter a password, and click OK. The already familiar System Recovery Options dialog will open, which contains a menu for selecting a recovery option.
7. Insert the previously recorded DVD with the system image into the drive.
8. Click on System Image Restore. After a few seconds, the system will find the image on the DVD and display the Restore your computer from an image dialog.
By default you are offered restore the system from its DVD image.

This is what the first one will look like Image Recovery Wizard window.
Windows Recovery
from a system backup image
9. Since we are happy with this choice, click Next. A second wizard window will appear in which you can select additional recovery options.

This is the second window of the Image Recovery Wizard
10. Accept all settings as they are and click Next. The final window of the wizard will open, containing information about the disk image used to perform the recovery.

The last window of the Image Recovery Wizard
11. Click Finish. A window will appear warning you that all data on the system disk will be replaced with data from the system image.

Warning window.
12. Click Yes. Will begin recovery process, which can take considerable time.
13. When the recovery is complete, the computer will automatically reboot and the Worker will appear in front of you Windows table, restored from the image. All files with your data will remain in their places.
This is a simple procedure Windows recovery from a system backup image.
How to create a Windows image
If you need a backup copy of your Windows BOOT disk, you will need create his image. A disk image is an exact copy of it along with boot sectors , which are not copied during normal copying, but which are necessary for the disk to be bootable. And so, now it is clear that in order for Windows to be installed “ from under BIOS”, simply copying the files on a disk and burning it to another is not enough. By creating a Windows disk image, you will not only create backup copy your disc, but you can also burn new discs with Windows at any time without having a copy on a CD.
Note. The operations presented below will be suitable for creating an image of any Windows versions (Windows 7, Windows 8, Windows XP, Windows Vista, Windows 2000, etc..).
Let's start creating a Windows image
We insert installation disk from Windows to the computer drive;
Launch the UltraISO program, select the menu section “ Tools” and item “ Create CD image”;

In the window that appears, select the source drive (if you have one drive, then there is nothing to choose from). Then we indicate the location of the new image that is convenient for you. Select the image format (preferably ISO). Click “ Do”;

Well, that’s all, in a few minutes, it will appear in the place you specified. image file, and now you can burn the Windows image to discs. And to check the image, you can first mount it with the same program (UltraISO), Menu “ Tools” => “Mount to virtual drive” (the virtual drive is installed with the program by default (unless you unchecked this box during installation of the program)). In the window that appears, select our new image and click “ Mount" And now the break" My computer” you will see a virtual drive with a virtual disk (image) inserted and you can access it or run it like a regular CD.
|
Don't forget to leave |
Publications on the topic
-
 UC Browser – high-speed browser Belka Latest version of uc browser
Among the dozens of browsers common today in both the mobile and desktop worlds, one truly stands out...
-
 Program for optimizing and accelerating Windows
The Samsung SCX-3400 model of printer is a classic multifunction device that can print, copy, and scan documents. It is also a monochrome...