
Put your face in a suit online. Photo collage: how to insert a face into a picture using Photoshop

29.01.2017 28.01.2018
Hello to all regular visitors and guests of the site site
In this tutorial we will look at how to insert a face into another photo in Photoshop. And let's fool around a little.
It is worth noting that the main aspect that you need to remember before creating a montage using faces is the sources. Their choice must be taken carefully and seriously, because the result depends on the choice of the source. It is necessary to ensure that the tilt and position of the head, lighting match, it is necessary that the photos are taken from the same angle, etc. Otherwise, you should not count on a high-quality result.
As mentioned earlier, we decided to play around and insert Putin's face into Trump's head. Download images.
Open Photoshop and start working
Open both photos in Photoshop (Ctrl + O):
Let's move on to the photo with Vladimir Vladimirovich and select the face in any convenient way.
For example, the Lasso Tool. The hotkey for calling the tool is L.

We select Putin’s face - we capture all the facial features, partially cut out the forehead:

Press Ctrl + C on the keyboard to copy the face, go to the recipient - Trump and press Ctrl + V to paste the face into the document.

Press Ctrl + T on the keyboard to call Free Transform.
Resizing the face to match the size of Trump's face:

To fit the face even better, reduce the opacity of the layer and try to make the eyes, lips and eyebrows match:

Once you have successfully placed the face, return the opacity back to 100%.

Go to Select – Modify – Contract:

In the drop-down window, set the radius to 5-8 pixels:

Go to the layer with Trump and double-click on the lock to unlock the layer:

Press the Delete key on the keyboard. After this, a “hole” will appear on the layer with Trump:

Press Ctrl + D on your keyboard to deselect. Hold down the Shift key and select both layers in the layers palette:

Go to Editing – Auto Overlay Layers (Edit – Auto – Blend Layers):

The settings should be as follows:


All the shortcomings of automatic insertion can be corrected, for example, with the Mixer brush tool.

Create a new layer:

In the top settings panel of the Mix Brush tool, set approximately the following settings:
On a new layer, use a Mix brush to go over the areas where the photo meets. We especially pay attention to the left side of the face:

Create another new layer and fill it (Shift + F5) with 50% gray:

Go to the menu Filter-Noise-Add Noise:
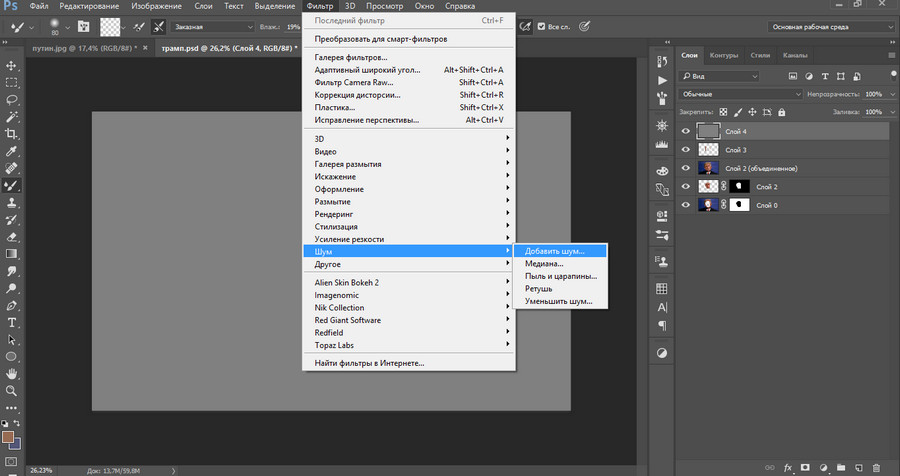
Add 1-3%:

Change the layer blending mode to Overlay (Overlay):

Right-click (right-click) on the layer in the Layers palette and select “Create Clipping Mask.” This way the noise layer will only affect the layer on which we painted the Mix with the brush.


So we found out a way to simply, easily and quickly insert a photo into another photo. A very accessible method in Photoshop!
Success in creative work! Let the Muse never leave you!
The photography industry is developing rapidly, so it is not surprising that everyone wants to get high-quality photographs. Their processing has become especially popular thanks to social networks. Previously, you had to use special software, which was not always easy to understand due to navigation, so it is not strange that many people want to insert a face into a photo online for free. To do this, you can use our service, which provides a variety of options for processing images. Believe me, not many resources allow you to do a lot of photo manipulations.
Our website also offers a wide selection.
Work principles
Before inserting a face online for free into any image, there are a few things to consider during pre-processing:- The photo format must be of high quality;
- You can’t take a photo with expensive equipment, but if you’re using a phone, you need to make sure that your face is clearly visible;
- Before inserting a face into a template online for free, you need to decide on the color scheme and design.
To make a photo montage online for free, inserting a face into a picture is quite simple:
- go to our service;
- select the appropriate section;
- select the necessary photo templates;
- Upload a photo;
- save the image on your computer.
Do you want to attach? Do it on best-photoshop.
Advantages
Photo montage is one of the ways to insert a face into a picture online without registration and for free. Now everyone can feel like a star posing for magazine covers, visualize dreams of a vacation on the coast of an exotic island, imagine, at least for a minute, what it’s like to be the hero of a famous film.When working, you need to adjust the color scheme, brightness and contrast of the image. The work is quite complicated and takes more than one hour, but if you insert a face into a photo online for free, you can avoid this process, since the service offers different filters for pre-processing.
If we talk about the advantages of using such resources, there are several of them:
- available without registration;
- various photo templates;
- simple interface;
- clear navigation;
- A full-fledged photo editor is available on one resource.
Internet services require the use of a variety of devices, including phones and tablets, because there are no system requirements. Now even those who have never done anything like this before can take a beautiful photo in just a few minutes. In addition, such a photo will be an excellent gift for family and friends. It does not need to be used only on social networks, but can be printed and hung on the wall.
Choose a photo montage and get beautiful images without much effort.
Many modern parents, trying to capture their children in a group photo, are faced with the problem when all the children look and smile at the camera, and one of them inevitably turns away at the moment of shooting. Naturally, the photograph has to be redone several times, and still there will be one restless child who will definitely ruin the whole picture. How would you like to leave at least one good photo as a souvenir? There are also times when parents just want to insert their child’s face into a ready-made interesting Photoshop template. It’s now easy to insert a face into a picture with modern plugins and graphics programs. Even those computer users who have never worked in Photoshop will quickly master this simple task with a training lesson.
Step 1: selecting a template and the required photo angle
Before you start processing photos and creating collages, you need to familiarize yourself with the basic tools of a graphics program, as well as understand the structure of the Photoshop program. Inserting a face into a picture is already a five-minute task once you have mastered the basic knowledge.
First of all, you need to choose any PSD template into which you will insert the child’s face. This can be from different angles: profile, full face, slightly turned to the side. This is why it is necessary to take different photographs of the child from different angles. “Photoshop” allows you to slightly rotate any object clockwise or counterclockwise, but the profile must match the template for the result to be the most believable and natural.
Step 2: Selecting the face using various Photoshop tools
After importing the photo into a graphics program, you need to cut out part of the object (in our case, this is the child’s head) and insert the face into the picture, collage or ready-made template. What tools do you need to use for cutting?

There are several basic tools that can be used to carve a face. You can use a pen. To cut out part of an object, you need to select the required area point by point. Then right-click to bring up the selection options and click on “Create selected area”. This way the face is highlighted. Now you can simply drag and drop it onto the finished template.
You can select part of an object using another tool. We switch to the quick mask editing mode by pressing the Q hotkey. Next, select a brush: hard, if you need to make the contours of the selected object clear, and soft, if you need to select complex objects such as hair, fur, etc. Paint over the required area of the face with a brush and exit the quick mask mode. Our object is highlighted. Now it can be transferred to another picture.
Step 3: Working with Layers in Photoshop
Once you have dragged and dropped from one photo to another application, inserting a face into the picture is no longer a problem. It is necessary to fit the object as accurately as possible to the scale of the template. To do this, select the face layer and press the key combination Ctrl+T. Now you can change the scale of the face. But to maintain the correct proportion, hold down the Shift key and drag the mouse over the corner of the selected object. This will increase or decrease the width and height of the face proportionally.

- Before creating a photo collage, you need to take into account the approximate dimensions of both images. It will be better if the photo with the child is much larger or approximately the same size as the Photoshop template. Scaling the face will result in unsightly pixel quality.
- The finished template should roughly match the quality of the photo. It’s not difficult to insert a face into a picture, but will it look natural if the finished collage is in a good format, and the face in the photo is pixelated?
So, inserting a face into a picture yourself so that the result is natural and believable is possible even for those who have not used a graphics editor before. All you need is a little knowledge and perseverance.
Do you want to become part of a monument or take a photo of your cat jumping from a plane? Have you ever wanted your portrait to be painted by Leonardo himself? Of course they did! That's why we've created a new version of Photo Montage that lets you do whatever you want! "Photo Montage" allows you to overlay elements of any image of your choice. All you need to do is just upload a background image and then place one or more photos on it. After that, using the control buttons, you can adjust the elements and photos, leaving part of your photo to match at the top of the background image. You can adjust the size and dimensions of the background in your photo and adjust the size, location and direction of any layers in the image that you want to place. Good luck!How to use photo montage?
1. Open Fotor and select "Photo Montage" in the Collage section.
2. Upload a background photo or choose one of our background patterns or colors.
3. Add one or more photos that you want to match and drag them onto the background. (Note that when you click on the toolbar, a large menu should appear with a huge number of options, these can be used to adjust and correct the image).
4. In the pop-up toolbar, use the Grater tool to remove elements from the photo that you do not want to remain in the background.
(NOTE: You can adjust the "Intensity" as well as the "Size" in "Grate". If you make a mistake while using, please click the "Reset" button.)
Publications on the topic
-
 What is a login and how to create one
Login is a unique account name that is issued automatically when registering on any website or is invented...
-
 What is WhatsApp and how to use it
WhatsApp Messenger is a mobile messenger program for fast and free communication by exchanging short messages in the form of text,...