
If you suddenly forgot your Windows password: Break the password! How to remove password on Windows 7.

On many home computers, a password is simply not needed to access the system. You can set the password as you wish or as needed. The point is that when Windows installation 7 supposedly requires you to enter a password, but in general you can skip this procedure by clicking on the “Next” button.
How to remove password in Windows 7
It takes a couple of minutes to cancel entering a password in Windows 7 when logging in. To do this you need:
- Log in with an administrator account. If there is only one account, then, in fact, it is the administrator.
- Open "Control Panel".
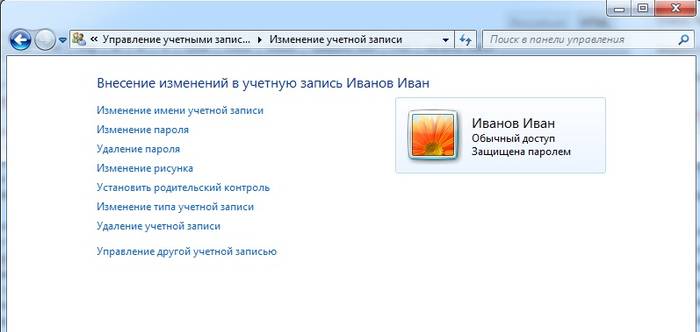
- Go to page " Accounts Users and Family Safety" if selected standard view display tools by category. If you select large or small icons, you can go straight to the User Accounts page.
- In the “User Accounts” block, find and click on the “Change Windows Password” link.
In order not to go to the “Control Panel” and not search for the necessary pages in it, you can use the Windows search. To do this you need:
- Click on the “Start” button.
- Above the button, find a text entry field.
- Enter the word "password".
- In the search results, find and click on “Change Windows Password”.
- Click on “Remove your password”.
- Enter your current password and click “Remove Password”.
There is another way that does not require entering the old password. To use it to remove a password in Windows 7, you need to:
- Click on the “Start” button, and then click on the “Run” button. You can use the keyboard shortcut Win+R.
- Type “control userpasswords2” without quotes and click OK.
- Uncheck “Require username and password” and click OK.
- In the window that appears, do not enter anything and click “OK”.
How to do this in other versions of Windows is written in the article.
Choose a method that is convenient for you and remove the password. If you suddenly forget your password and are unable to log in, it will be difficult to access it, especially for an inexperienced user.
We remind you that attempts to repeat the author’s actions may lead to loss of warranty on the equipment and even to its failure. The material is provided for informational purposes only. If you are going to reproduce the steps described below, we strongly advise you to carefully read the article to the end at least once. The editors of 3DNews do not bear any responsibility for any possible consequences.
IN Windows already The SAM system has long been used to store and manage passwords for all users. All information in it is well protected, so in order to find out the password, you will have to spend a lot of time and resources, especially if it is quite complex. Most often, however, there is no need to find out the password at all - just reset it or change it. Several utilities have been developed for this, one of which we will use. Another important point- it is obvious that when the OS is running, it will not allow you to just get into the password storage. Therefore, you need to make sure that your computer supports booting from a CD/DVD or USB media in order to launch the necessary utilities.
The most famous of them is Offline NT Password and Registry editor, which can work with passwords and Windows registry XP/Vista/7. Download the USB or CD version of the utility, burn the downloaded image to disk, or use our tips for creating a multiboot flash drive. The utility does not have GUI, but you shouldn’t be afraid of this - everything in it is quite simple and understandable. In addition, the desired option is often offered by default, so you only need to press the Enter key.

Boot from removable media Offline NT Password and Registry editor. You are unlikely to need additional boot options, but in some cases you will have to empirically select those that will help the utility start. The next step is to select the partition number on which Windows is installed. You will have to navigate first of all by its size. In principle, until the very last moment the program does not make any changes to Windows, so in case of an error, you can simply start the password reset procedure again.


Then the utility will ask you to specify the path to the folder where the SAM files are located (in fact, this is a registry hive). The default is X:/Windows/System32/config, this is what the program offers at the beginning. Then you need to select the first item (Password reset), since we are going to reset the password.


Then everything is simple. Select the first item (Edit user data and password) and enter the user name or identifier in the format 0xabcd, Where abcd is the RID listed in the first column. RID is useful if the username is not displayed correctly or cannot be entered. For example, when using Cyrillic.


All that remains is to specify item 1 (password reset) or 2 (password change) for the selected user. Exit password editing mode by entering Exclamation point and pressing Enter.


Everything is almost ready. Enter q, press Enter, and then agree to the changes by entering y and pressing Enter again. We refuse to continue working in Offline NT Password and Registry editor ( n), remove the flash drive or CD and press the treasured combination Alt+Ctrl+Del to reboot. Done - the password is reset!


This was an easy way to reset your Windows 7 password. There shouldn't be any difficulties with it. You just need to be careful and careful. Problems can only arise if the necessary drivers for working with the hard drive are missing. Then you will have to put them on a floppy disk (if, of course, you find a living representative of this almost extinct species and a working drive for it) or on a USB flash drive and at the first stage select the fetch additional drivers item.
For the second and third methods, you only need the Windows 7 installation disk and nothing else. A more complex option involves enabling the initially hidden “Administrator” account by editing the registry from the installation Windows environment 7. In the future, you will be able to log in to the system using this account and edit any other account in the OS. By default, “Administrator” does not have a password, which only plays into our hands.


So, let's boot from installation disk and press Shift+F10 to call command line, where we drive in regedit and press Enter to launch the Registry Editor.


Selecting a section HKEY_LOCAL_MACHINE, and in the menu select “File” → “Load hive...” (File → Load hive...). We need to open the SAM file, which is located in the folder \Windows\System32\config on the partition where Windows 7 is installed. When opening, you will be asked to enter the name of the hive to load - enter any.

Now you need to select a section HKEY_LOCAL_MACHINE\hive_name\SAM\Domains\Account\Users\000001F4 and double click on the key F. An editor will open in which you need to go to the first number in line 038 - this is 11. It must be changed to 10. Be careful and do not make a mistake - you only need to change it, without adding or deleting other numbers!


Now we need to select our bush HKEY_LOCAL_MACHINE\hive_name\ and in the menu select “File” → “Unload hive...” (File → Unload hive...), and then confirm unloading the hive.


That’s it, you can reboot by removing the pre-installation disk and log in under an administrator account. In the panel Windows management in the user management section you can change the settings of another account. Including changing the password.

There is one last way left, the wrong one. Why wrong? Because we'll do the substitution system files, and this is an ignoble matter. What is the main idea? It's simple - the OS has the function of detecting sticky keys enabled by default. You've probably encountered it at least once, and if not, just quickly press Shift at least 5 times, and you will see this wonderful window:

This window belongs to a small auxiliary program sethc.exe, which is located in the Windows system directory. Moreover, it even starts on the welcome screen, when you are asked to select a user and enter a password. But it can be replaced with something useful. Eg, cmd.exe. Naturally, not directly in the running OS, but after booting from the installation Windows disk 7 and pressing Shift+F10.

You need to start by identifying the drive letter on which Windows is installed. The easiest thing is to simply view the contents of the root partition with the command dir. C: will most likely be seen as D:, but not necessarily.

Having decided on the volume letter, we execute two simple commands - copy one just in case original file sethc.exe to the root of the disk or wherever you like, and change the second one to cmd.exe.
Copy d:\windows\system32\sethc.exe d:\copy d:\windows\system32\cmd.exe d:\windows\system32\sethc.exe
We reboot, quickly press the Shift key (or Ctrl, or Alt) several times and observe the command line window. You need to enter another command in it, substituting the name of the desired user and New Password. Other options for this command can be found in the official help.
Net user username new password

If you want to return everything to normal, you need to boot from the installation disk again, open the console and run the command:
Copy d:\sethc.exe d:\windows\system32\sethc.exe
However, you don’t have to restore anything, but leave this little trick in the system just in case. In addition to the methods listed above, there are many other methods for resetting or recovering a password in Windows, but we will not consider them now. Once again we urge our readers to be attentive and careful when working with the internals of the OS, and even better not to bring the situation to a “surgical” intervention in SAM. Good luck restoring access to your accounts!
Removing the password when logging into Windows 7 is quite simple. This will require a minimum amount of time and knowledge. This kind of operation usually takes no more than a couple of minutes.
It can be done different ways: via a special console, command line or by resetting key data from SAM. Each method has both its advantages and disadvantages.
Why set a password
It often happens that some important and confidential data is stored on the PC, access to which should be limited. Microsoft Windows makes it possible to easily limit the circle of people who have access to files on the computer by installing a special key. Each person can have his own if there are several users.
An access code is also required to protect information on the PC to different owners from each other. For example, this is often necessary for parents so that curious children are not able to get acquainted with some information that they are not entitled to.
Removing the password through the “Run” console
One of the most simple way disabling the entry of an access key on the OS - using the “Run” item. Accessing it is quite simple - just click on the “Start” button. Most often, the item in question is present on the right side of the window that opens.
Entering a command
To disable the function in question, you must enter a specific command. It will open a special applet that allows you to do this.
The process of entering the command is as follows:

- open the Start button menu;
- click on the “Run” item;
- In the field that opens, write “control userpassword2”.
After completing these operations, a window called “User Accounts” will open.
It contains two tabs:

- "Users";
- "Additionally".
You need to focus your attention on the first tab. Since this is where all account settings are made, including changing the login, access key and other attributes. In addition, if desired, you can easily add new accounts or delete old ones.
Disabling the password
To disable Password, just open the corresponding window (“accounts” -> “users”). In it, you need to uncheck the box called “Require username and...”. In this simple way you can disable the need to enter Password.
Confirming the user
You can also completely disable the Microsoft Windows login window.
To do this, you need to do the following:
- in the window called “Accounts”, double-click on the desired line (admin, user or something else);
- click “OK”.
A window will open containing three fields. Only the top one should be filled in; login is written there. The rest remain empty. After that, click on “OK” again. After performing these operations, when starting Microsoft Windows, there will be no need for Password. Which is quite convenient if physical access Only one person has access to a PC.
video: Password reset
Removing the password when starting Windows without programs
Also Password in the considered operating system can be unstuck without using the “Run” item, as well as various kinds third party applications. To do this, just use a special command line. In this way, you can avoid having to enter Password when you turn on the computer, as well as when it comes out of sleep mode.
Command line setup
In order to configure the command line, you need to use the Windows distribution disk. This method of setting up and resetting the access code is suitable if it is forgotten and it is not possible to start the OS otherwise.
First of all, you need to install it through the BIOS to boot from a CD or other device containing the distribution. After this, you should reboot and start the installation.
After this, the following actions are performed:


- CmdLine – enter cmd.exe;
- SetupType – replace parameter 0 with 2;
- select section 999 and click “Unload hive”;
- extract the distribution package and reboot the PC.
Resetting your password and login
After loading the operating system, the user will immediately see the command line window. To reset the password, you must enter the following command: net user username

If for some reason User has forgotten the account name, then you can simply write net user without parameters. This will allow you to display all available items and select the one you need.
If the new Password is not intended to be used, then it is sufficient to leave the field blank.
If you need to enter a new one, the command will look like this: disk name:Windowssystem32net user user_name new-key.
It is also often necessary to create a new account without an access key.
To do this, you need to run the following commands in strict order:

These commands perform the following operations in strict order:
- creating a new User;
- adding it to the Administrator workgroup;
- removal from the Users group.
The reset method in question is quite complicated, but quite feasible even for not very experienced PC owners.
Method for resetting key data from SAM file
Exists great amount the most different ways resetting the login code. But all of them only change in various ways the information stored in a special file called SAM. It is used by the OS to store data related to both User and Password. This abbreviation name stands for Security Account Manager.
The file in question does not have an extension, since it simply does not require one. It is a direct part of the registry, located in the directory systemrootsystem32config. There is also a copy of the file in question on the emergency recovery disk if this function for some reason it was not disabled earlier.
Editing this file To change the login parameters of the operating system is the most difficult way. To work with SAM you need specialized software from third party developers. All operations with SAM must be performed with the utmost care and precision.
How it works
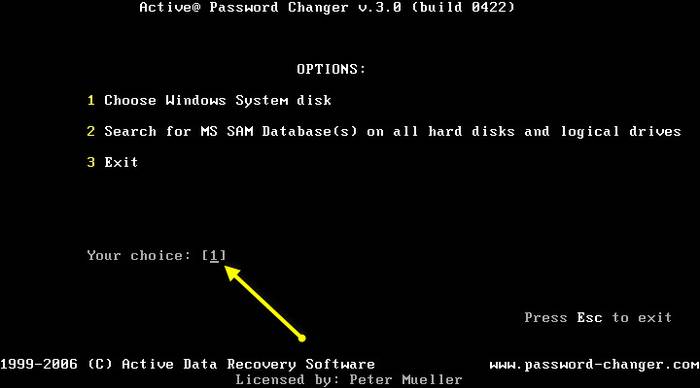
The most popular application for changing data in the SAM file is active password changer. Before you start, you need to copy the application to some media or other HDD FAT32.
After performing this operation you must:

- run the password file from the folder "BootableDiskCreator";
- in the window that opens, select "Add USB...";
- activate the button "Start".
After completing all the above steps, a bootable USB flash drive will be created.
The process of changing data using the application in question is as follows:

This method of working with accounts and their attributes is as secure as possible. Since it allows you to avoid editing the registry and other manual operations. This is sometimes difficult for not very experienced users who started working with their PC relatively recently. The likelihood of harming the operating system in this case is practically zero.
Another important advantage of this program is the ability to set a schedule for PC use by individual accounts.
The disadvantages include the fact that some outdated models motherboards do not support launching from a USB drive. In such a situation, you have to look for some alternative options: a floppy disk, a CD, or something else.
Quite often, especially with beginners, situations arise when the combination of characters required to enter the OS is forgotten or lost for other reasons. There are many ways out of such a difficult situation; reinstalling the system is not always required. Moreover, any computer owner who has minimal skills in interacting with this type of equipment can cope with resetting the OS access code.
>You can use the command netplwiz, inscribed in the line of the “Run” utility. To enter there directly”, press the keyboard shortcut Win+F.
Hello everyone, on the blog there is a topic about correcting your mistake when installing Windows 7 OS. Yes, I think so, because sometimes with our ignorance we complicate our lives. As in this case with assigning a password when installing Windows.
So we need to follow the path: Start - Run and enter the above command and click OK. But in some builds of windouws 7 it is not so easy to find, but you need to follow the Start button further: All programs - Standard - Run - netplwiz.
A window like this should appear on your desktop: 
Now after a reboot, when you log in, the computer will no longer require you to enter a password. But if you block for something using a keyboard shortcut Win+L, then as a result you will have to remember your password again and enter it in the login line.
Therefore, to avoid such “hemorrhoids”, remove it completely. To do this, we follow the path: Start - Control Panel - User Accounts - Delete (change) your account password.
By selecting the “Delete your password” item, we find ourselves in the next window where we confirm that we want to delete the current password. 
If you have set a password for your account (the user under which you boot into Windows), but you don’t want to enter it every time, then you can disable password entry.
Before you disable password entry in Windows, it is important to understand that anyone who can approach your computer can also gain access to any data on it. But when accessing via the network, the password will still be valid.
This instruction is also useful if you created a new user, and Windows stopped automatically logging in with your user, stopping at the welcome screen. The instructions are relevant for all modern Windows versions (7-8-10)
Instructions for disabling password entry in Windows 7, 8, 10:
1. Click " Start", write in the search field " netplwiz" (without quotes), press the " key on your keyboard Enter"[you can also press the Win+R keys, in the "Run" window that appears, in the "Open" field, enter "netplwiz" or "Control Userpasswords2" without quotes and press "Enter"];
2. In the “User Accounts” window that appears, in the “Users on this computer” list select the desired username(the one you are running under in Windows);
3. Uncheck near the inscription “Require username and password”;
4. Click the button OK" and enter the password of the user selected in the second step twice;

Publications on the topic
-
 Types of USB connectors - main differences and features
Contents: In our age of computer technology, smartphones and gadgets, it is difficult to find a person who does not know what connectors are...
-
 How to change a hard drive to an SSD
When replacing HDD with SSD, what increase in performance speed can you expect? This article tests using an example model...