
How to reset a laptop's battery charge controller. HP Notebook PCs - Checking and Calibrating the Battery (Windows)

At one time, laptops gained immense popularity due to the ability to run on a battery, which made it possible not to be confined to one place and to do the necessary work almost everywhere. The first models could last only a short time without a charge, and the nickel-metal hydride batteries used had a lot of disadvantages. But manufacturers did not sit idly by, and over several decades, battery manufacturing technologies have undergone dramatic changes. Today, the vast majority of laptops use lithium-ion batteries. They can last quite a long time and lack many of the disadvantages of their predecessors.
However, they are not perfect and may also become unusable over time. A battery malfunction means that it discharges very quickly, or the laptop does not display the charge level correctly. In this case, manufacturers and equipment sellers recommend purchasing a new battery. But, since the cost of the original component is quite high, you can try to correct its operation yourself. Depending on the extent of the damage, it is necessary to either replace the battery cells, or it will be enough to reset the laptop battery controller.
Note that the battery controller is an electronic device and can also fail. If this happens, the battery will not work at all. Then all the tips below will not help - the controller will need to be repaired by a service center or the battery replaced. However, if the battery works at least somehow, then the controller is functional. It only shows incorrect charging values, quickly charges or discharges the battery, and this can be dealt with.
It is the latter possibility that we want to talk about in more detail in today’s material. You will be able to find out in what cases you need to reset the controller, and we will also tell you about possible ways how you can do it yourself at home.
First, it's worth finding out what a battery controller is. This is a small microcircuit built into the battery itself that controls its operating condition, as well as the charging and discharging process. It interacts with the power controller on motherboard the laptop itself, and also transmits the necessary system information to the operating system. We hope the diagram is clear to you. We tried to describe everything in simple words, but if you want to know the technical details, search the Internet.
When this small chip stops working correctly, you may need to reset the controller. This procedure is also popularly known as battery calibration. By and large, there are only two situations when this may be required: incorrect charge display and replacement of battery cells.
An incorrect charge display means a situation where the laptop’s operating system, even after a long charge, shows that the charge level is less than 100%, or the charge drops sharply, and the laptop turns off not after a few hours, as it should, but much faster. Many people begin to think that the battery has become unusable, but this is not always the case. The problem very often lies in its controller, which simply does not display the charge correctly.
By replacing battery cells we mean that in some workshops and service centers may offer so-called battery repacking, that is, replacing internal units that have become unusable. After this, the controller must be reset so that all new elements are recognized and can be used correctly. Although, if after replacing the blocks something does not work correctly, you have every right to make a claim and demand that the defects be corrected.

Now let's look at how to reset a laptop's battery controller. Let's touch on the software and manual methods.
Controller soft reset
On some sites you may see a recommendation to use the Battery EEPROM Works program. This is truly a very powerful and advanced utility that can, in some cases, literally revive the battery. But there is one big BUT! To use it, you need to know a lot and be able to understand electrical circuits, as well as have the necessary adapters, which are not always easy to get on the open market. We will not recommend this program for use in home devices, as it is very easy to permanently damage the battery. What then is right for you?

Battery EEPROM Works window
Almost every manufacturer has built-in power management utilities. It can be downloaded from the support site, on the driver download page for your device, and in some cases the utility can be either pre-installed or recorded on the included driver disk. Select the reset or calibration option and follow the on-screen instructions exactly. Most often, the utility discharges the battery to zero, after which it charges up to 100%. The controller will remember the extreme charge level indicators and will work as it did immediately upon purchase.
Different laptops may use different software provided by the manufacturer. Let's look at some popular models:
- Acer - BatteryMark utility tests the battery, fully loading the processor. If inconsistencies are noticed in its operation, a reset and several charge-discharge cycles are performed.
- Asus has a Smart Battery Calibration option in the BIOS on the tab. Here you can reset all controller data.
- Dell - here you need to look at the utility for your model on the official website of the manufacturer. If it is not there, you can use other programs, for example, Smarter Battery.
- HP – on the manufacturer’s website there is an HP Support Assistant utility, which has a “Check Battery” option.
However, if you still want to do full reset controller, you will have to learn how to work with the Battery EEPROM Works program. But keep in mind that you do this at your own peril and risk, so it’s worth experimenting if you don’t mind throwing away the battery if it fails. This utility allows you to:
- Resets the battery charge-discharge cycle counter.
- Changes the release date of the battery to the system notebook.
- Flashes the actual battery capacity into the controller.
After this, the battery is considered “new”. Correcting the actual charge can help if the controller shows it incorrectly and the laptop quickly shuts down even though the battery may still be working. This must also be done after replacing the battery cells with new ones. Let us remind you once again - first learn how to use this program, as it allows you to do a lot.
Manual controller reset
If for some reason you cannot find or install the power management utility, you can reset or calibrate the battery manually. How?
- Disconnect the laptop from the electrical network, and then transfer it to BIOS mode. You can read more in the article how to start BIOS mode.
- Leave the laptop and do not touch it until it is completely discharged. Take care that it does not overheat.
- Without turning on the laptop, put it on charge. Wait until it is fully charged; to do this, you can leave it overnight.
In 99% of cases, such simple steps will help bring the battery back to life. Well, if this doesn’t help, buy a new battery, or connect the laptop directly to the outlet, removing the battery.
- If you only use your laptop at home, then to reduce wear on its battery, it would be better to remove it. But before that, charge it to about 80% and also check the charge level from time to time as it is prone to self-discharge. After removing, connect the laptop to the power supply and use it as desktop computer. This option is suitable for those who have a laptop in only one place, since with this use you can lose data if you disconnect the laptop from the power source while working.
- To increase the operating time of your device, set the appropriate parameters in the power plan settings. If necessary, use the energy saving mode.
Conclusion
Friends, today we talked about how to reset a laptop charge controller. We learned that sometimes the problem lies not only in the computer hardware, but also in the software. Therefore, there is no need to rush to order a new battery right away. We hope everything worked out for you and there are no questions left. Don't forget to share your opinion in the comments.
Modern laptops are equipped with Li ion batteries of different capacities. Thanks to this, for each specific device the required battery volume is calculated to maintain a long service life. battery life. Autonomous operation is one of the reasons why users prefer laptops.
During the operation of the device, the battery loses its original capacity, charge/discharge cycles decrease, this is especially noticeable in demanding programs and games. If all requirements are met correct operation devices, then such a problem may not occur. To preserve the capacity and restore the functionality of the laptop battery, calibration will come to the rescue.
When is it necessary to calibrate a laptop battery?
Battery calibration is primarily necessary when problems are observed fast battery consumption in undemanding applications: browser, text editors etc. In such situations, the charge can drop to 0 in a few minutes. It will also be useful when the system shows incorrect charge percentage or its level remains within one value, i.e. When connecting a charger, the percentage does not increase.
We also recommend that you perform calibration immediately after purchasing your laptop. This is necessary for the initial setup of the power controller, otherwise after a while failures may occur: The charge display is incorrect or the charging process starts after a while. Calibration will also help increase the battery life.
How to determine battery capacity
To determine the battery capacity we will use standard means operating room Windows systems. For this method you will need to use command line:
 powercfg.exe -energy -output c:\report.html
Manual calibration
You can perform calibration and boost the battery manually, without resorting to additional software. In this case, we will use standard means operating system.
Before you begin, you need to configure your energy saving settings:

The manual calibration process is as follows:
- First, put the laptop on charge and charge it to 100%;
- Further discharge to 0% by disconnecting it from the power supply;
Important! When the laptop is discharged to 0%, you should not use it or run any programs, otherwise you will not be able to reset the controller.
- After the charge level reaches the minimum value, put the computer on charge again and charge it to 100%. At the same time, it is not recommended to use a PC during the process; this will disrupt the battery recovery process.
Important! Calibration cannot increase the battery capacity; it does not eliminate physical wear of the battery. Thanks to this operation, the controller begins to work correctly: failures are eliminated, the charge level is displayed correctly, charging proceeds without delay.
Calibration programs
Next, we’ll look at specialized utilities that will help you calibrate your laptop battery. It is best to use the software offered by the device manufacturer, because... they have a specification that allows you to work correctly with the battery.
For Lenovo laptops there is a special utility that allows you to find out the status, restore the battery and perform calibration. The utility is equipped with all Lenovo IdeaPad series laptops. 
Battery operation process:
- After launch, click on the “ gears» located at the bottom of the utility window;
- then a reset warning will appear in a new window, click “ Start» to start calibration. You must first close all running programs and connect the computer to the power supply;
- then click " Continue»;
- The battery optimization process will begin. It is worth saying that it will take quite a long time. The battery will be charged first and then discharged. The process cannot be interrupted; it is not advisable to use a laptop.
Smart Battery Calibration in Phoenix BIOS
This utility is built into the Phoenix BIOS on HP laptops and devices from other companies. The Smart Battery Calibration utility allows you to check the battery status, run diagnostics and calibrate it. 
- First, turn off the computer;
- then we start the laptop and on the start screen press the key combination to enter the BIOS. The most common combinations are “Delete”, “Esc” and “F2”. The required command to enter is usually displayed on the start screen;
- when entering the BIOS, to navigate, use the arrow keys and the “Enter” key to open the desired section;
- move the pointer using the arrow keys to the " tab Boot»;
- Next in the list, look for the “Smart Battery Calibration” utility and click “ Enter»;
- in the window that appears, click “ Yes” and wait for completion, which may take quite a long time.
Functional utility for HP laptops. With her help you can check the status all hardware and software elements of a computer. It also carries out a battery diagnostic process and calibrates it if malfunctions in the controller are detected. 
- launch the program from the desktop;
- After starting the utility, in the main window, select the section “ My Computer»;
- then we start testing the battery " BatteryTest»;
- After this, a window with test results will be displayed. The results may be as follows:
- « Passed» — battery replacement is not required.
- « Perform calibration"—automatic battery optimization starts.
Important! Battery calibration using HP Support Assistant may take several hours and is recommended during periods when the computer will not be used for an extended period of time.
A small program that will allow you to effectively diagnose the battery on any laptop, including Asus, Acer or Samsung. With its help, it is possible to optimize charge consumption, obtain detailed information about the state of the battery, quickly switch between power management schemes, set charge/discharge cycles, and find out the battery life. After installation, the utility is located in the system tray. BatteryCare can successfully replace the Battery Doctor or Battery Calibration utility for a laptop on Windows 7/8/10. 
Instructions for working with:
- go to “Settings” and to the folder “ Notifications»;
- in the block " Miscellaneous Event» check the “Recommend battery calibration after” checkbox and set the required charging cycle, in our case 25 cycles;
- After the recommended cycle has been exhausted, the application will offer to perform automatic calibration.
This utility will allow you to track the battery charge level, assess battery wear, find out the voltage, restore the battery and conduct tests. It will also allow you to find out the equipment manufacturer. During operation, the utility automatically generates a schedule of battery operation and charge/discharge cycles, saving it in a special folder on the hard drive. 
Important! The utility is paid, the trial version is available for 14 days. Calibration can only be performed if the program has been purchased.
Instructions:
- launch the program and in the main window click on the battery icon;
- then several blocks will appear in a new window “ Battery", which displays information about the current state of the battery and "Calibration";
- in this section you need to activate the parameter “ PerformCalibration" and "Battery Calibration" to start the process. The operation will be performed automatically.
How to save your battery
- for proper battery calibration it is best use special utilities , which are designed for specific device models;
- if autonomous operation is not expected, then it is best remove the battery from the device and work from the network. In this case, the battery must be charged at least half to prevent it from entering a deep discharge state. But you shouldn’t constantly use the power supply; you need to use the battery at least once every 5 days;
- to extend battery life, it is recommended to connect to the network when the charge level reaches 15-20%;
- frequent calibration may cause harm The battery has simply used up extra charge/discharge cycles. It is important to know that cycles are limited and cannot be restored;
- If the battery wear is more than 65%, then optimization is recommended to be carried out once a month. This will help extend the service life a little;
- In order to save the laptop battery, you need to control the temperature value. Optimal temperature ranges from +5 to +45, values higher may have a negative effect on the device.
Let's see what kind of batteries there are in principle:
- NICKEL-CADMIUM BATTERY - (or NiCd for short) nickel-cadmium;
- NICKEL METAL-HYDRIDE BATTERY - (or NiMH for short) nickel-metal hydride;
- LITHIUM ION BATTERY - (or Li-ion for short) lithium-ion batteries.
Lately batteries have been used Li-ion
The first thing you need to do is calibrate the battery. In fact, this is the calibration of the controller.
First you need to completely discharge the battery - turn off the power supply, reboot, intercept the boot (so that the OS does not boot) by calling the BIOS setup.
Place the laptop on its end like a slightly open book (for better cooling, with the muzzle up if it is on the side) and leave it until it turns off until the entire battery is drained.
Typically, the controller notes both events (full discharge and full charge), after which it begins to count the charge correctly - until a charge measurement error occurs again.
If all of the above does not help, I'm afraid you'll have to change the battery completely. We have almost any laptop battery.
Pinout of 9-pin DELL battery connector
A program for working with a laptop battery.
The process of repairing a laptop battery can be divided into two parts: replacing the elements and editing the contents of the EEPROM or the internal flash memory of the battery controller. If replacing elements simple process, accessible to any novice radio amateur who has basic skills in handling a soldering iron / spot welding machine, then programming the controller is a difficult stage of work,
accessible only to a repairman with sufficient knowledge and experience. Software Battery EEPROM Works is specially designed to maximize the strength of the second stage of battery repair. Battery EEPROM Works makes this step as easy as 1-2-3. The user only needs to connect the memory chip (EEPROM) to the adapter and press the RESET button. The program will do all the rest. The Full Charge Capacity will be the same as what you set before pressing the RESET button and will display the actual capacity of the new cells. The Cycles Count will be set to zero. The Manufacturer Date will be changed to current date your computer. The Permanent Failure Flag will be removed and all other necessary changes will be made. The data in the controller will be the same as in a new battery.
Battery EEPROM Works supports most laptop batteries from different manufacturers
Download: You cannot download files from our server
Key Features
Reading SMbus data through the laptop battery connector.
Saving SMbus data to text file.
Saving data in its own BQD format (BQ208X data file), for further use in cloning bq208X chips.
Reading and writing of all memory chips used in laptop batteries.
Reading and writing data from flash memory and EEPROM in integrated memory chips such as: BQ2083, BQ2084, BQ2085, PS401, PS402, BQ20Z70, BQ20Z80, BQ20Z90.
Saving data from flash memory and EEPROM in BIN format.
Resetting (zeroing) the parameters of the microcircuit to the original (factory) parameters with one click of the mouse.
Cloning password-protected chips with integrated flash memory (bq208X) into new or non-password-protected chips.
Battery calibration- This is an important step for portable laptop users who monitor the condition of their devices.
Due to the peculiarities of their functioning, they currently require periodic adjustment before use so that the current charge is correctly determined
Contents:
When is the setup done?
The procedure is required to be performed on new devices, which will give the user up-to-date information about the battery status.
The procedure will not eliminate physical wear and defects in the structure of batteries, but it may increase the battery life. At a certain charge level, usually 30%, the device goes into standby mode.
And if the controller shows that there is 30% of it left (and in reality this value is higher) and transfers it to , then the current state of the capacity will be displayed.
Newer nickel-based cells exhibit what is called a “memory effect.”
It seems to remember the charge level when there is power from the mains and does not discharge below this value, considering that this level corresponds to a complete discharge.
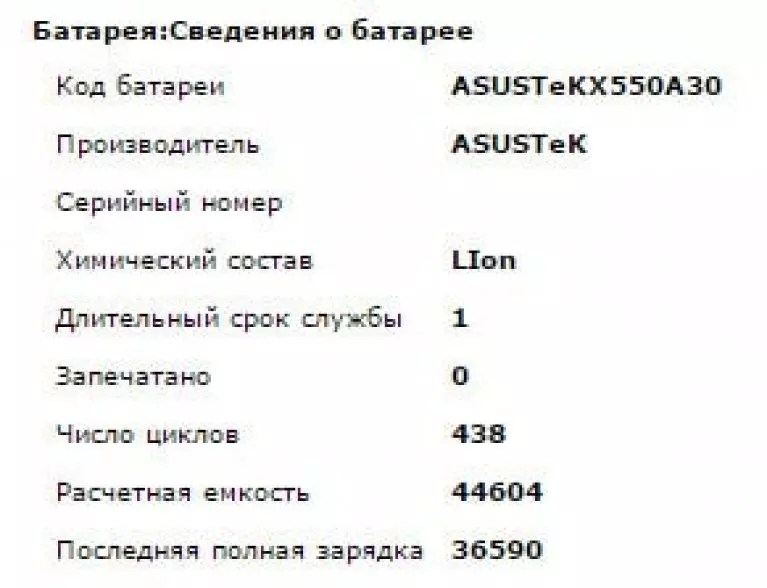
Determining the battery capacity of a laptop computer
Before calibrating the battery, you should make sure that the operation is necessary, especially if there are no problems in determining the amount of charge.
- We launch it with administrator privileges, for example, by entering “cmd” in the “Run” window (Win + R) or through search in Windows 10.
- We execute the code in it "powercfg.exe -energy –output disk:\path\filename.html".

- We are waiting for the operation to complete (indicated by the closing of the window).
- We go to the specified directory and open the one created in the .
To do this, you will need a browser, and the functionality of IE or the built-in “ten” is quite sufficient.

- We look through the report and find the capacity calculated by the controller and its value after the last full charge.
Calibration is carried out when the peak capacity of the battery is tens or more percent higher than the actual capacity obtained as a result of its last charge.
Battery tuning techniques
There are two ways to make the controller work correctly:
Manual setting
Done in three simple steps and does not require any third-party software.
1 Charge to the maximum value of 100%.
2 Disconnect the cable from the network and wait until its charge drops to zero.
3 Connecting again(as soon as possible) and charge to maximum.
It seems simple, but there is one nuance: when it decreases to a certain level (about 30%), it goes into sleep mode, and therefore it will not be possible to achieve the desired effect in this way.
The following chain of actions will help to avoid such a situation (relevant for any Windows):
- Calling the applet Power supply .
This is done through a search in Windows 10 or the control panel when its elements are visualized in the form of large icons.

- Click on the menu on the left "Create a power plan".

Here you can edit the current plan or create a new one. Let's take the second route, so as not to distort the standard settings of standard plans.
- We create a new power supply scheme, set its name and set high performance.

Entering a name and plan for the diagram

Afterwards the scheme will be automatically activated.
If it suits you, after charging and disconnecting from the network, you can restart and wait for the device to turn off by entering the BIOS menu, but you will have to wait longer, because the processor load in this case is minimal.
Automatic setup
Many developers ship their laptops with power management utilities. , for example, come with an Energy Management utility.
- Launch the software and click on the icon with the image of a gear to start the process.

- Click “Start”, closing all third-party programs.
- We connect the power cord to the network if it is not connected, and click “Continue”.

The battery will charge, discharge to zero and be charged again. There is no need to remove and connect the cable, and interrupting the process is strictly not recommended, nor is it recommended to use the device.
Only in this case is success guaranteed.
BIOS
Those laptops that use the Phoenix BIOS I/O system have an integrated test and calibration function.
Third party software
If you don’t have the desire/opportunity to perform manipulations in , download applications like Battery Care or Battery Eater or Battery Mark if there is no standard software to solve the problem.
The last program, after charging, loads the CPU with the task of calculating the infinite value of Pi.
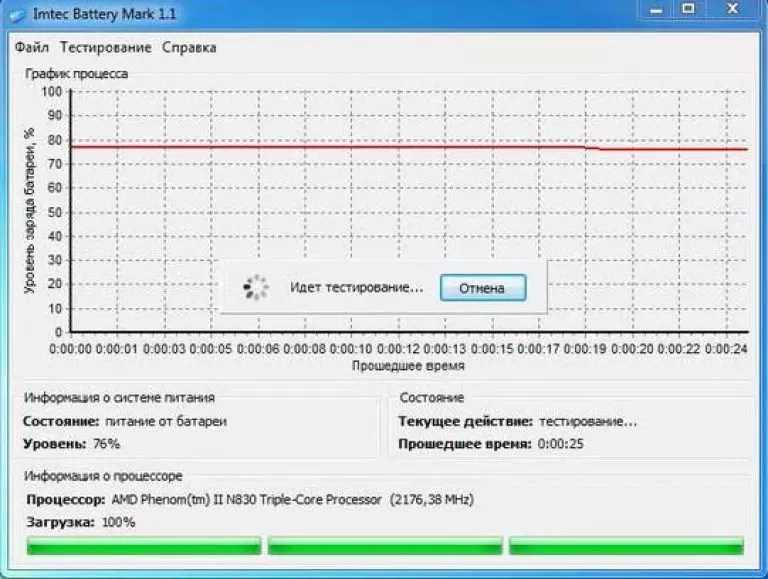
The utility will additionally allow you to conduct comprehensive testing of the battery both during and in the event of its downtime.
A special algorithm will allow you to perform a couple of discharge-charge cycles for about an hour (the time depends on the capacity and degree of wear).
Hewlett-Packard ships laptops with HP Support Assistant.
The “My Computer” subsection contains tools for testing and debugging a laptop PC.
Correct operation
Following these tips will help you extend your battery life:
Simple rules will also extend the service life.
In this topic, post the software necessary for battery repair, information you need to know during repairs, typical faults and other necessary information, Do not ask questions in this topic.
A little about batteries
Laptop battery. Accumulator battery (other names: accumulator, battery) - this is one of the main devices that distinguishes a laptop from a desktop machine, although this does not affect the operation of the laptop as such, but still you still want to have a working battery, at least so as not to turn off the laptop move from the room to the kitchen.
Let's see what kind of batteries there are in principle:
NICKEL-CADMIUM BATTERY - (or NiCd for short) nickel-cadmium;
NICKEL METAL-HYDRIDE BATTERY - (or NiMH for short) nickel-metal hydride;
LITHIUM ION BATTERY - (or Li-ion for short) lithium-ion batteries.
The latter are the most common and are considered to be the best batteries. Is it so?
Alkaline nickel battery technology was proposed in 1899, but the first NiCd battery appeared in 1947. At one time, these batteries were really almost the only ones. The emergence of newer electrochemical batteries, although it led to a decrease in the use of NiCd batteries, however, the identification of the shortcomings of new types of batteries led to renewed interest in NiCd batteries. The NiCd battery is like a strong and silent worker who works intensively without causing much trouble. The first thing that catches your eye is the weight and dimensions of the batteries. The NiCd battery is the largest and heaviest, being approximately twice as thick and heavy as the NiMH. It is harmful for NiCd batteries to remain in charger within a few days. In fact, NiCd batteries are the only type of battery that performs best when subjected to a full discharge periodically. All other types of batteries according to the electrochemical system prefer shallow discharge. So, periodic full discharge is important for NiCd batteries, and if this is not done, NiCd batteries gradually lose efficiency due to the formation of large crystals on the cell plates, a phenomenon called memory effect.
The appearance of NiMH was due to an attempt to overcome the shortcomings of nickel-cadmium batteries.
Eventually:
30 - 50% higher capacity compared to standard NiCd batteries;
less prone to memory effect than NiCd. Periodic recovery cycles should be performed less frequently;
less toxicity. NiMH technology is considered environmentally friendly.
However, there are also disadvantages:
Number of cycles: The number of charge/discharge cycles for NiMH batteries is approximately 500. Shallow rather than deep discharge is preferred. The durability of batteries is directly related to the depth of discharge;
Fast charge: NiMH battery generates significantly more heat during charging compared to NiCd. Additionally, a NiMH battery cannot charge as quickly as a NiCd; charging time is usually twice as long as NiCd;
Self-discharge: Both NiMH and NiCd batteries have an acceptably high self-discharge. A NiCd battery loses about 10% of its capacity during the first 24 hours, after which self-discharge is approximately 10% per month. The self-discharge of NiMH batteries is 1.5-2 times higher than that of NiCd;
Capacity: The capacity of NiMH batteries is approximately 30% greater than the capacity of a standard (not very high capacity) NiCd battery of the same size;
Price: The price of NiMH batteries is approximately 30% higher than NiCd.
In 1970, the first commercial copies of primary lithium power sources appeared. Attempts to develop rechargeable lithium power sources were made back in the 80s, but were unsuccessful due to the impossibility of ensuring an acceptable level of safety when handling them. Research conducted in the 1980s revealed that during the charging and discharging of early lithium batteries, dendrites formed on the surface of the lithium. The growth of a dendrite to the positive electrode and the occurrence of a short circuit inside the lithium current source causes the element to fail. In this case, the temperature inside the battery can reach the melting point of lithium. As a result of the violent chemical interaction of lithium with the electrolyte, an explosion occurs. Thus, a large number of lithium batteries supplied to Japan in 1991 were returned to the manufacturers after several people suffered burns as a result of cell phone battery explosions.
Another type of popular battery is Lithium Polymer. The difference from Li-ion is inherent in the name itself and lies in the type of electrolyte used, it is understood that a dry solid polymer electrolyte is used, but today technology does not allow making such an element, so geleobra is used
a strong electrolyte, and as a result we get some kind of hybrid. Such batteries are neither pure li-ion nor Li-pol, and it would be more correct to call them lithium-ion polymer, but manufacturers call them lithium-polymer to promote batteries. As for the pros and cons of li-pol, they are exactly the same as those of li-ion, so further we will consider li-ion, because they are the most common today.
The advantages of a Li-ion battery include the absence of a memory effect. Once fully charged, a trickle charge is not required and the Li-ion battery can remain in the charger while not in use;
The disadvantage of a Li-ion battery is that it is subject to aging, even if not used. Capacity degradation occurs after about one year, and the battery often fails in the second and third year. Therefore, it is not recommended to store Li-ion batteries for a long time.
Enjoy them as much as possible while they are new. Maximum term The service life declared by the element manufacturers is 5 years. Having become unusable, a Li-ion battery cannot be restored using charge-discharge cycles, as is the case with other types of batteries.
The only possible repair is to replace the battery elements, but there are some nuances here:
Laptop Lithium-ion batteries are implemented in the form of a sequential chain of elements, and an increase in capacity is achieved by parallel connection of the chains. When connecting batteries in series, there is a danger of overcharging the weakest of them; when connecting batteries in parallel, the difference in their internal resistance turns out to be significant: a battery with less resistance will be charged with a higher current. Both of these have a catastrophic negative impact on battery life. All battery cells must have the same parameters, so partial replacement of damaged cells with new ones will not lead to the expected result. Elements must also be from the same batch; elements from different batches have different parameters.
The above-mentioned danger of overcharging means the following: overcharging can lead to an increase in pressure in the element and depressurization. Therefore, the safety of battery operation is always ensured by a system of external electronic protection against overcharge and overdischarge of individual batteries. It includes controllers that measure the voltage of each battery or block of batteries connected in parallel, and a switch to open the electrical circuit when voltage limits are reached. Thermistors are used to monitor battery temperature.
Another disadvantage of Li-ion batteries is the fear of severe discharge (overdischarge). The above-mentioned protection circuit is powered directly from the batteries and therefore if the elements are completely discharged, the circuit stops working and the elements do not charge; in addition, a deep discharge negatively affects the internal structure of the elements themselves. It is believed that the optimal range for operation of li-ion cells is 20-100% charge; output below 20% leads to faster aging of the cells.
The service life of Li-ion cells is calculated not only in years of service, but also in charge-discharge cycles; as a rule, before the capacity is reduced by 20%, they provide 500 - 1000 cycles. It is quite difficult to predict the further behavior of the elements due to the large number of elements in the battery; most often there is a smooth decrease in capacity, sometimes abruptly, so the protection system keeps track of the number of cycles. On older battery models, when a certain cycle value was reached, the protection system closed the battery and it was not possible to use it. The possibility of closing the battery when a certain number of cycles is reached remains today, it’s just that the number of cycles prescribed in the battery is quite large, and the aging of the elements, and therefore the drop in capacity, occurs earlier. As a rule, the counter value can be reset, but do not forget that using such a battery is somewhat unsafe; the elements in the battery age unevenly, which means they are also charged and discharged unevenly.
There is another difficulty associated with the counter: what is considered a charge-discharge cycle? Full discharge and full charge? But it is not recommended to completely discharge it. Is it possible to read a short-term disconnection from the network in a cycle? Most modern batteries do not charge if the charge is currently greater than 90-95%, this avoids unnecessarily high rates of charge-discharge cycles. The figure 90%-95% is arbitrary - on some laptops it can be edited with special utilities.
As for storage conditions, there is no unambiguous information on this issue; the most common opinion is that it should be stored at a charge of 40% periodically (every two to three months), recharging to this value.
In general, Li-ion batteries function best at room temperature. Operating at elevated temperatures dramatically shortens their service life.
At low temperatures, battery efficiency decreases. A temperature of minus 20°C is the limit at which Li-ion batteries stop functioning
Battery repair is required in two cases:
1. The battery does not last long. She kept it new for an hour or two or three, and now it’s 5-15 minutes. Conclusion - bad elements. Options to solve the problem:
a) buy a new battery.
2. The battery does not hold at all. There are again two options:
a) buy a new battery
b) buy new cells and revive the battery yourself.
As you can see, there are few problems and few solutions.
Option b) New elements are definitely needed. 4-6-8-9-12 cell battery - accordingly you need 4-6-8-9-12 new cells. Simply replacing a dead group will not help. Why? The old elements have one capacity, the new one will have a different one. Accordingly, an imbalance will appear on groups of elements, and the electronics will simply turn off this battery.
Means:
1. ALL new elements are needed. It is recommended to set the capacity of the elements no less than the nominal one. Those. If you had 1800mAh cells - you can set 1800, 2000, 2100, 2200 mAh. There were 2000s - put 2000, 2100, 2200. Unless, of course, the difference in price is small. If this criterion is important (prices), then take elements of the native denomination.
2. Open the battery.
3. The elements must be welded in the same way as the original ones were welded. Look for people who have the appropriate equipment. You can't just solder. Some people say “not recommended”, but believe me - NOT.
4. You need to disconnect elements from the electronics from the largest plus to the smaller. In most cases this can be determined visually. If it doesn’t work, arm yourself with a tester.
5. Before welding the elements, connect them all together overnight: all the pluses to the pluses, the minuses to the minuses. This is necessary to equalize the potential on the banks.
6. The battery is opened, new elements are purchased, welded in the likeness of the old ones, the old ones are removed... In theory, all that remains is to solder the new elements to the electronics, and hurray!!! No, no cheers. It's all about the same electronics. It remembers everything about your old elements - the number of cycles performed, the capacity of the elements, etc. If your battery had a capacity of 4000 mAh, and after a year or two or three of operation its capacity became 200 mAh, then even if you insert new elements into the battery, the electronics “will not believe it”. Convincing electronics that it has new elements is called flashing (resetting, resetting) the firmware. For what tools to do this, see the section “HARD - hardware that is necessary for repairing laptop batteries”
7. Now you need to determine which bundle you will be dealing with. The term “bundle” appeared due to the fact that, as a rule, a pair of microcircuits are used in electronics: a control controller and a memory in which various useful data are stored. There are batteries whose electronics contain only memory, or only a controller. But out of habit, we will continue to call them “bundles”. Look carefully at the electronics board. The controller is usually the largest chip on the board. Memory is usually an 8-pin microcircuit, for example, series 24C64, 24C32 and the like.
8. The link has been identified. Now the question is what and where to change in order to reset the firmware. Some controller manufacturers do not hide this information and describe everything in detail in datasheets. By reading and understanding the datasheet for your controller, you will know what needs to be changed and what. In some cases, battery manufacturers hide the information, and it is obtained bit by bit. But then it is embodied in programs that can be used for repairs.
9. We connect the elements to the electronics from “ground” to “plus”. Those. first the “ground”, then the “plus” of the first element, then the second, etc. - until the very last.
10. Battery assembly, firmware reset. It's time to insert the battery into the laptop (I recommend sticking it with tape until you get 100% success) and try to charge it. If the battery takes a charge (which can be seen either by the indicator on the laptop or by the Windows software indicator, or even better, use the BatMon program). We wait until the battery charges to 100%. Next: in Windows, in the power supply properties, we create a new scheme (test), in which nothing is ever turned off: neither the screen, nor the hard drive - nothing at all. We also turn off all alarms. Launch BatMon, unplug the power plug from the laptop and enjoy the discharge curve. It should fall evenly and smoothly. If it went down sharply, it means you made a mistake in reflashing. If it drops evenly and then falls through, it means you have acquired bad elements. After the laptop turns off, put it on charge again. It is recommended to charge and discharge the battery two or three times.
Please note that during the first discharge the following is possible: the curve will quickly drop down, and then the laptop can work at zero percent for a long time (this is why we disabled the laptop’s self-shutdown). No need to panic. It’s just that after the first time, the electronics have not yet “determined” the extreme points of charge and discharge of the elements. That is why it is recommended to carry out a couple of charge-discharge cycles - so that the electronics work correctly. If after several cycles this does not happen, it means that an error was made somewhere.
11. So, if the goal is achieved: the laptop runs on battery for the required hour or two or three (like new), the charge and discharge curve is uniform - then we can be proud of ourselves and consider that we have achieved success.
A program for working with a laptop battery.
The process of repairing a laptop battery can be divided into two parts: replacing the elements and editing the contents of the EEPROM or the internal flash memory of the battery controller. If replacing elements is a simple process, accessible to any novice radio amateur who has basic skills in handling a soldering iron / spot welding machine, then programming the controller is a complex stage of work,
accessible only to a repairman with sufficient knowledge and experience. Battery EEPROM Works software is specifically designed to make second-stage battery repair as easy as possible. Battery EEPROM Works makes this step as easy as 1-2-3. The user only needs to connect the memory chip (EEPROM) to the adapter and press the RESET button. The program will do all the rest. The Full Charge Capacity will be the same as what you set before pressing the RESET button and will display the actual capacity of the new cells. The Cycles Count will be set to zero. The Manufacturer Date will be changed to the current date of your computer. The Permanent Failure Flag will be removed and all other necessary changes will be made. The data in the controller will be the same as in a new battery.
Battery EEPROM Works supports most laptop batteries from different manufacturers
Key Features
Reading SMbus data through the laptop battery connector.
Saving SMbus data to a text file.
Saving data in its own BQD format (BQ208X data file), for further use in cloning bq208X chips.
Reading and writing of all memory chips used in laptop batteries.
Reading and writing data from flash memory and EEPROM in integrated memory chips such as: BQ2083, BQ2084, BQ2085, PS401, PS402, BQ20Z70, BQ20Z80, BQ20Z90.
Saving data from flash memory and EEPROM in BIN format.
Resetting (zeroing) the parameters of the microcircuit to the original (factory) parameters with one click of the mouse.
Cloning password-protected chips with integrated flash memory (bq208X) into new or non-password-protected chips.
![]()
![]()
Publications on the topic
-
 Add to favorites Script to add to favorites for all browsers
Starting today I will tell you about one useful function on the site - this is a link, well, or a button “Add to bookmarks (favorites)”. This feature...
-
 How to remove non-reciprocal readers (followers) on Twitter Who are unfollowers
Twitter is becoming more and more integrated into modern life. Not only is the service very interesting, but its use...