
Hidden remote computer control via the Internet. Remote access to a computer using standard Windows tools

Good afternoon
In today's article I would like to focus on remote control of a computer running Windows 7, 8, 8.1. In general, such a task can arise in a variety of circumstances: for example, helping relatives or friends set up a computer if they do not understand it well; organize remote assistance at the company (enterprise, department) so that you can quickly solve user problems or simply monitor them (so that they don’t play or go through “contacts” during working hours), etc.
You can remotely control your computer with dozens of programs (or maybe even hundreds, such programs appear like “mushrooms after the rain”). In this article we will focus on some of the best. So, let's begin…
Team Viewer
This is one of best programs For remote control PC. Moreover, it has a number of advantages in relation to similar programs:
It is free for non-commercial use;
Allows you to share files;
Has a high degree of protection;
The computer will be controlled as if you were sitting at it!
When installing a program, you can specify what you will do with it: install it to control this computer, or control it and allow it to connect. It is also necessary to indicate what use of the program will be: commercial/non-commercial.
Once Team Viewer is installed and launched, you can get started.
To connect to another computer need to:
Install and run the utilities on both computers;
Enter the ID of the computer you want to connect to (usually 9 digits);
Then enter the access password (4 digits).
If the data is entered correctly, you will see the “desktop” of the remote computer. Now you can work with it as if it were your “desktop”.
The Team Viewer program window is the desktop of the remote PC.
R admin
One of the best programs for administering computers on a local network and for providing assistance and support to users of this network. The program is paid, but there is a trial period of 30 days. At this time, by the way, the program works without restrictions in any functions.
The principle of operation is similar to Team Viewer. The Radmin program consists of two modules:
Radmin Viewer is a free module with which you can manage computers on which the server version of the module is installed (see below);
Radmin Server is a paid module that is installed on the PC that will be managed.
A mmyy Admin
Relatively new program(but about 40,0000 people around the world have already become familiar with it and started using it) for remote control of computers.
Main advantages:
Free for non-commercial use;
Easy setup and use even for novice users;
High degree of security of transmitted data;
Compatible with all popular operating systems Windows XP, 7, 8;
Works with installed Firewall, via proxy.
Window for connecting to a remote computer. Ammyy Admin
RMS - remote access
A good and free program (for non-commercial use) for remote computer administration. Even novice PC users can use it.
Main advantages:
Firewalls, NAT, firewalls will no longer prevent you from connecting to your PC;
High speed of the program;
There is a version for Android (now you can control your computer from any phone).
A eroAdmin
 Website.
Free solutions
Remote control involves connecting to another computer to gain access and manage resources. Thanks to this feature, the user can solve many additional tasks remotely: conduct consultations, diagnostics, and computer monitoring. Thus, tasks are simplified that are often impossible or irrational to perform at a distance.
As part of the review, 10 solutions (6 free and 4 paid) for remote management will be considered. The main attention will be paid to the following features of the software of the selected category:
- Contents: what components are included in the distribution, types of installation on the host and client computer
- Connection modes: supported protocols, working with RDP (see below)
- Presentation functions: this means the possibility of audio and video accompaniment, screen capture, the presence of additional tools (“pointer”, “drawing board”, etc.)
- Security: supported encryption technologies, storage of confidential data, types of authorization on local and remote computers, availability of necessary settings
- Platform support: mobile platforms and OS, online version available.
Standard Windows capabilities will not be left unattended, namely the Remote Desktop Protocol (RDP), which will be considered first. At the end of the review there is a comparison table with detailed information about the presence of the necessary functions in the mentioned applications.
RDP - Windows Remote Desktop Protocol
Starting with Windows NT, support for the Remote Desktop Protocol (RDP) is provided. Accordingly, Windows 7 offers the user RDP 7 (an update is also available for Windows XP), Windows 8 - RDP 8 (also available for Windows 7 SP1). The capabilities of the current version, RDP 8, will be reviewed.
Connecting to a remote worker is carried out using the mstsc.exe application, after entering the name of the remote computer. Connection parameters are also available in this dialog.
The “Screen” tab specifies the resolution of the remote desktop (with the ability to enable full-screen mode), color depth (up to 32 bits).
In the “Local Resources” section, you can select the audio playback mode (on the remote or current computer), and enable audio recording from the remote desktop. This section also configures access to the printer, local disk, drive, PnP devices, and ports.
The quality of data transmission is regulated in the “Interaction” tab. You can not only select a connection profile, but also independently determine the display parameters: desktop background, anti-aliasing, visual effects, image caching. All these options affect the speed of data transfer during remote access and can significantly optimize network traffic.
Security settings are available through the System component (System Properties in Control Panel). In the “Remote Access” tab, you can allow Remote Assistance connections, as well as remote connections to your computer. Authentication is performed at the network level. You can also limit access by specifying a list of allowed remote desktop users yourself.

Thus, Windows provides basic tools for working with the RDP protocol. But, as expected, advanced security settings, support for mobile platforms, and presentation functions are not offered to the user.
Teamviewer
TeamViewer is perhaps the most famous free remote control program. The toolkit allows you to establish remote access to your home computer, manage your desktop from various platforms and devices, and administer Windows servers. In addition, the developers highlight the corporate capabilities of TeamViewer: the program can be used to organize conferences, consultations and help colleagues at work.
TeamViewer is available for Windows, Linux, Mac platforms (with restrictions), remote access from OS-based devices is possible. TeamViewer client in the full version of the distribution kit (“All in one”), as a system service (TeamViewer Host), in a portable format, on a terminal server and other options. It is worth highlighting the TeamViewer QuickSupport module, which does not require installation and is optimal for performing urgent tasks.
The full version of the program has client and operator parts available. The TeamViewer interface is represented by a main window with two tabs - “Remote control” and “Conference”.

Remote control
The user receives a unique ID to identify the computer on the network and a temporary password. Also, using the partner's ID (optional IP address) and knowing his password, you can establish a connection to a remote device.
Three connection modes are available:
- Remote control: remote control of a device or collaboration on the same computer
All actions are performed on another computer through the remote control window. At the same time, it is possible to change the resolution and scaling, switch between active monitors and other options. - File Transfer: Share files during a session
To exchange data in TeamViewer, a two-panel file manager, in which host and client resources and basic file operations for working with them are available, such as: creating folders, deleting, copying, etc. - VPN: virtual network mode
You can install a virtual private network to provide shared access to devices (printers, removable media and etc.).
Conferences
In this TeamViewer tab you can create a blitz conference or connect to an existing one. Among the available tools are voice and video communication, screen sharing, and session recording with the ability to convert to AVI. Whiteboard is used as a canvas for drawing, sketching, and commenting.

One of the undeniable conveniences of TeamViewer is the “Computers and Contacts” list, which provides fast access to devices. In addition, here you can monitor the network status of computers and exchange messages (group chat options are available). Looking ahead, it should be noted that not every review participant offers an address book for quickly connecting to other devices.
For security purposes, the program uses encryption of sessions (AES 256 bit) and traffic (RSA key exchange). Files transferred during the session are signed by VeriSign and the end user must consent to receipt. Through the TeamViewer settings, it is possible to restrict access: setting access to all operations only after confirmation or prohibiting outgoing sessions.
Summary
TeamViewer is a universal solution with the ability to choose a remote control method. Thanks to its wide range of multimedia functions and convenient organization of contacts, the program is optimal for holding conferences.
[+] Wide functionality free version
[+] Conference tools
[+] Security
[+] Presentation capabilities
[−] Remote session limit (5 minutes in free version)
Ammyy Admin
Ammyy Admin does not require installation and combines a simple interface and flexible functionality. The program is free and has no restrictions for home use. Distributed for Windows, Linux/FreeBSD platforms, mobile devices are not supported.

Client and operator modules are available in the main window. The user receives an ID that is generated in connection with the equipment. Optionally, you can use IP when connecting.
The client part can be activated or stopped, thereby prohibiting connections; By default, Ammyy Admin works in standby mode. You can track the connection status using indicators, the explanation of which is in.
There is an address book, contacts can be combined into groups, the order of contacts can be changed, and new addresses can be manually added. The network status of computers, however, cannot be monitored.
The main connection modes include Desktop (remote desktop), File manager(File Manager) and Microsoft RDP. RDP allows you to connect to a remote desktop; standard Windows functions are provided.
Other modes include Voice Chat and Speed Test. Obviously, the multimedia capabilities here are not as fully presented as in TeamViewer: Ammyy Admin is not positioned as a kind of corporate solution. You can note the screen sharing function, which in combination with voice chat makes Ammyy Admin a program suitable for remote assistance.
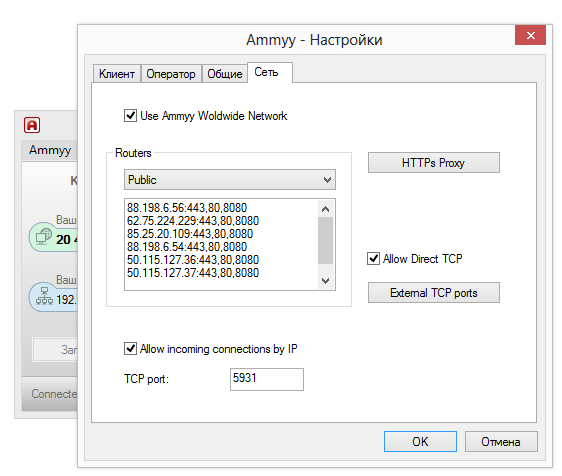
By going to “Ammyy → Settings → Operator”, you can specify RDP parameters, select the encryption type and codec profiles, thereby reducing the load on the network. More importantly, the “Network” tab allows you to configure the Ammyy Admin connection, manually specify routers, enable or disable data transfer over the Ammyy Worldwide Network.
The file manager is a two-panel one, through which standard file operations between the client and the operator are available.
In the access rights settings (“Client → Access Rights”), you can set separate parameters for each ID. The authentication mode (connection to a PC) is available to choose from: by Hardware ID, password or user permission. Thus, you can minimally protect your computer from unauthorized remote connections.
Summary
The main advantages of Ammyy Admin are its speed, simple and fast interface, relative independence from Ammyy servers and free of charge. This is probably not the most optimal solution for working in a team, but for individual use, with several computers at your disposal, it is quite possible.
[+] Speed
[+] Easy to set up
[+] RDP support
[−] No support for mobile devices
Supremo Remote Desktop
Supremo Remote Desktop is a convenient portable tool for remote control and remote assistance to other users. Runs Windows XP and higher, mobile devices are not supported.
The program starts without installation; to start working, the host and client must download Supremo Remote Desktop from the developer’s website. Traditionally, two operating modes are supported: using a computer as an access point and connecting to a remote device. In the first case, access is opened by pressing the Start button. In the Your credentials section, the data required for connection is available: ID and password generated at the beginning of the session. The client requests authorization when logging in (Ask authorization option), thereby preventing unauthorized access attempts to the computer.

To connect to the host, use the Your partner field; you can also select an address from the Address Book. The list of active connections is displayed in the Connections section of the main program window.
During transmission, the HTTPS (SSL) protocol is used, the data is encrypted. The security settings are poorly disclosed: you can set a password to launch the program and specify the IDs allowed for the connection.
Other tools available in Supremo Remote Desktop include multiple connections of users to one machine. To transfer files, a manager is used that is similar to the classic two-panel one; uploading and downloading files is available. There are no presentation or multimedia functions provided. This certainly limits the use of Supremo as a remote assistant.
Summary
Supremo Remote Desktop is an easy-to-use program that has a standard set of tools for remote control. Users who do not need multimedia functions may pay attention to it.
[+] No router setup required
[+] Simple interface
[−] Few settings
[−] Slow screen rendering
mRemoteNG
Speaking about universal tools that allow you to work with several protocols simultaneously, it is worth mentioning mRemoteNG. The program provides access to VNC, ICA, SSH, Telnet, RAW, Rlogin and HTTP/S, and also has RDP support. Distributed in a portable and standard version of the installer for the Windows platform.

The mRemoteNG interface is presented in several sections, there are panels, tabs - as a result, it is easy for the user to configure appearance programs in your own way. Basic options are available in the “Configuration” section. Here you can specify the protocol required for connection and related parameters: connection settings, protocol, gateway, appearance, resources and others. “Configuration” displays the host connection status.
Connection to devices is carried out through the quick connection panel - here it is easy to create several configurations, which, in the case of multiple protocols, is very convenient. Connections can be grouped and configurations can be easily imported/exported.
File transfer is carried out using the SSH protocol - which is not very familiar to the average user and at the same time, more reliable in terms of security. Additional features include a port scanner, and you can add external tools to the list.
The vagueness of mRemoteNG is striking. This is manifested in an unusual interface: it is not so convenient to work and configure with each specific protocol. In the connection configuration, many parameters are reduced beyond recognition - this can be attributed to the quality of localization. When trying to find a description of the functions, the documentation is silent, its sections are empty.
Summary
A notable feature of mRemoteNG is the combination of popular protocols into a single graphical shell. By setting up multiple connections, there is no need to use multiple specialized solutions. This plus to some extent compensates for the unintuitiveness of the program and the lack of documentation.
[−] Unintuitiveness
[+] Support for multiple protocols
[+] Transferring files via SSH
[−] Lack of documentation
TightVNC
Homepage: http://www.tightvnc.com/
TightVNC Software develops several products: TightProjector, RFB Player, VNC Reflector and TightVNC. TightVNC is a program for remote control; it can be used to solve computer problems, educational purposes, and administration.
TightVNC is a cross-platform solution. For Linux, however, at the time of writing this review is only available old version programs, Mac OS is not supported. However, there is a version of TightVNC available on the Java platform, which allows for remote control via a web server. On the Windows platform, TightVNC is installed as a regular application or as a system service. “Silent” mode is supported, it is quite easy to transfer the configuration to other computers or update servers remotely.
The TightVNC toolkit is divided into two modules: WinVNC - a server part installed on a remote machine, and a Viewer application designed to view the contents of the remote server's screen. In the Viewer connection settings, the VNS server address and transmission speed are set.

It should be noted that TightVNC does not generate an access password; you need to define it yourself in the settings. The connection status can be recognized by the icon displayed in the notification area: if at least one user is connected to the computer, the colors of the icon change.
The developers hint that data transfer via VNC, despite the original DES password protection, is imperfect. For security reasons, it is recommended to use SSH tunneling. At the same time, TightVNC settings reduce the likelihood of unauthorized access to zero. In future versions of the program it is also planned to introduce more reliable protection methods.
Summary
TightVNC surprises with a large number of settings regarding connection and security. This is a good choice for an administrator, but in terms of transfer to a server and further maintenance, it is not the best option for an inexperienced user.
[+] Flexible setup
[+] Java version
[−] Non-operative setting
[−] Unintuitive interface
Remote Utilities
Remote Utilities is a solution, according to the developer, intended for small and medium-sized businesses. Remote control is possible directly via local network or Internet. When working with a set of utilities, no firewall adjustments or preliminary configuration are required.

The complex works only under Windows; for Linux it is suggested to install the Wine emulator - but only for working with RUT-Viewer. There is no mobile version.
Remote Utilities consists of three modules: viewer - installed on the local computer, host - on the remote computer, agent - a module for supporting users. The agent, it should be noted, is optimal for quickly establishing communication between the client and the host. Remote installation, as well as updating, is simple, thanks to the Remote installation tool.
A connection in one of the above modes is made using the New connection dialog (Connection → Add Computer), you can specify an IP address, Internet ID or DNS as an access point. The connected computer is added to the list of the address book, from which the necessary devices are subsequently selected.
Standard tools for remote control are provided, such as a remote device manager, registry viewer, terminal and file manager. The manager is two-panel, with the ability to copy and move data, launch and open applications and documents on a remote host. Also available is terminal support and power control.
Text chat is quite simple, but be aware that Remote Utilities also offers audio/video chat for users. Here it is worth mentioning the ability to capture video and adjust the transmission quality - from 24-bit color transmission to an optimized “picture” for a network with limited transmission (in addition, there is a Network usage mode parameter in the Properties settings of the remote computer). In a word, there are those features that have been repeatedly listed in similar programs with RDP support.
Remote Utilities provides 3 types of authorization, AES encryption with a 256-bit key, and a 2048-bit public key. Incoming connections are filtered by IP, and you can also create a list of trusted users with different access rights. The security subsystem is optional: you can choose RUT or WinNT. Both modes allow you to flexibly configure access to certain functions for each user; there are no significant differences between them.
Summary
A simple set of utilities for remote connection, without selecting a connection protocol, but extremely easy to install and configure. Essentially, it lacks cross-platform functionality and a user-friendly interface for working with multiple devices simultaneously.
[+] Remote installation and update in remote mode
[+] Availability basic settings for RDP
[+] Work via local and Internet
[+] Free (for non-commercial use)
Simultaneous work on several computers, of which only one is in front of you, and the rest are even on the other side of the Earth, is not fantastic. To have this wonderful opportunity, all you need is Internet access and a remote control program on each machine.
Remote control programs are bridges that connect the PC or mobile gadget in front of you with various computer devices around the world. Of course, if you have a key, that is, a password that allows remote connection with them.
The possibilities of programs of this kind are very wide. This includes access to the contents of disks and launching installed applications, and changing system settings, and viewing user actions... In a word, they allow you to do almost everything on a remote PC as on a local one. Today's article is an overview of six free programs for remote control of a Windows-based computer (and not only), one of which is included in the operating system itself.
If you need to establish a connection between two computers or a PC and a mobile device, one of which (remote) is running Windows, and the second is running Windows, iOS, Android or Mac OS X, sometimes you can do without third party programs(if only Windows computers are involved in the connection). The Remote Desktop system application is present in all editions of Windows, starting with XP. It is not necessary that both machines have the same version of the OS; you can easily establish a connection, for example, between Windows 10 and Windows 7.
The Microsoft Remote Desktop app for Android and Apple is available for free download on Google Play and the App Store.
What else is needed to create a connection:
- Remote access permission - configured on the computer that you are going to manage externally.
- An account with a password on the remote computer. To solve administrative tasks (installing and uninstalling programs, changing system settings, etc.) you need an account with administrator rights.
- Connecting both machines to the Internet or being on the same local network.
- On the receiving side - open port TCP 3389 (used by Remote Desktop by default).
How to enable permission
This and further instructions are shown using Windows 10 as an example.
- Right-click on the “This PC” icon on the desktop. Let's open "Properties".

- While in the “System” window, click “Remote access settings” in the transition panel. In the “Remote Desktop” section of the window, check the “Allow...” checkbox (it’s better to leave the “Allow authenticated connections only” checkbox). Next, click “Select Users”.

- To add a user who will be allowed to connect to you remotely, click “Add”. In the “Enter names” field, enter the name of his account on this computer (don’t forget, it must have a password!), click “Check names” and OK.

This completes the setup.
How to configure connection settings
We perform the following steps on the computer from which we will make the remote connection.
- Click on the search icon in the taskbar and start typing the word “remote”. Select “Remote Desktop Connection” from the found one.

- By default, the application window opens minimized, with only fields for entering the computer name and user data. To access all settings, click the “Show options” arrow. At the bottom of the first tab - “General”, there is a button for saving connection settings to a file. It's convenient when you use different settings for connection with different machines.

- The next tab, “Screen,” allows you to change the image properties of the remote computer’s screen on your monitor. In particular, increase and decrease the resolution, use multiple monitors, change the color depth.

- Next, we’ll configure “Local Resources” - sound from a remote computer, conditions for using keyboard shortcuts, access to a remote printer and clipboard.

- The parameters of the “Interaction” tab affect the connection speed and the quality of displaying the image from the remote machine on your monitor.

- The "Advanced" tab allows you to define actions if authentication of a remote PC fails, as well as set connection parameters when connecting through a gateway.

- To start a remote access session, click “Connect.” In the next window, enter the password.

Once the connection is established, the current user's computer session will be terminated and control will pass to you. The user of the remote PC will not be able to see his desktop, since a screen saver will appear on the screen instead.
By following these instructions, you will easily connect to a computer that is on the same network as yours. If the devices are connected to different networks, you will have to make several additional settings.
How to connect to a remote computer via the Internet
There are 2 ways to set up a Remote Worker connection Windows desktop over the Internet - by creating a VPN channel so that the devices see each other as if they were on the same local network, and by forwarding port 3389 to the local network and changing the dynamic (variable) IP address of the remote machine to a permanent (static) one.
There are plenty of ways to create VPN channels, but describing them all will take quite a lot of space (besides, a lot of information about this can easily be found on the Internet). Therefore, let us consider, as an example, one of the simple ones - our own using Windows.
How to create a VPN channel in Windows
On the remote machine that will be the server:

After that in the folder network connections the “Incoming Connections” component will appear, which will be the VPN server. To ensure that the connection is not blocked by the firewall, do not forget to open TCP port 1723 on the device. And if the server is assigned a local IP address (starting with 10, 172.16 or 192.168), the port will have to be redirected to the external network. How to do this, read below.
On the client computer (Windows 10), setting up the connection is even easier. Launch the “Settings” utility, go to the “Networks and Internet” -> “VPN” section. Click "Add VPN connection". 
In the parameters window, specify:
- Service provider - Windows.
- Connection name – any.
- Server name or address – IP or Domain name the server you created before.
- VPN type – detect automatically or PPTP.
- Login data type – login and password (one of the accounts to which you have given access permission). To avoid entering this data every time you connect, enter it in the appropriate fields below and check the “Remember” checkbox.
 Port forwarding on the router and obtaining a static IP
Redirection (forwarding) of ports to different devices(routers) is performed in its own way, but general principle everywhere the same. Let's look at how this is done using the example of a typical TP-Link home router.
Let’s open the section “Forwarding” and “ Virtual servers" In the right half of the window, click the “Add” button. 
In the “Add or edit entry” window, enter the following settings:
- Service port: 3389 (or 1723 if you are setting up a VPN).
- The internal port is the same.
- IP address: computer address (look in the connection properties) or domain name.
- Protocol: TCP or all.
- Standard service port: you can not specify it or select it from the PDP list, and for VPN – PPTP.
How to make a changeable IP address permanent
The standard package of Internet service providers for home subscribers, as a rule, only includes a dynamic IP address, which is constantly changing. And assigning a permanent IP to a user usually costs him a lot of money. So that you do not have to incur extra costs, there are DDNS (dynamic DNS) services, the task of which is to assign a permanent domain name to a device (computer) with a changing network address.
Many DDNS services provide their services for free, but there are also those who charge a small subscription fee for this.
Below is a short list of free DDNS, whose capabilities are more than enough for our task.
The rules for using these services, if they differ, are insignificant: first we register an account, then we confirm the email address, and finally we register the domain name of your device and activate it. After this, your home computer will have its own name on the Internet, for example, 111pc.ddns.net. This name should be specified in the connection settings instead of the IP or local network name. 
By the way, some routers only support a small group of DDNS providers, for example, only the oldest and most famous DynDNS (now paid) and No IP. And others, such as Asus, have their own DDNS service. Installing alternative firmware DD-WRT on the router helps remove restrictions.
Pros and cons of using Windows Remote Desktop
The main advantage of the proprietary Windows tool over third-party developments is the absence of intermediary servers during the connection, which means a reduced risk of data leakage. In addition, this tool has a lot of flexible settings and, with a skillful approach, can become an “impregnable fortress” and a “space rocket.”
Other advantages of the Windows desktop are that there is no need to download anything, there are no restrictions on session duration, the number of connections, and it is free.
Disadvantages: difficulty in setting up for access via the Internet, vulnerability to Pass the Hash attacks.
TeamViewer
Before you start using the service, you will have to register a Google account (Android device users already have one) or log in using it in the browser Google Chrome.
The main window of the Chrome Desktop includes 2 sections:
- Remote support. This contains options for managing a one-time connection to another PC and providing access to yours.
- My computers. This section contains machines with which you have previously established a connection and you can quickly connect to them using a given PIN code.

During the first communication session using the Chrome Desktop, an additional component (host) will be installed on the remote computer, which will take 2-3 minutes. When everything is ready, it will appear on the screen secret code. After entering it in the appropriate field, click “Connection”.
As with TeamViewer, the user of the remote machine will be able to see all your actions on the screen. So for covert surveillance, for example, of a child, these programs are not suitable.

is a very simple and equally reliable utility designed for remote control of computers running Windows and Linux. Its main advantages are ease of use, reliability, high connection speed and the fact that it does not require installation. Cons: no mobile versions(it will not be possible to establish a connection via Android and iOS using this program) and the fact that many antiviruses consider it malicious and seek to remove it. Fortunately, the latter is easy to prevent by adding the utility to the exceptions.
Ammyy Admin supports 2 methods of establishing communication - by ID number and by IP address. The second one works only over the local network.

The utility window is divided into 2 halves - “Client”, where the computer identification data and password are located, and “Operator” - with fields for entering this data. The connection button is also located here.
The contact book and program settings, which are quite simple, are hidden in the “Ammyy” menu.
- another compact portable Windows program, externally similar to the previous one, but with a more interesting set of functions. Supports 2 connection methods - by ID and IP, and 3 modes - full control, file manager (file transfer) and only viewing the screen of a remote PC.
It also allows you to define several levels of access rights:
- Remote operator use of keyboard and mouse.
- Clipboard synchronization.
- Changing access rights by an administrator, etc.
The “View Only” mode can be used to covertly monitor the actions of users of remote machines (children, workers), which is not available in similar products.

In the main AeroAdmin window there is a button to open an email chat (located next to the “Stop” button). Chat is designed for quick sending email operator, for example, asking for help. This function is unique, since analogue programs only have a regular chat for text messaging. And it starts working only after the connection is established.
Unfortunately, the AeroAdmin contact book does not become available immediately. It requires separate activation - via Facebook. And only members of this social network, since in order to receive an activation code, developers request a link to your personal page. It turns out that those who liked the program cannot do without registering on Facebook.
Another feature of AeroAdmin is the admissibility free use even for commercial purposes, if you do not need additional features (continuous connection, multiple parallel sessions, etc.), available only in paid versions.
— the last utility in today’s review for remotely connecting to a Windows PC from another computer or mobile device. Can be used without installation or with it. 
Like its predecessors, it has a number of unique functions:
- The highest speed of image transfer from a remote machine.
- The fastest file sharing, even with low Internet speeds.
- Supports simultaneous connection of multiple remote users. The ability to collaborate on one project (each user has their own cursor).
Plus, like other programs in this class, AnyDesk provides the operator with full access to the functions of the remote machine, connects very simply (using ID and password) and reliably protects the transmitted data.
Surely not every PC user (especially a beginner) knows that a computer can be safely controlled from a distance, and fully! Those. as if you were sitting and working at your own computer, but from a distance, and doing it, for example, from a tablet or another computer. This can be very convenient and, for example, I use this opportunity regularly. Why do I need it? I work a lot on the Internet, but I can’t always sit at my computer. Sometimes I need to go somewhere or see someone, but some urgent matter comes up and I need my computer to open some program, run something, look at something. Carrying a computer with you always and everywhere is very problematic. It weighs about 4 kg, which feels good when carrying it :) But on the other hand, I always have a tablet or smartphone with me, from which I can connect to my computer at any time and from anywhere, which I leave turned on at home. And this way, I can work on it just as if I were at home. Another reason for remote access is the ability to ask a friend or colleague to help you sort out any problems in the settings or programs on your computer through remote access. You yourself can also help someone solve some problem on their computer by connecting remotely to this person. And lastly... It happens that the right computer is in a hard-to-reach place or you need to walk to it. In this case, the easiest way is to connect to it remotely and you’re done!
This article of mine will talk about how to remotely control a computer from any device, and with the help of this guide you will learn how to do it easily even if you are a complete beginner! We will consider the most, in my opinion, convenient program for this matter - TeamViewer, and today I will tell you about its main most necessary and useful functions. Yes, it is also free for non-commercial use! There are only 2 conditions for remote device management: the presence of an Internet connection on both devices, and the presence of the TeamViewer program on both devices.
Today, the TeamViewer program is supported, one might say, by all devices:
Smartphones based on operating systems Android, Windows Phone 8;
Tablets on the same Android systems,Windows Phone 8;
iPad of all modifications;
Computers based on the operating system Mac, Linux, Windows.
For all these devices, you can download the TeamViewer app for free.
It is also interesting that you can control it the other way around – smartphones and tablets from a desktop computer.
So, let's begin to understand the program step by step, starting with its installation process.
Installing TeaViewer
First you need to download the program itself. It is best to download from the official website, since the most latest version. Go to the official TeamViewer website using the link:
teamviewer
At the top of the page that opens, you can’t help but notice the large “Free full version” button. Here we press it:
After downloading the file, find it on your computer and run it. The file will be named: “TeamViewer_Setup_ru”:
The next program window will ask you to select the option to use TeamViewer. These settings can be changed at any time after installation. If you want to control this computer (on which you are installing the program) remotely, then immediately select the appropriate item. Otherwise, simply select Install.
Below, be sure to select the “Personal, non-commercial use” option, since the program is distributed free of charge only for this use case.
At the end, check the box “Show additional settings" and click the "Accept - Next" button:
Account control Windows entries may ask you for confirmation to continue with the installation. Just click “Yes”:
In the next window, check the path where the program will be installed and change it if desired. But I recommend leaving the default path. The options below may not be enabled. All of them, if necessary, can be set after installation. Click the “Finish” button:
A quick program installation process will begin, which will take from a few seconds to a minute.
This completes the installation of the TeamViewer program! Let's move on to its settings and application.
Setting up TeamViewer
Setting up uncontrolled access to a computer:

Now we can freely control this computer from any other device, no matter where we are within the Internet access zone :) But for this, let’s deal with the information that we (or anyone else) need to know so that we can connect to this computer remotely.
Data required for remote control of any device:
Perhaps the most important thing is to know the data by which you can connect remotely to your current computer.
To connect to this computer from another computer / device with TeamViewer installed, you only need to know:
ID of this computer;
Password for accessing this computer via TeamViewer (not to be confused with the password for logging into Windows!).
All this data is located in the main program window:
According to my example (see image above), to remotely access this computer at the moment I need to point to remote device ID: 900 288 832 and password: 6sx71k.
The ID in TeamViewer for each specific computer does not change. Those. the one that is indicated in the window you will always indicate during a remote connection. And there are 2 types of passwords in TeamViewer: temporary (random) and personal (permanent). Now more about this:

I hope you understand the difference in passwords :)
Now let's go through the main most important settings of the program.
Basic program settings:
To go to all program settings, open the “Advanced” menu at the top and select “Options”:
We will immediately be taken to the “Main” tab. Here you can enable or disable automatic launch of TeamViewer when booting Windows. If you are going to control this computer remotely, then I strongly recommend leaving this item enabled. Then you won’t have to launch TeamViewer manually, and even more so, if you are far away and TeamViewer is not running on this computer, you will not be able to connect to it.
Below you can see a message that you are linked to the account you created earlier. If you click the "Delete" button, you can break this connection.
On this tab, there are no more important settings that are not set by default. Go to the next tab “Security”.
On the “Security” tab we can change the “Personal” password by entering a new one and repeating it at the very top. Below you can set up a “random” password by specifying the number of characters. By default, such a password will always be 6 characters long.
In the last section, “Rules for connecting to this computer,” you can allow or deny logging in remotely using Windows password. It is safest to leave this parameter set to default, i.e. - "Is not allowed". The easiest way to connect is through a TeamViewer password and it will be safer this way.
“Remote control” tab. There are important settings here. All these settings are global - i.e. for any connection. But if you created for yourself account(as discussed), then for each computer added to your personal list, you can set your own connection parameters, but more on that later.
This is what the settings on this tab look like:
At the very top you can adjust the image quality when connecting to a remote computer. It’s better to leave either “Automatic quality selection” or “Optimize speed”. I always set speed optimization to connect to a remote machine and work with virtually no delays even through Mobile Internet. There is only one minus - the image quality (the way we see the remote computer) will not be the best, but sometimes this is not even noticeable.
Below, as you can see, the “Hide wallpaper on the remote machine” option is enabled. This means that when you connect to a remote computer, the desktop background there will become simply black. I always leave this option enabled so as not to waste resources on loading a sometimes large background image.
Even lower are additional settings that can be configured according to everyone’s preferences. For example, if the “Play computer sounds and music” function is enabled, you will accordingly hear all the sounds of the remote computer.
It can be useful to enable the “Send keyboard shortcut” option. If you enable this option, then when you connect to a remote computer, you will be able to use your usual keyboard shortcuts. For example, a quick way to open the task manager is “Ctrl+Shift+Esc”.
In general, here you configure it as you need.
Let’s go straight to the “Computers and Contacts” tab.
The “Computers and Contacts” tab will display your account settings, which will then show all the remote computers and users you have added. On this tab you can change your account information, as well as computer display settings.
At this point we have discussed the basic settings. Now let's move on to the main thing - remote computer control.
The principle of remote computer control
We can, as I already said, control a computer or any other device (TeamViewer must also be installed and configured on them!) from any point where there is access to the Internet and we just need to know the ID of the managed device and its password (random or permanent ). Knowing these 2 parameters, we can control the computer.
Let's try to connect to the computer remotely:
We specify the password if you know the “personal” password of the remote computer. Otherwise, leave the field blank.
Specify the network name of the remote computer (for your own convenience). It will appear in the list of your computers.
If you wish, you can specify a description of the remote computer to be added for convenience if you have a large list of them.
In the Window list, I selected Full Screen Mode. This means that when connected to a remote computer, TeamViewer will display the remote computer in full screen. It will look like you are fully working on that computer. You can also select another option, such as " Windowed mode", and then the remote computer will be displayed in the window.
In the “Quality” list, I always select “Optimize speed” so as not to sacrifice performance, especially when connected to a slow Internet.
It is better to always set “Identification mode” to “TeamViewer Identification”. Then you will only need to know the password set for a particular computer in the TeamViewer program to connect to it.
In the main TeamViewer window, where the “Manage Computer” section is located, indicate the ID of the computer that we will manage in the “Partner ID” field.
If you created an account, then we can immediately add the computer to our “Favorites” list by clicking the button with an asterisk:
A window for access settings for the computer that we add to the list will open in front of us:
In the image above, I have marked the fields and lists where it is best to make changes:
The remaining settings can be left with the “Inherited” value, because, as a rule, there is no need for them and, in extreme cases, they can be configured at any time.
When the settings are set, click the “OK” button.
The computers that you will add to your list will be visible in a separate window, as in my example in the image below:
In the example, I added a computer named “Test TeamViewer”.
Now that the computer is in the list, to connect to it, simply double-click on its name. If you immediately specified a password, it will not be requested and the connection will occur immediately (within a couple of seconds).
Another way to quickly connect to a computer, if for some reason you did not create an account and do not add computers to your favorites list, is to simply enter the ID in the appropriate field and click “Connect to partner”:
The default mode is “Remote Control”, which is what we need. And we can enable the “File Transfer” mode at any time during a remote session.
Now a window will appear where you need to enter a password to connect to the remote computer:
Enter the password and click the “Login” button.
The connection usually occurs in a couple of seconds, but this depends on the speed of the Internet on both sides. After connecting to the remote computer, the window will look like this:
As you can see, the screen of the remote computer is black. As you probably remember, in the settings we left the “Hide wallpaper on the remote machine” option enabled. As a result, the wallpaper on the remote machine became black, which will reduce resource consumption, and immediately after disconnecting from the remote computer, its desktop wallpaper will return to its previous appearance.
This is how simple and easy it is to connect to a remote computer :)
You will be able to fully control your computer from any distance, and at the same time it will look exactly as if you were sitting at that computer.
Let me remind you once again that the same can be done from almost any device. If you, for example, have an iPad, then download TeamViewer onto it (it’s always free!), enter the ID and password of the remote computer, and that’s it! You will connect and be able to control it directly from your tablet, and it’s also very convenient!
Now let's look at some of the functions available to us during a remote session.
Functions available during a remote computer session using TeamViewer:
So, we are connected to a remote computer. At the top we see a panel with a set of functions. Let's go through the most necessary of them:
The button numbered “1” allows you to immediately terminate the connection with the remote computer.
After any termination of a TeamViewer session on both devices, a window will be displayed indicating that the free session has ended. Just always click "OK":
You can also instantly terminate the connection while on that remote computer. For example, someone remotely helps you set up a system or fixes a problem. If suddenly that person began to do some actions on your computer that, in your opinion, he does not need to do at all, then you can break the connection with just one button in the form of a cross (see image below):
The button numbered “2” allows you to hide this panel remote session functions.
The button numbered “3” allows you to instantly switch to full-screen mode, which I use in 99% of cases.
A very useful feature is transferring files from local computer to the remote one and back. You can do this by simply dragging and dropping necessary files from your computer window to the remote computer window.
Another way is to use a special manager – “File Transfer”. It opens from the same panel that is fixed at the top. Select “File Transfer”, and then “File Transfer” again:
A special manager will open - Explorer. There is nothing complicated here either. We indicate from which folder on the local computer the file will be transferred, then indicate the folder where exactly the file will be transferred to the remote computer. Then select the file itself on the local computer that we will transfer and click the “Send” button:
The file will be transferred to the remote computer. In my example, I transferred an image file called "" from the "Downloads" folder to the remote computer's desktop:
After transferring the necessary data, the file transfer manager can be closed, and a window will be displayed with statistics on the transfer of your files, where you need to click “Close” again:
Or you can minimize this window.
There are 3 more very useful functions, which are available during the remote session. This includes voice communication, video broadcasting and chat support.
All these 3 functions can be activated by selecting the “Audio/Video” menu:
Here you can change the scaling, for example, enable full screen mode. Here, in the “Quality” submenu, you can select the quality you want for displaying content on the remote computer, for example, by turning on “Optimize speed”. Also here you can change the resolution of the remote computer (for example, if the resolution of your local computer is very different) and show / hide the wallpaper on the remote machine. Everything else is not so significant and necessary...
Well, that’s probably all the most useful things you need to know about how to remotely control a computer using TeamViewer :) Cool program, isn’t it? :)
The most important thing is that it is extremely simple, convenient, and even a beginner can handle it. And, of course, it’s free! In general, to be honest, I have not seen a better worthy replacement for the TeamViewer program.
And now I think that in a couple of weeks I will already write an article, and you will be able to familiarize yourself with the next testing of the new autoclicker!
Well, now I say goodbye to you for a week... Good luck to you and always have a good mood! ;)
There are a lot of programs for organizing remote access. There are paid and free programs, there are programs for different operating systems. It is clear that in this article we will not be able to consider everything at once, but we will talk about the most interesting of them, and most importantly, we will understand what is more effective for a particular task.
Radmin (shareware)
About ten years ago, the most popular program for remote access was Radmin, it still exists (www.radmin.ru) - it has not gone anywhere during this time. Let's start the review with it.
The program consists of two parts: Server and Viewer. The first one runs on a remote computer (or remote computers), and the second one runs on your computer and is used to connect to the remote machines that you are going to configure. On the developers' website you can download both the complete set and individual components. There is also a portable version of Viewer that works without installation, and a version of Radmin Server 3.5 NTI - this is a special version without a tray icon, that is, the user of a remote computer will not know that Radmin is installed on it until you start managing his computer.

I will note the key features: support for Windows 8 32/64 bit, support for switching user sessions in Windows XP/Vista/7/8, compatibility with Wine (Radmin can organize remote access to a PC running Linux control via Wine), Telnet support, remote PC shutdown, Radmin server scanner (allows you to find all the PCs that you can manage on your network), file transfer between Server and Viewer.

Conclusions:
- The program's functionality includes its own authentication, voice chat support, and the ability to transfer files. Everything is very convenient.
- Due to the fact that Server is installed on the remote computer, the presence of the user is not required, as in other similar programs. For example, you can administer the remote PCs of your colleagues when they go to lunch. In other similar programs, it is necessary either for the user to allow the connection, or for the user to provide you with a password, which is generated automatically with each communication session.
- Low system requirements, the program does not load the processor at all, which is especially important for my old laptop with an AMD processor, which gets hot like an iron - it acted as a “remote” computer.
- Just running Server is not enough; you also need to configure it.
- Many users love TeamViewer not for its functionality, but because it does not require any special ports (it uses port 80 by default) and does not require any firewall settings. Radmin Server uses port 4899, and it will not be possible to run it without setting up a firewall.
- No mobile clients.
- Does not support other OS.
TeamViewer (freeware)
Nowadays, TeamViewer is probably the most popular remote access program. You can download it full version from www.teamviewer.com/ru and not pay a penny. For non-commercial use the program is absolutely free.
 Rice. 4. TeamViewer is running
 TeamViewer pleases with support for Windows, OS X, Linux, which was so lacking in Radmin. There are also mobile clients for Android, iPad/iPhone: you can control a remote computer from your iPhone. There is also a Portable version of the program for Windows, which is very useful for infrequent use of the program, and the Portable version can be run both on the “server” and on the “client”, unlike Radmin, where you can only run the client (Viewer) without installation, but the “server” part must be installed.
After starting the program, you will see the main TeamViewer window and the “Computers and Contacts” window (Fig. 4). If you plan to help all your relatives and colleagues at once, you can click the “Register” button, create an account, and then in this window you will see all the numerous computers that you have set up.
 Rice. 5. TeamViewer in action
 Now let's figure out what is what. If you need to connect to your computer, then you must provide the remote party with your ID (in this case 969 930 547) and password (8229). How to communicate, decide for yourself - you can copy and transmit these values via Skype, ICQ, email, SMS, or simply dictate over the phone. This password changes every time the program is started. If the program is installed on your computer, you can make a permanent personal password, but I do not recommend it: the password can be compromised and then anyone can connect to your computer.
If you need to connect to a remote computer, then you need to enter the ID of the remote party (in this case 411108007) and click the “Connect to partner” button, after which the program will ask you to enter the password that you received from the remote party. That's all - in the window that appears, you can configure the remote computer (Fig. 5).
You've probably already noticed the main difference from Radmin: you need to give the password to the person setting up the computer, but in Radmin the password is specified when creating a user account. In other words, the user must be present at the computer. The question is, how can you organize a home office when you want to access your work computer from home, for example, at night? Everything is very simple. You need to organize TeamViewer autostart (for example, add it to the “Startup” group or register it in the registry in the Run key) and set a “Personal password”. Please note that you cannot set a personal password if the program is not installed on your computer, but is launched without installation.
There is one more program you should know about: TeamViewer Host. It runs as a system service and is used for 24/7 access to a remote computer, including logging in/out. It turns out that TeamViewer Host allows you to organize a terminal server, and it supports an unlimited number of clients for one server (the number of clients is limited only by the computing capabilities of your computer). It should also be noted that for TeamViewer installations Host needs administrator rights, which are not always available, so in most cases you will still use regular TeamViewer. However, if you need to set up just one computer (or simply organize remote access to it, say, from home), then TeamViewer Host is not needed. For the sake of fairness, it should be noted that if a regular TeamViewer (not Host) is running on computer A, then computers B, C, D (the number three is given as an example) can connect to it for joint administration. Another thing is that it is necessary to coordinate the actions of administrators, since the keyboard and mouse are shared, but one can configure, the rest will observe.
Like Radmin, TeamViewer allows you to exchange files, voice and text messages, as well as remotely reboot the computer (the required command is in the “Actions” menu, see Fig. 5; simply rebooting the computer is not enough - because then the TeamViewer communication session will not be established, reboot When setting up a computer, you only need to use the “Actions” menu).
Conclusions:
- Simplicity (the program is simpler than Radmin - a huge advantage for untrained users who will have to install it on the remote side).
- The program does not require installation at all: both on the client and on the server. Installation is optional.
- It works through port 80 (and some additional ports), so it does not require firewall configuration.
- Availability of versions for other OS.
- Availability of mobile clients for Android, iOS and Windows Phone 8 (that is, you can control a remote computer directly from your iPad).
- Possibility of organizing interactive conferences (up to 25 participants).
- Does not require administrator rights for remote access.
- It loads the processor noticeably more than Radmin, my old laptop even overheated and turned off.
- Although there are mobile clients, they are not very convenient (however, this is better than nothing).
Royal TS (shareware)
Once upon a time there was such a program - mRemote. I don’t know what happened there, but the mRemote project was closed, and the developers went and created another project - Royal TS. On the site you will find versions for Windows, OS X and iOS (can be run from iPhone and iPad).
In Royal TS, before creating a connection, you need to create a document, that is, one connection = one document. Royal TS documents are a very convenient thing; they can be transferred as regular files, for example to another admin. He will be able to open such a document and immediately connect to a remote computer without having to create a connection manually. The shareware version has a limit on the number of simultaneous open documents- ten. As for me, this is quite enough for non-commercial use of the program, so in practice you won’t even notice that you are missing something (unless, of course, you remotely administer a huge network of computers).
First of all, it must be said that this program is radically different from Radmin and TeamViewer. Both of these programs combine the functionality of both server and client (in the case of Radmin, server and client are different programs, in the case of TeamViewer - the same program). In other words, on one of the computers you can install Radmin Server or TeamViewer, and on the other you can use Radmin Viewer or TeamViewer, respectively, to connect to this remote computer. So, Royal TS is something like Radmin Viewer, that is, a program for connecting to a remote server, but you will have to create the server yourself. How you do it is your problem. Royal TS will not help you create such a server, but only let you connect to it.
 Rice. 6. Royal TS for Windows
 Among the protocols for connecting to a remote server that Royal TS supports: RDP, Telnet, SSH, Citrix, VNC. The RDP/Telnet/SSH and other servers themselves will have to be configured independently.
On the one hand, this is beyond the scope of the article, on the other hand, it would be incomplete if I did not give an example of setting up at least one of the servers that Royal TS supports. SSH/Telnet servers, I think, will not be very interesting to the reader. I want something graphic. Let's say we have Linux (Ubuntu or its clone) and need to configure a VNC server. To do this, first install the VNC server with the command:
Sudo apt-get install vnc4server
After that, you need to run it - for the first time without parameters:
Sudo vnc4server
When running the sudo vnc4server command, you need to enter a password that will be used to connect to this VNC server. The password itself will be saved in $HOME/.vnc/passwd. I won’t say another word - there is man :). After the first launch, you need to launch vnc4server, specifying the screen number:
Sudo vnc4server:3
Next in Royal TS you need to create new document(on the File tab), then go to the Edit tab and click the VNC button. In the window that appears (Fig. 7), you need to enter the display name (Display Name) - in our case: 3, the IP address of the VNC server and specify the port number (usually 5900). The password will be requested when connecting to the server.
 Rice. 7. VNC connection parameters
 Conclusions:
- A universal client for connecting to a remote server using various protocols.
- There are versions for Windows, OS X and iOS.
- It is impossible to organize remote access using Royal TS alone; additional programs are needed.
- Not suitable for remote configuration of computers for inexperienced users - they simply will not be able to configure the necessary remote access services.
Supremo: free and simple (freeware)
Let's analyze the situation. If you don’t like TeamViewer or cannot use it for some reason (including the need to purchase a license for commercial use), and Radmin is also not suitable for some reason, then you will have to look for analogues. Since the article talks about simple and free programs, then it is necessary that next program was: a) free; b) simple. This is the Supremo program, which can be downloaded from the website.
The program (Fig. 8) was created “in the image and likeness” of TeamViewer. It does not require installation, its operating principle is the same as that of TeamViewer, it even uses the same terminology (this is me regarding the partner ID and other inscriptions in the program interface).
The computer you are setting up and the support technician's computer must be running Windows only. Multiple editions of Windows are supported, including Windows 7 and Windows Server 2008 R2. ABOUT Windows support 8 and Windows Server 2012 nothing has been said on the official website yet.
Rice. 8. Supremo programThe algorithm for using it is simple: you need to run the program on both computers, then ask the remote party for its ID and password, and then click the “Connect” button. Before this, the remote party must press the “Start” button, otherwise the connection will not be allowed. Perhaps this is the only difference from TeamViewer.
To make the review more complete, let's go to the program settings (Tools -> Options). In the “Security” section (Fig. 9), you can configure automatic launch of the program, specify a password for remote connections, and indicate which IDs are allowed to connect to your computer.
 Rice. 9. Supremo Security Options
 In the “Connection” section (Fig. 10), you can specify the parameters of the proxy server, if it is present on your network.
Rice. 10. Supremo connection parametersIn addition to its direct purpose, namely remote computer control, the program can be used to exchange files. To exchange files (which is possible in two directions - both downloading and uploading) simply use drag & drop.
Conclusions:
- Easy to use.
- No installation required.
- Ability to transfer files.
- Chat option.
- Does not require firewall configuration (uses HTTPS/SSL).
- There is no support for operating systems other than Windows.
- No mobile clients.
LogMeIn (freeware)
Let's look at one more useful program- LogMeIn (Fig. 11). The purpose of this program is the same as all the others discussed in this article - remote access. On the website logmein.com you will find several similar products, but we are primarily interested in the LogMeIn Free product. Its capabilities are quite sufficient for most purposes: access to a computer running Windows or OS X, remote control and viewing of the desktop, copying and pasting data between computers, reboot function, chat, support for multiple monitors, intrusion detection via SSL/TLS protocol, etc. requires configuration of firewall settings, does not require administrator rights on the remote computer.
Personally, I liked the functions of copying and pasting data between computers, as well as the reboot function: during the process of setting up the computer, sometimes you need to reboot it, after which the remote access session will be automatically restored, which is very convenient.
Unlike the Free version, the Pro version supports file transfer between computers, HD video, dragging and dropping files between computers and several other functions that are hardly worth paying almost 53 euros per year - that’s what the Pro version costs. A comparison of these two versions, as well as the OS X version, can be read at: https://secure.logmein.com/comparisonchart/comparisonFPP.aspx.
Rice. 11. LogMeIn main windowThe way this program works is slightly different from TeamViewer and similar programs. It's a little more complicated, but apparently this is how the LogMeIn developers determine who uses the program and for what purposes. In the main window, select “from Mac or PC” and then you will see the sequence of actions that need to be performed to give another user access to this computer (Fig. 12). Grandfather and grandmother will definitely get confused and not appreciate it. You can’t do without registering on logmein.com; although it is free, in terms of convenience it is completely unnecessary.
Rice. 12. How to connect to this PCThere is, however, a simpler way - anonymous access through a browser. Quite an interesting feature that is not found in other similar programs. The point is this: a user who wants you to set up his computer creates an invitation link, then sends it to you in any convenient way (by email, Skype, and so on). The invitation link is valid for a certain time (the time is set by the remote user), even if someone spies on the link, he is unlikely to be able to use it after the expiration date.
Let's look at how to create an invitation and how to use it. In chapter " General access to the desktop" current invitations are displayed. By clicking the “Send invitation” button, you can generate that same link. The New Invitation Wizard allows you to determine the duration of the invitation and how the invitation will be sent (you can send by e-mail link, or you can just get the link and send it manually).
 Rice. 13. Management remote computer via browser
 Then this link needs to be sent to the person who will be setting up the computer. When he copies it into the browser and opens it, he will see a screen similar to the one shown in Fig. 13. To continue, click the “Continue” button. After which the user who sent the link will receive two requests sequentially. The first request is a request to allow access to the guest, the second request is to grant access rights (Fig. 20). The guest can either fully control the computer, or only view the desktop without control.
Conclusions:
- Does not require administrator rights.
- Does not require firewall configuration.
- Ability to use a browser for remote control.
- Mobile clients.
- Some unusual principle work.
Mosh (mobile shell): a good alternative for SSH
Mosh can also be used for remote console access (that is, you can execute commands remotely and see their results). The main advantage of Mosh over SSH is the ability to roam, that is, change the network on the client machine, which is useful on the road when the network can change (now it is cellular, in a few minutes - Wi-Fi, while the IP changes, but the connection remains). Frequently traveling admins will appreciate this. But there is one big drawback: Mosh will not connect to a regular SSH server, which means you will have to install Mosh on the server. But Mosh does not work as a daemon, like SSH, but as a regular program, that is, root access is not required to run it. Mosh is available for many Linux and BSD distributions, OS X, iOS (as part of the popular iSSH client), and Android.
UltraVNC/RealVNC
VNC (Virtual Network Computing) is a system for remote access to a computer desktop using the RFB (Remote FrameBuffer) protocol. Previously, it was shown how to organize a VNC server in Linux; in Windows, such a server can be created using the UltraVNC or RealVNC programs. UltraVNC is similar to RealVNC, but has additional features such as encrypting the connection between the client and the server, the Java Viewer module (access to a remote PC via a Java-enabled browser) and others. Although RealVNC has a VNC Viewer plugin for Google Chrome, so there is no need for Java Viewer. As already noted, the programs are largely similar, so in this article we will only consider UltraVNC.
When installing UltraVNC, it is possible to install both a VNC server and a VNC client. If you don’t need remote access to your computer, you don’t need to install a VNC server. When installing a VNC server, you will be able to configure it to run as a system service, but this requires administrator rights. The RFB protocol that VNC uses typically uses ports 5900–5906. Therefore, to connect via VNC you need to configure a firewall, otherwise it will kill the connection.
To connect to the VNC server, use the UltraVNC Viewer program. The program is universal, and you can use it to connect to any VNC server, not just the one running UltraVNC Server. Similarly, you can connect to a server created by the UltraVNC Server program using the RoyalTS program or any other VNC client.
A few words about how it all works. First, launch the UltraVNC Edit Settings program and on the Security tab set a password to access the VNC server, then you need to launch the UltraVNC Server program. Then, on another computer, launch UltraVNC Viewer (Fig. 14) and enter the IP of the computer on which the VNC server is installed, and click the Connect button.
Rice. 14.UltraVNC ViewerConclusions:
- You need administrator rights, you need to configure a firewall.
- The same protocol can be used for Windows management, OS X and Linux, but these are the advantages not of a specific program, but of VNC itself.
SSH access
SSH remains the classic of remote access. It would seem, what else can you come up with here? Well, for example, what to do if you have a lot of remote machines? Should I register aliases for each? Eat special utilities, allowing you to quickly switch between machines. One such manager in Linux is Gnome Connection Manager. The program is very convenient, we highly recommend it. On Windows, AutoPuTTY is used for this purpose - a shell for the popular SSH/Telnet client PuTTY, which can be downloaded from: http://www.r4dius.net/autoputty/. There is a similar SSH connection manager for OS X -Shuttle. For mobile platforms, you can use mobile SSH clients - Prompt (iOS) and ConnectBot (Android). You can easily find links and screenshots on the Internet.
Ammyy Admin (freeware)
Ammyy Admin is another program for remote desktop access. The good thing about the program is that it is absolutely free, completely undemanding in terms of resources (the executable file generally takes up a ridiculous 700 KB), allows you to organize both regular remote access to the desktop and a remote office-style connection, and does not require installing or changing firewall settings. You can find out about the rest of the program's features on the developers' website.
AnywhereTS (freeware)
Allows you to convert computers to thin clients. The main purpose of this program is not remote access for reasons technical support, as in all previously described programs, although it can also be used for this. AnywareTS allows you to give a second life to old computers that will be used as thin clients - connect to a server that will run programs that are physically impossible to run on old PCs. You will find detailed information about this program on the developers' website.
Remote access in Windows 8
This review would not be complete if we did not consider the capabilities of the OS itself. On the “server” (that is, on the computer to which remote access is planned), you need to perform the following steps:
- Run SystemPropertiesRemote.exe.
- Enable the "Allow Remote Assistance connections to this computer" checkbox.
- Turn on the “Allow remote connections to this computer” switch and click the “Apply” button.
- If you are using energy saving mode, you need to configure your computer so that it never goes into sleep mode.
On your computer, use the Remote Desktop Connection application to connect to a remote computer.
Rice. 15. Allow remote accessGoogle Hangouts: screen sharing and video conferencing
As a last resort, you can use a new service from Google - Hangouts. It allows you to host video meetings, during which users can share their screen with each other. If you wish, you can familiarize yourself with this service yourself.
Instead of a conclusion
There are a lot of programs for remote access. As I hope I have shown, the most familiar tool is not always the most effective. You need to build on the conditions of a specific task, target platforms and other factors. I hope that now I have finally cleared up the whole picture of remote access in your head. All suggestions and wishes can be sent to [email protected].
Publications on the topic
-
 A quick way to install Windows without a disk or flash drive
How to reinstall Windows 7. A detailed description of reinstalling Windows 7 from start to finish. To reinstall Windows 7 for dummies, we...
-
 Rambler mail (login, setup, working with inboxes) and its place among other free email services Rambler mail ram
Hello, dear readers of the blog site. At one time, I wrote a number of reviews with my personal experiences and impressions of working with...